Step 1: Review the LX Structure
Contents
Step 1: Review the LX Structure#
A Duckietown LX is structured in three parts, each implemented by a different directory.
These directories are created for you when running the command dts lx create (more on this in the following sections of this manual). When distributed, they will reside in three different Git repositories.
If you are reading this as a learner, you will only need to use the single LX directory provided by your instructor. All the necessary behind the scenes components to drive the LX activities will be handled automatically by dts.
Three but One#
A LX is broken down into three parts:
A learner’s workspace;
A back-end;
A solution;
The learner’s workspace (or, the front-end)#
The learner’s workspace (also referred to as “the meat”) is the only part that a learner will interact with. It contains instructions, interactive learning materials (e.g., Jupyter notebooks) and boilerplate code that the learner will have to work on.
The back-end#
The back-end (also referred to as “the recipe”) is what defines the rules of a LX.
It contains all those files that are necessary for the learner’s workspace to function but must be protected from the learner’s edits. The recipe is the immutable part of a LX, and it is common to all the learners’ workspaces and solutions.
For example, in a localization exercise, the back-end might have access to a map of the environment, and a trajectory taken by a robot within the map. The back-end would use this data to generate simulated sensors’ readings and pass those to the learner’s workspace. The learner is required to implement a system that can consume these readings and reconstruct the original trajectory taken by the robot. In this case, the back-end must protect the ground-truth trajectory of the robot, else the solution would be exposed to the learner, invalidating grading.
The solution#
The solution part is simply a copy of the learner’s workspace but with all the solutions to the activities and exercises already implemented. This is usually used for two main reasons:
to make sure that the boilerplate provided in the learner’s workspace is sufficient to implement a solution to the learning activities presented;
to serve as example solutions to non-graded learning activities.
Development Workspace#
A LX development workspace is set up with dts lx create. This command generates a workspace directory that is named using a filesafe version of the LX name. Fig. 20 shows an example of how an LX development workspace is structured.
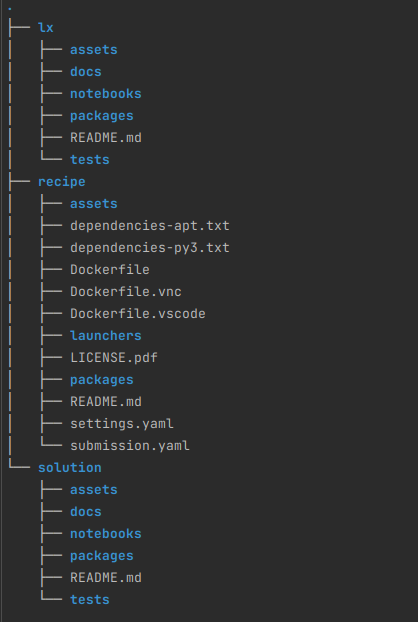
Fig. 20 Directory structure of a LX development project named How To Robot! generated by dts lx create.#
The learner’s workspace (the meat)#
The learner’s workspace is stored inside the directory lx
(how-to-robot/lx in Fig. 20). Fig. 21 shows an example of what
a learner’s workspace looks like.
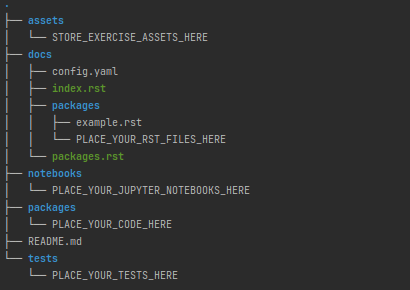
Fig. 21 Directory structure of the LX template generated by dts lx create.#
The back-end (the recipe)#
The back-end is stored inside the directory recipe
(how-to-robot/recipe in Fig. 20). Fig. 22 shows an example of what
a back-end directory looks like.
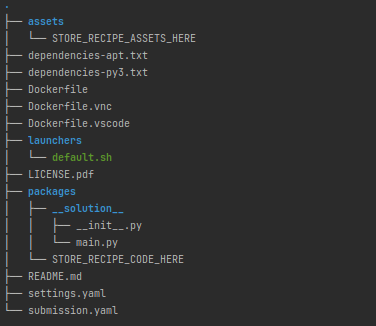
Fig. 22 Directory structure of the LX recipe template generated by dts lx create.#
The solution#
When a new LX is created, the learner’s workspace and the solution located in the solution directory are identical. The instructor is
then responsible for adding a fully developed and tested solution, with example agents and activity solutions.
Tip
While developing a new LX, it is good practice to start working on the solution first. Once the solution is in place, parts of the solution with relative pedagogical value can be stripped out and replaced with placeholders effectively producing a boilerplate code that can populate the learner’s workspace. This procedure guarantees that the resulting boilerplate is (by construction) enough for the learner to achieve a valid solution.