Notebook Activities
Contents
Notebook Activities#
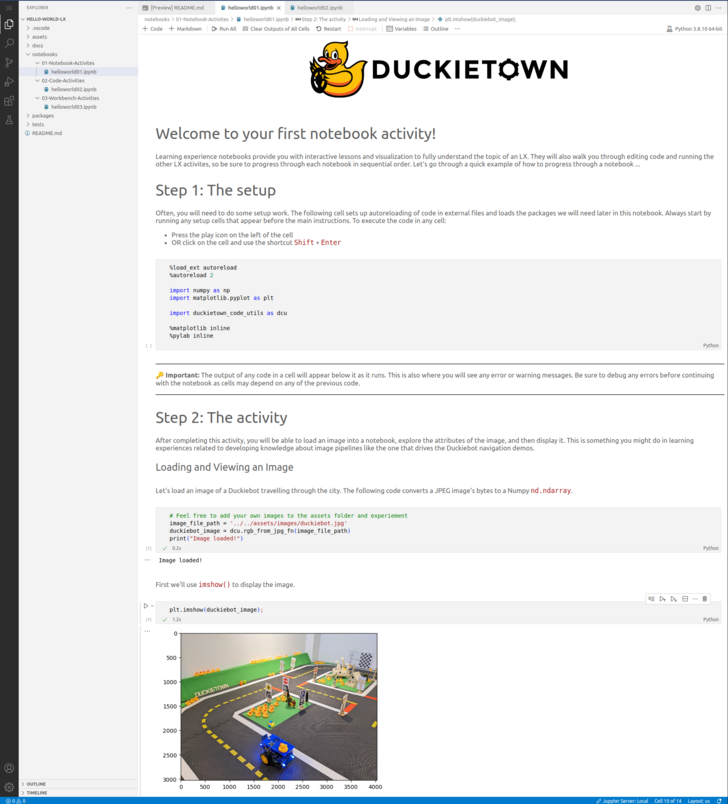
Notebooks offer a clean interface to provide lesson content, visualizations, and instructions for proceeding through an LX.
At the core, a Duckietown Learning Experience notebook has all the possibility of a classic Jupyter notebook but with every library and functionality from the Duckietown ecosystem added in.

Fig. 26 Each challenge and linked learner submissions can be found on the Duckietown Challenges Server.#
Take a moment to explore the notebooks in the Demo Learning Experience to see a few of the integration options.
Edit zones#
The following table contains a list of the files and directories that you may need to update to implement this type of LX activity. If you would like a full walkthrough showing how to implement notebooks, skip to the next section.
Feature |
File Location |
Purpose |
|---|---|---|
Jupyter Notebook |
|
Notebook files contain the knowledge portion of an LX, walking students through activities, visualizations, and development. |
Learner Solution Code |
|
Python files for learner implementations should remain in the |
Notebook Dependencies |
|
Required libraries are built into the VSCode editor environment by including them in the |
Duckietown LX Development Guidelines#
Here are some suggestions on how to leverage the LX infrastructure to build compelling experiences for your learners.
Notebooks and packages:#
Notebooks and Packages: As a general rule, example code and visualizations should be developed by learners directly in the notebooks.
Code for agents and other packages should instead be placed in the packages/solutions directory for learners to edit the respective Python files, then imported into the notebooks and unit tests.
On solutions:#
All but the last notebooks should generally be thought of as guided tutorials (or, learning activities), introducing the background and tools required to implement a complex autonomous behavior for the Duckiebots. The final notebook can be thought of as a learning assessment instead, where users are expected to bring together and build upon the learning activities to produce their own solution. Learning assessments should not have solutions publicly available.
Learners should be editing package files during the activities to implement their work, as directed by the notebook instructions. Solutions to the activities should be provided after the students gave an honest attempt at solving them on their own.
The solution to the assessment instead should be hidden in the separate solutions repository, to enable evaluation.
Notebook length:#
The format of a Duckietown LX paired with the dts code workflow enables learners to iteratively edit the notebooks and execute their solution approaches to the pedagogical challenges provided, reinforcing their understanding with immediate feedback.
Within this framework, shorter notebooks with concrete goals that build learner skills up to a final agent challenge are more effective than one long, content-heavy notebook. Granularity should be preferred to monolithic LXs.
Tutorial: Adding Content to Notebooks#
Step 0: Confirm your LX workspace setup#
The first step after creating a new development project should always be to run dts code build --recipe ../recipe in the <your-lx-workspace>/lx directory, to ensure the template was initialized properly.
Step 1: Backwards design: start from the intended learning outcomes (ILOs)#
What do you want your students to take away from this learning experience? Try to write it down as a skill, starting with an active verb, e.g.:
Learners will be able to implement a PID controller once provided with the reference and output signals from a plant;
Learners will explain the effects of changing
of to their peers using the correct terminology;
Defining the intended learning outcomes will inform the content and visualization that you add to the notebook. It helps clearly determine the scope of the learning experience, by formalizing its end.
We recommend to limit the number of ILOs for each learning experience to 3-5. When you find yourself wanting learners to take away a larger number of learning outcomes, consider breaking down your LX into multiple LXs.
Step 2: Determine the prerequisites and dependencies#
Having formalized the end point of your soon-to-be LX, i.e., the ILOs, it is good practice to similarly define what are the prerequisites for engaging in this LX. Prerequisites can be:
purely theoretical: e.g., learners should know linear algebra and ODEs before engaging in a LX designed to derive the dynamic model of a robot;
tools related: e.g., learners should have a computer set up in a certain way, with at least tot amount of free hardware space;
skill related: e.g., learners should have completed another LX (with skill-focused ILOs), and be familiar with how to run update a Duckiebot.
Moreover, if possible determine the required Duckietown and external libraries that you envision using during the LX, and add them to a setup cell at the beginning of the notebook. This will avoid import errors and let you focus on fleshing out the learning activities.
You can install external libraries by adding to the recipe/dependencies-apt.txt and recipe/dependencies-py3.txt files. Any dependencies listed added here will be available in the VSCode editor environment.
Step 3: Content and code recommendations#
Content is added to a LX notebooks in the same Markdown format as any standard Jupyter notebook. For more information, see the Jupyter notebook docs.
As noted above, students should be editing package files to implement their work as directed by the notebook instructions, and the solution should be hidden in the separate solutions repository to enable evaluation. This means that there are three places you can choose to have learners write solution code.
Directly in the notebook cells. This should be used for content examples and practice.
In a solution Python script in the
lx/packages/solutiondirectory that is imported into the notebook for visualization. All functions should be predefined with clear TODOs marked for learners to complete as directed by the notebook.In a solution Python script in the
lx/packages/solutiondirectory that is then imported into the Duckiebot agent code located in therecipefor simulation and workbench activities (more on this in the following sections).
As a general rule, notebooks do not have access to the packages in the recipe/solutions directory where the base code is placed for Duckiebot agents. This is to prevent learners from editing agent code to a confusing or unusable state.
In summary: place visualization and content practice code in the notebook. Place learner solution code in linked Python scripts housed in the solutions directory.
Hint
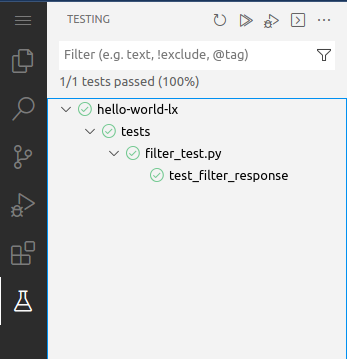
Strengthen learner test-driven development (TDD) habits by using the Testing interface in the VSCode editor, to provide unit tests for each function to be completed in an LX.
This will confirm that their solution performs as expected before any attempts to run it in simulation or on Duckiebots. Note that the beaker symbol to open the Testing interface may not appear in the sidebar until after one of the Python files in the packages directory has been opened.

Step 4: Clean up and publish#
Clear all cells of output to avoid publishing solutions. Then follow the workflow in Publishing your LX to add your notebook and recipe updates to your Learning Experience repositories.
