Initializing the Flight Controller
Contents
Initializing the Flight Controller#
What you will need
A base station computer
Flight Controller
USB to USB-C cable
What you will get
An up-to-date, initialized Flight Controller
The Flight Controller (FC) implements several low-level behaviors, e.g., stabilizing the Duckiedrone around roll, pitch, and yaw through three different PID controllers. Correctly configuring the Flight Controller is critical for flying safely.
Attention
Make sure, you are not using a “charging only” USB cable
Installing Betaflight Configurator (BFC)#
Betaflight Configurator is an app that allows the base station to connect directly to the Flight Controller and access its configuration interface.
Steps:

Flashing the correct firmware#
Updating the Flight Controller firmware (Flashing the Flight Controller)#
Flight Controllers might have different versions of firmware (i.e., the software that runs on the Flight Controller microcontroller) out of the factory. Normally, this only needs to be done once initially. Follow this procedure to update your firmware.
Attention
During flashing, do not press the “Connect” button in Betaflight Configurator.
Our current target firmware is BTFL v4.3.2.
Prepare for flashing the Flight Controller firmware#
Attention
Regardless of the firmware version, if it is the first time setting up the Flight Controller, we recommend performing the below flashing procedure once anyways in order to start from a clean state.
Perform the following 2 steps with the Flight Controller disconnected.
In the default Welcome page of Betaflight Configurator, in the left sidebar, please click on the
Firmware Flashertab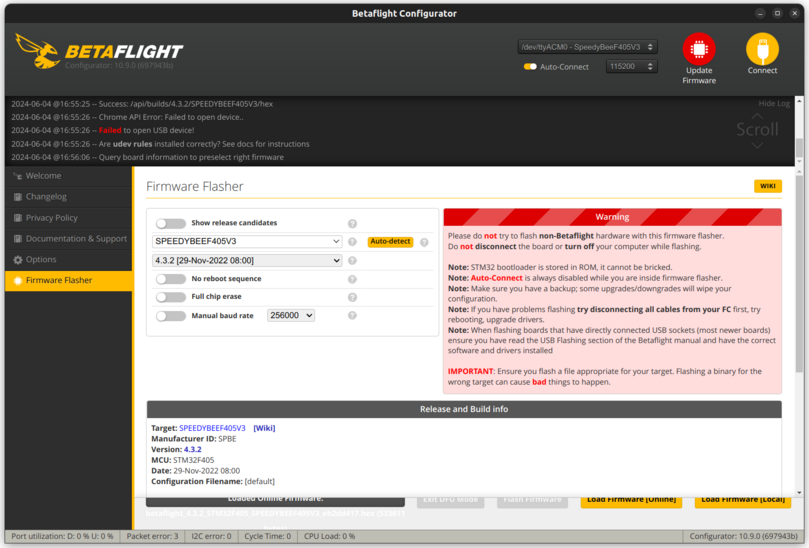
Fig. 50
Firmware Flashertab in Betaflight Configurator#Configure the options in the tab as below:

Flashing the Flight Controller#
Attention
Normally, when connected to the base station, the Flight Controller connects in Normal mode.
This can be identified by:
Having a red LED on the Flight Controller board
Having no blue blinking LED on the Flight Controller board
Having an orange LED on the Flight Controller board
If this is the case during this section, unplug from base station and try to reactivate bootloader mode as detailed below.
Warning
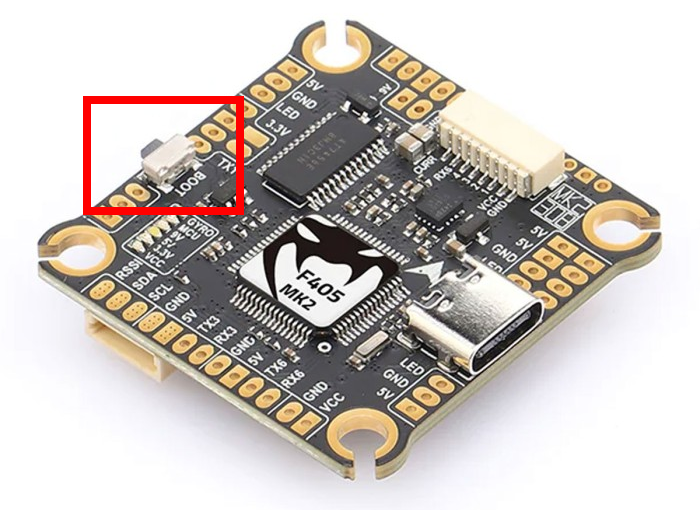
In June 2025 a new revision of the DD24 hardware was released, the DD24-B.
The hardware revision is printed on the outside of the box.
This revision ships with a different (but equivalent) flight controller, the Mamba f405 mk2 v2. Before continuing with the instructions, identify your flight controller here.
To flash the firmware, we need the Flight Controller to be in bootloader mode.
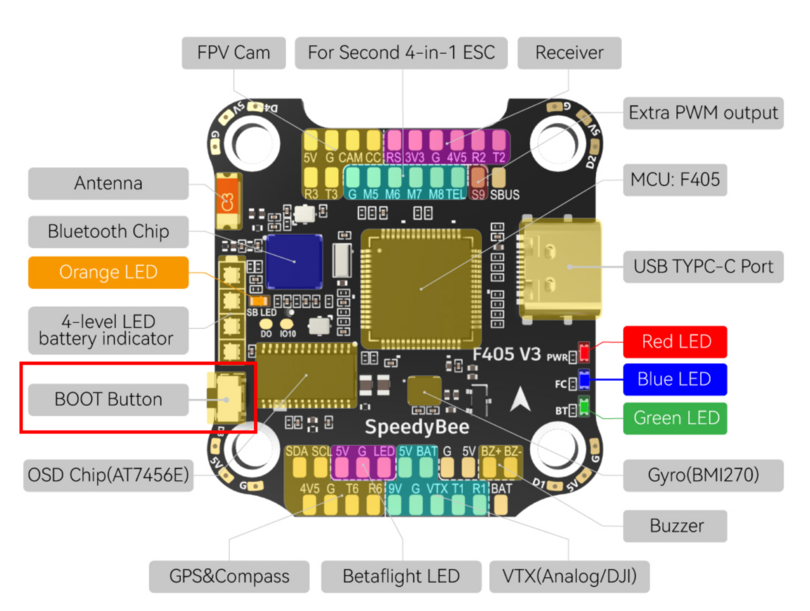
Identify the
bootbutton on the Flight Controller to the laptop and press theConnectbutton:Connect the Flight Controller to the laptop while pressing the
bootbutton.
Now that the Flight Controller is in bootloader mode you can flash the correct firmware:
In the Betaflight Configurator Firmware Flasher tab, click the
Load Firmware [Cloud]button in the bottom right.Depending on your operating system, it might be necessary to configure the OS to detect the board in DFU mode. See the link here to find out how for your specific OS.
Click the Flash Firmware button (bottom right) and check the progress bar.
Check
The progress bar shows:
“Flashing…”=>“Verifying…”=>“Programming SUCCESSFUL”Tip
In case the progress bar turns red, see the Troubleshooting section below
If successful, without needing to reconnect the cable, the Flight Controller should go back to the
Normal mode.Check
Verify the blue blinking LED is back on
Click
“Connect”and verify the firmware version is correct as detailed below
Connecting to the Flight Controller#
Unplug the battery from your drone
Attention
Double-check the battery is unplugged
Connect the USB-C cable from your Flight Controller to your base station
Identify the
"Connect"button in the top right corner (right now it will be green as the Flight Controller is not connected yet)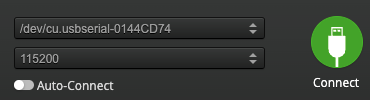
Fig. 55
"Connect"button in the top-right corner of Betaflight Configurator#Select the correct connection port
Tip
Details might vary depending on available connections on your base station.
The correct port should start with:
Linux/macOS
/dev/tty.usbserial*/dev/cu.usbserial*/dev/ttyUSB*
Windows
COM*
Leave the baud rate (number) at the default value of
115200Press the
“Connect”button and a“Setup”page should greet you with a rendering of your drone (see figure below).
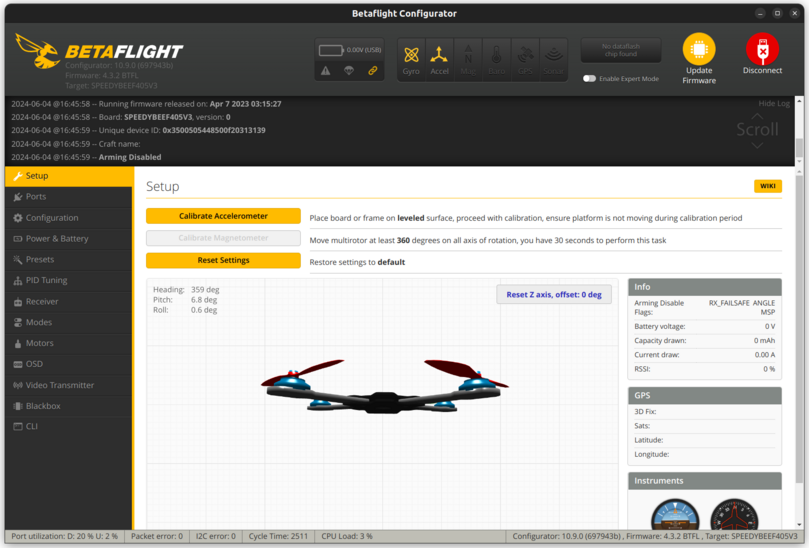
Fig. 56 Betaflight Configurator "Setup" page#
Attention
Please check below that you have the correct versions of both:
Configurator:
10.9.0Firmware:
BTFL 4.3.2
Checking the firmware version#
On the top left of the Betaflight Configurator interface, one could check for the Firmware version. For example, in the figure below, the firmware version of the Flight Controller is BTFL 4.3.2.
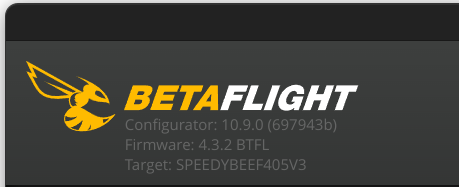
Fig. 57 Top left of Betaflight Configurator, check Betaflight Configurator version and Flight Controller firmware version here#
Restoring the correct settings#
We will restore the correct settings for the Flight Controller that reflect the setup we have on Duckiedrones (i.e. Flight Controller upside down, ESCs communication protocol, etc.)
The settings for the Flight Controller can be saved and restored through the CLI interface of Betaflight, which is akin to a shell used to interact with the firmware.
We have created a file with the required setup for you, so you will only need to restore it without having to tweak parameters through the Betaflight Configurator.
To do this:
Download the configuration file corresponding to your flight controller model:
Open it in the notepad app of your base station
Copy all content of the file from the notepad by simply clicking on the text and using CTRL + A or CMD + A
Go in the
CLItab of Betaflight Configurator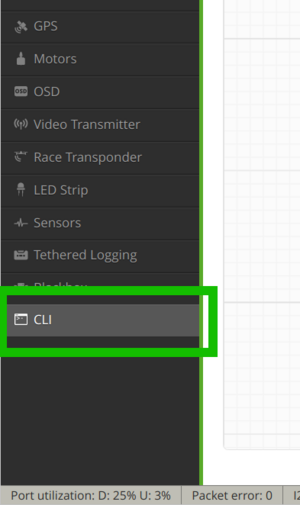
Fig. 58 CLI tab#
Paste all the text you previously copied using CTRL + V or CMD + V in the text field at the bottom (the one with the text
Write your command here. Press Tab for AutoComplete).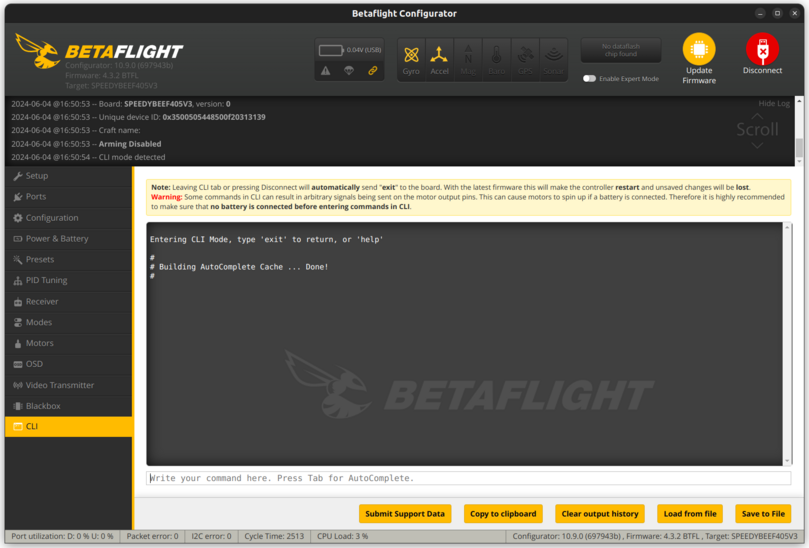
Fig. 59 CLI interface#
Press
Enteron your keyboard to execute the commands and wait for the shell to finish (it should take a few seconds)
The Flight Controller will now reboot and reconnect.
Configuring motors spin direction#
Warning
Remove the propellers before attempting this procedure.
This section provides information on how to set the spin direction for the motors:
Go to the
Motorstab and click on theMotor directionbutton.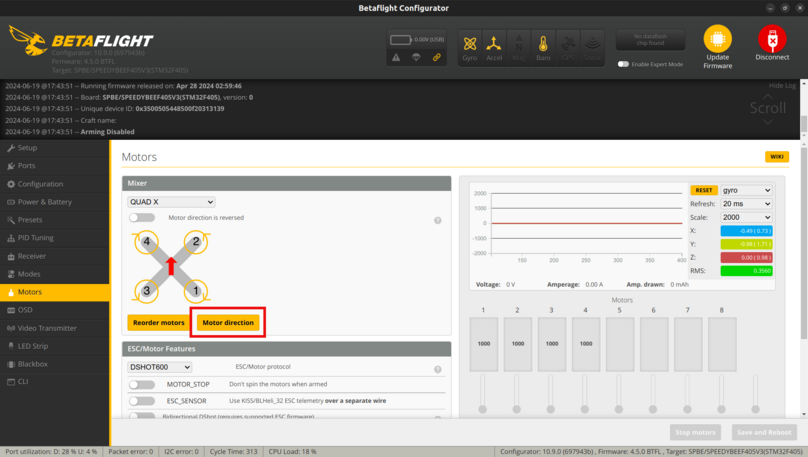
Fig. 60
motorstab#Read the wizard than opens, toggle the option saying
I understand the risksand click the buttonIndividually.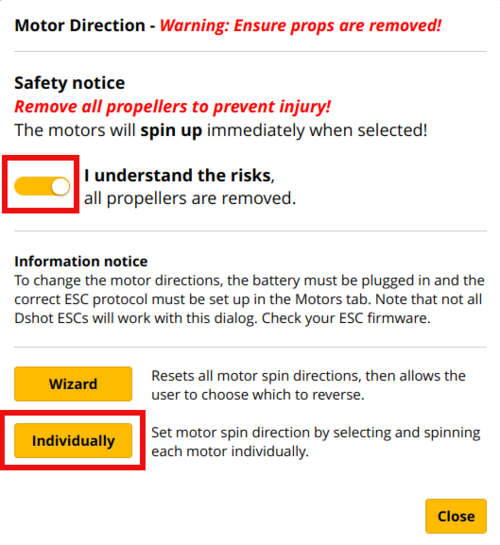
Fig. 61 Motors direction wizard#
The wizard will change to show you the different motors of the drone and after clicking on one you will be able to select whether to have it spin in the normal direction or to reverse it. Do this for each one of the 4 motors, then click
Close.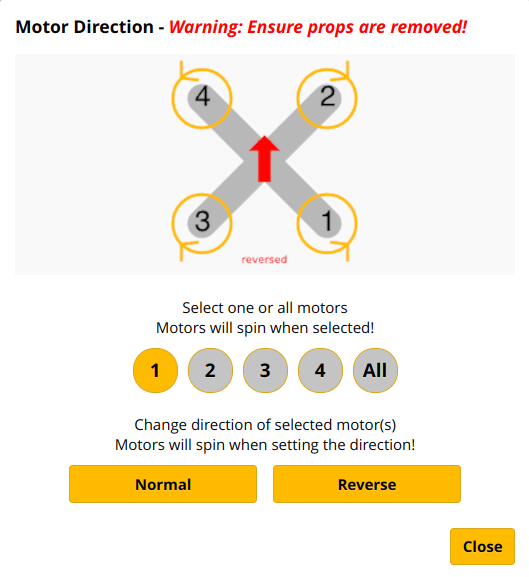
Fig. 62 Motors direction wizard#
Click on the
Save and Rebootbutton to save the changes and reboot the flight controller.
Configuring ESCs functionalities#
The ESCs used by the Flight Controller of the DD24 (SpeedyBee f405v3) use the BLHeli_S firmware. By default they have a functionality that produces a beep sound after 10 minutes of not receiving any commands. This can be annoying so you can disable it using the esc-configurator web tool https://esc-configurator.com/ .
Attention
You need to connect the battery in order to program the ESCs.
Note
You need to use a Chrome-based browser (Google Chrome, Microsoft Edge, etc.) for this.
Connect the battery to the ESC board. (The ESC board cannot be powered by the flight controller, it needs its own power supply).
Open Google Chrome and navigate to the esc-configurator web tool: ESC-Configurator
Click on
Select Serial Portin the top-right corner. A prompt will be shown to let you choose the serial port, use the same you have used to connect to the flight controller and clickConnect.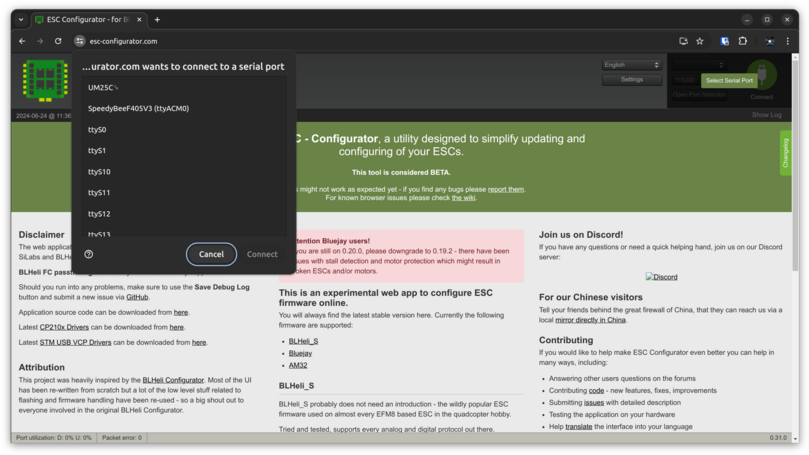
Fig. 63 Serial port selection prompt.#
If the connection is successfull you will see the following screen. In the
Beacon Delaydrop down menu selectInfinite.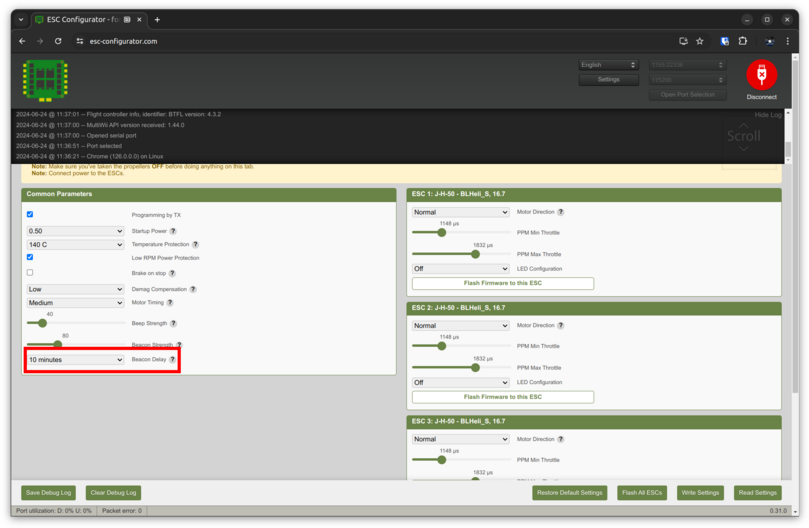
Fig. 64 Set
Beacon DelaytoInfiniteto disable the beacon sound.#Click the
Write Settingsbutton in the bottom-right corner in order to save the settings.
Troubleshooting#
Troubleshooting
SYMPTOM
The progress bar turns red and shows "No response from the bootloader, programming:FAILED"
RESOLUTION
This is likely due to the Flight Controller not being in Bootloader mode. Please double check the indicators of that mode in the section above.
Troubleshooting
SYMPTOM
"Flashing..." started, but progress bar turns red with a "Timeout" error
RESOLUTION
Linux requires udev rules to allow write access to USB devices for users. An example shell command to achieve this on Ubuntu is shown here:
(echo '# DFU (Internal bootloader for STM32 and AT32 MCUs)'
echo 'SUBSYSTEM=="usb", ATTRS{idVendor}=="2e3c", ATTRS{idProduct}=="df11", MODE="0664", GROUP="plugdev"'
echo 'SUBSYSTEM=="usb", ATTRS{idVendor}=="0483", ATTRS{idProduct}=="df11", MODE="0664", GROUP="plugdev"') | sudo tee /etc/udev/rules.d/45-stdfu-permissions.rules > /dev/null
This assigns the device to the plugdev group(a standard group in Ubuntu). To check that your account is in the plugdev group type groups in the shell and ensure plugdev is listed. If not you can add yourself as shown (replacing
sudo usermod -a -G plugdev <username>
If you have any other operating system you can take a look at the OS-specific configuration at this link.
Troubleshooting
SYMPTOM
On Linux, Betaflight Configurator doesn’t connect to the Flight Controller and an error Failed to open serial port appears in the log
RESOLUTION
This is a permission issue to access the serial port of the Flight Controller.
First try to run sudo usermod -a -G dialout <USERNAME> , replacing
If this doesn’t work, the quickest solution is to run sudo chmod 0777 /dev/tty* while Betaflight Configurator is open, where `/dev/tty* is the port you’re using to connect to the Flight Controller.
This second procedure has to be done each time the Flight Controller is reconnected to the base station.
Troubleshooting
SYMPTOM
Other issues
RESOLUTION
We’re happy to support! Please contact our hardware team via email: hardware@duckietown.com