Beginner - Python Library
Contents
Beginner - Python Library#
In this section you will learn how to create a Python library following the Duckietown template.
Step 1: Get the Duckietown library template#
A boilerplate is provided by the library template repository.
Click Use this template → Create a new repository.
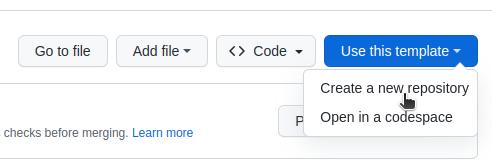
Fig. 11 Use the library template repository on GitHub.#
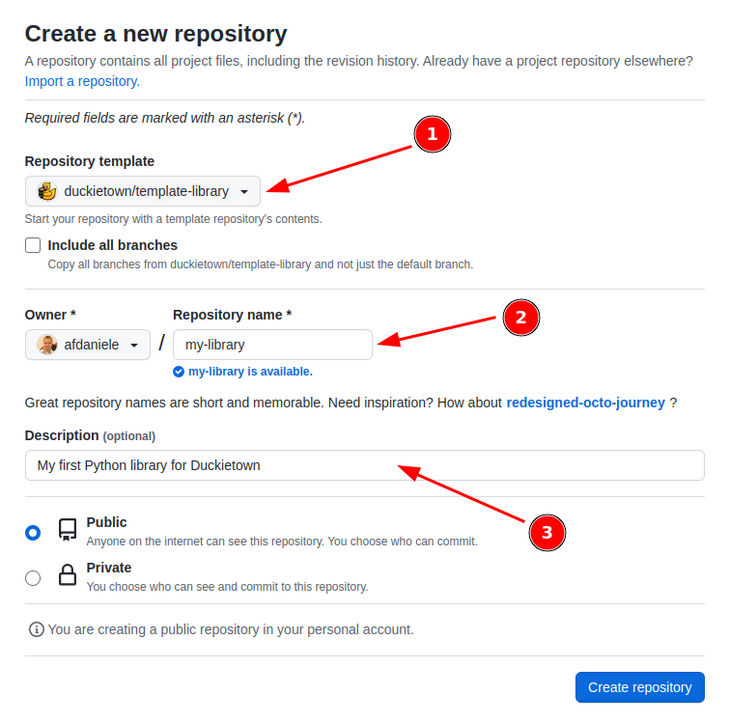
Fig. 12 Creating a repository from template.#
Clone the new repository (which is my-library in this example, but any name will do):
git clone https://github.com/YOUR_USERNAME/my-library
cd my-library
Features of the library template#
Unit‑tests with Nose
Docker‑based local build/test
CircleCI integration
CodeCov coverage reports
Integration with Sphinx to build code docs. (So far, only built locally.)
Jupyter notebooks, which are run also in CircleCI as tests.
Version bump using Bumpversion.
Code formatting using Black.
Command-line program for using the library.
Anatomy of the library template#
This repository describes a library called “duckietown_pondcleaner” and there is one command-line tool called dt-pc-demo.
Meta-files#
.gitignore: Files ignore by Git..dtproject: Enables the project to be built and used bydts develtools.bumpversion.cfg: Configuration for bumpversionMakefile: Build tools configuration with Make
Python packaging#
requirements.txt: Contains the pinned versions of your requirement that are used to run tests.MANIFEST.in: Deselects the tests to be included in the egg.setup.py: Contains meta information, definition of the scripts, and the dependencies information.
Python code#
src/- This is the path that you should set as “sources root” in your toolsrc/duckietown_pondcleaner: Contains the code.src/duckietown_pondcleaner/__init__.py: Contains the__version__library.src/duckietown_pondcleaner_tests: Contains the tests - not included in the egg.
Docker testing#
These are files to build and run a testing container.
.dockerignore: Describes what files go in the docker container.Dockerfile: The build configuration for the software image
Sphinx#
src/conf.py: Sphinx settingssrc/index.rst: Sphinx main filesrc/duckietown_pondcleaner/index.rst: Documentation for the package
Coverage#
.coveragerc: Options for code coverage.
Notebooks#
notebooks: Notebooks that are run also as a test.notebooks-extra: Other notebooks (not run as test)notebooks/*.ipynb: The notebooks themselves.
Step 2: Creating your Library#
Clone your repository
Place Python packages in
src/List Python dependencies in
dependencies.txtUpdate
setup.pymetadataClean leftover references:
grep -r . pondcleaner
Update branch names in
README.md
Admin setup#
Enable CircleCI, ensure build passes
Enable CodeCov, set
CODECOV_TOKENin CircleCI environment
Step 3: Using the library template utilities#
Test the code#
Test the code using Docker by:
make test-docker
This runs the test using a Docker container built from scratch
with the pinned dependencies in requirements.txt.
This is equivalent to what is run on CircleCI.
To run the tests locally, use:
make test
Note
To run the tests you will need to have installed the libraries listed in the file requirements.txt on your computer.
For that we assume you have already set up a Python virtual environment.
To use a Python virtual environment you will need to pip install virtualenv then virtualenv duckietown then source duckietown/bin/activate. In order to install the requirements to run the test do pip install -r requirements.txt.
Development#
In the same virtual environment as above run:
python setup.py develop
This will install the library in an editable way (rather than copying the sources somewhere else).
To skip installing dependencies, use --no-deps:
python setup.py develop --no-deps
For example, this is done in the Dockerfile so that we know we are only using the dependencies in requirements.txt with the exact pinned version.
Adding tests#
To define new tests, add files with the name test_*py in the
package duckietown_podcleaner_tests. The name is important.
Tip
Make sure that the tests are actually run by looking at the coverage results.
Using the notebooks#
Always clean the notebooks before committing them:
make -C notebooks cleanup
Warning
If you do not think you can be diligent about this, then add the notebooks using Git LFS.
Step 4: Releasing a new library version#
Updating the version#
The first step is to change the version and tag the repository.
DO NOT change the version manually; use the CLI tool bumpversion instead.
The tool can be called by:
make bump # bump the version, tag the tree
If you need to include the version in a new file, list it inside the file .bumpversion.cfg using the
syntax [bumpversion:file: <FILE_PATH >].