Initializing the Flight Controller
Contents
Initializing the Flight Controller#
What you will need
A base station computer running Linux (Ubuntu) or macOS
Flight Controller
USB to USB-C cable
What you will get
An up-to-date, initialized Flight Controller running PX4
The Flight Controller (FC) implements several low-level behaviors, e.g., stabilizing the Duckiedrone around roll, pitch, and yaw through three different PID controllers. Correctly configuring the Flight Controller is critical for flying safely.
The DD24 runs the PX4 Autopilot firmware, built for the mamba-f405-mk2 target. Flashing is performed entirely from the command line with dfu-util so that the procedure is fully scriptable and does not require a graphical flasher.
Note
The flashing is a two-stage process:
Flash the PX4 bootloader (the
omnibusf4sd_blbootloader, which is the canonical bootloader for STM32F405-based boards using PX4 board ID42, including the Diatone Mamba F405 MK2).Flash the PX4 firmware built for the
mamba-f405-mk2target on top of the bootloader.
Both stages are performed via dfu-util while the FC is in STM32 DFU mode.
1. Install dfu-util#
Install dfu-util on your base station. Pick the tab matching your operating system.
sudo apt update
sudo apt install dfu-util
(Optional but recommended) install a udev rule so dfu-util does not need sudo:
sudo tee /etc/udev/rules.d/45-stm32-dfu.rules > /dev/null <<'EOF'
SUBSYSTEM=="usb", ATTR{idVendor}=="0483", ATTR{idProduct}=="df11", MODE="0664", GROUP="plugdev"
SUBSYSTEM=="usb", ATTR{idVendor}=="26ac", MODE="0664", GROUP="plugdev"
EOF
sudo udevadm control --reload && sudo udevadm trigger
brew install dfu-util
Note
macOS does not need udev rules — dfu-util accesses USB devices directly via IOKit, without requiring sudo. Run the dfu-util commands in this guide without sudo.
Tip
Use dfu-util version >= 0.9. Older versions may silently truncate writes on STM32F4 targets. The Homebrew formula ships 0.11, which is the version the procedure has been validated on.
2. Enter DFU Mode#
Disconnect the USB cable connecting the Flight Controller to the Raspberry Pi.
Reconnect it to your base station while keeping the BOOT button on the side of the flight controller pressed.
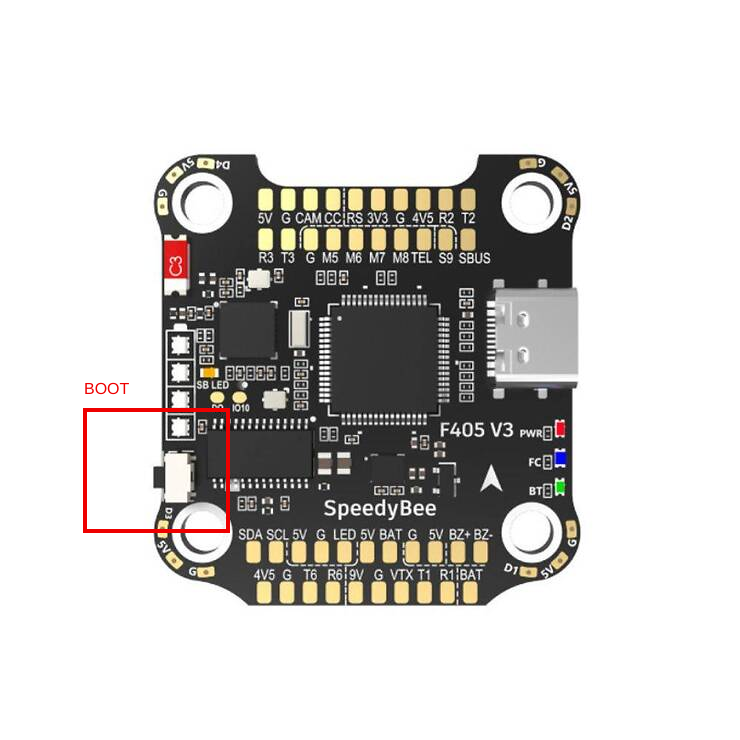
Fig. 49 Flight controller BOOT button location.#
After a couple of seconds, release the BOOT button.
Verify that the board is enumerated as an STM32 DFU device:
dfu-util -l
You should see one or more interfaces with the vendor/product ID 0483:df11 (“STMicroelectronics STM Device in DFU Mode”), as in the following image:
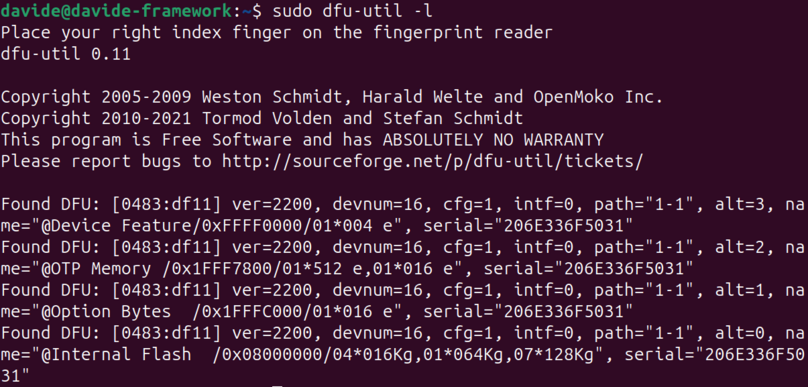
Fig. 50 Output of dfu-util -l with the FC in DFU mode.#
3. Flash the PX4 Bootloader#
Download the prebuilt omnibusf4sd_bl bootloader hex shipped with the PX4 user guide and convert it to a raw binary that dfu-util can flash. The conversion needs arm-none-eabi-objcopy from the ARM bare-metal toolchain:
sudo apt install binutils-arm-none-eabi   # provides arm-none-eabi-objcopy
curl -L -o omnibusf4sd_bl.hex \
  https://github.com/PX4/PX4-user_guide/raw/main/assets/flight_controller/omnibus_f4_sd/omnibusf4sd_bl_d52b70cb39.hex
arm-none-eabi-objcopy -I ihex -O binary omnibusf4sd_bl.hex omnibusf4sd_bl.bin
brew install --cask gcc-arm-embedded   # provides arm-none-eabi-objcopy
curl -L -o omnibusf4sd_bl.hex \
  https://github.com/PX4/PX4-user_guide/raw/main/assets/flight_controller/omnibus_f4_sd/omnibusf4sd_bl_d52b70cb39.hex
arm-none-eabi-objcopy -I ihex -O binary omnibusf4sd_bl.hex omnibusf4sd_bl.bin
Tip
If you already have the PX4 dev toolchain installed via brew tap PX4/px4 && brew install px4-dev, you can skip the cask install — arm-none-eabi-objcopy is already on your PATH.
Tip
The bootloader hash suffix d52b70cb39 is tracked in the PX4 user guide; if the URL above 404s, re-resolve it from
the PX4 bootloader-from-Betaflight page.
You can also build the bootloader from source with make omnibusf4sd_bl from a clone of PX4/PX4-Bootloader.
With the FC still in DFU mode, flash the bootloader to address 0x08000000:
dfu-util -a 0 --dfuse-address 0x08000000:leave -d 0483:df11 -D omnibusf4sd_bl.bin
Tip
Explanation of the dfu-util command:
-a 0: selects the first DFU alternate setting (the internal flash).--dfuse-address 0x08000000:leave: writes to the start of flash and reboots the board into the freshly written image after the write completes.-d 0483:df11: matches the STM32 ROM DFU device.-D omnibusf4sd_bl.bin: the file to flash.
After the flash completes (this takes a few seconds), the board will reboot. It will now enumerate as a PX4 bootloader device under the 26AC USB vendor ID (e.g., 26AC:0011). Verify it has come back up:
lsusb                         # look for a 26AC:xxxx entry
ls /dev/serial/by-id/         # should list a *PX4_BL* entry
lsusb is not shipped with macOS. Either install it with brew install lsusb, or use the built-in tools to enumerate USB and serial devices:
system_profiler SPUSBDataType | grep -A 3 -E "PX4|26AC"
ls /dev/tty.usbmodem*         # PX4 bootloader appears as e.g. /dev/tty.usbmodem01
Note
macOS does not populate /dev/serial/by-id/. The board is exposed only as /dev/tty.usbmodem* (and a matching /dev/cu.usbmodem*). It can take 1–2 seconds for the node to appear after the board reboots out of DFU.
4. Flash the PX4 Firmware#
Download the PX4 firmware binary for the mamba-f405-mk2 target:
curl -L -O https://github.com/duckietown/PX4-Autopilot/releases/download/dd24-mamba-f405-mk2-v1.15.4-1/diatone_mamba-f405-mk2_default.bin
Note
Use dd24-mamba-f405-mk2-v1.15.4-1 for the DD24 — this is the build on which the shipped duckiedrone-px4.params file is known to load and save cleanly. The v2 hardware variant of the Mamba F405 MK2 ships without an on-board barometer or magnetometer; the param file restores SYS_HAS_BARO=0, SYS_HAS_MAG=0, SYS_HAS_GPS=0, and CBRK_SUPPLY_CHK=894281 so preflight does not flag the missing sensors.
A newer dd24-mamba-f405-mk2-v1.16.1-2 build also exists (with baro/mag drivers stripped at compile time) but currently has an unbisected param-related boot regression. Avoid it for now.
Put the FC back into DFU mode (disconnect, hold BOOT, reconnect), confirm it shows up again in dfu-util -l, then flash the firmware to the application offset 0x08008000:
dfu-util -a 0 --dfuse-address 0x08008000:leave -d 0483:df11 -D diatone_mamba-f405-mk2_default.bin
Important
The PX4 firmware is loaded at offset 0x08008000, not at 0x08000000. The first 32 KiB of flash is reserved for the bootloader you wrote in step 3. Writing the firmware to 0x08000000 would overwrite the bootloader.
After the flash completes the board reboots and runs PX4. The boot sequence is: STM32 reset → PX4 bootloader at 0x08000000 → PX4 firmware at 0x08008000.
Tip
Alternative — use the PX4 serial uploader.
Once the bootloader is flashed (step 3), you can also flash the firmware over USB-CDC with the PX4 uploader script. This is the canonical PX4 path — it verifies that the firmware’s board ID matches the bootloader’s reported board ID before erasing flash:
curl -L -O https://github.com/duckietown/PX4-Autopilot/releases/download/dd24-mamba-f405-mk2-v1.15.4-1/diatone_mamba-f405-mk2_default.px4
git clone --depth 1 https://github.com/PX4/PX4-Autopilot.git
python3 PX4-Autopilot/Tools/px4_uploader.py diatone_mamba-f405-mk2_default.px4
The .px4 file is a JSON-wrapped, board-ID-tagged firmware envelope; px4_uploader.py verifies that its embedded board ID matches the bootloader’s reported board (42) before erasing flash. The dfu-util flow above is preferred for fully programmatic deployments.
5. Starting the drone software stack#
Now you will need to start the drone software stack, allowing you to connect to the flight controller from your laptop.
To do so you need to use the Duckietown shell dts.
Attention
Make sure that the dts on your laptop is:
Running the
entedistribution. You can check by runningdts profile listUpdated to the latest version by running:
dts update
To start the flight software stack execute the command
dts duckiebot update -t duckiedrone --distro=ente -f [ROBOT_NAME]
Wait for the command to terminate before proceeding to the next step.
6. Connecting to the Flight Controller#
Attention
Unplug the battery from your drone!
Installing QGroundControl and Restoring the correct parameters#
By following these steps you will be able to install QGroundControl, connect to your flight controller via TCP, and restore your vehicle’s parameters from a .params file. The .params file contains the PX4 parameters that differ from the upstream defaults (rangefinder-only altitude estimation, quadrotor airframe configuration, controller tuning, etc.) and is shipped alongside this book at _static/duckiedrone-px4.params.
Note
The shipped param file sets EKF2_EV_CTRL = 0 so the EKF does not try to fuse vision before a VIO is online. Once a VIO publishes VISION_POSITION_ESTIMATE / ODOMETRY over MAVLink, raise EKF2_EV_CTRL to 7 (fuse vision pos + vel) or 15 (also fuse vision yaw — recommended on this magless airframe).
Install QGroundControl:
Go to the QGroundControl website and download the installer for your operating system (Windows, macOS, or Linux).
Follow the installation instructions for your OS:
Windows: Run the installer and follow the prompts.
macOS: Download the
.dmgfile, open it, and drag the QGroundControl icon into your Applications folder.Linux: Follow the package manager or AppImage instructions provided on the QGroundControl download page.
Once installed, launch QGroundControl.
Connect to Your Vehicle via TCP:
Open QGroundControl on your computer.
Go to the Application Settings → Comm Links section by clicking on the Q application icon in the top left corner.
Select Add to create a new communication link.
Choose TCP from the dropdown.
Set the Host Address to
<robot_name>.localand the Port to the port exposed by themavlink-proxyservice on your Duckiedrone (default:5760).Click Connect to establish the connection with your flight controller.
Access the Vehicle Setup:
Once connected, open the menu by clicking on the Q application icon in the top left corner and open the Vehicle Setup page from the popup menu that appears.
Navigate to Parameters:
In the Vehicle Setup menu, select the Parameters tab to view the configurable parameters for your vehicle.
Load the
.paramsFile:In the Parameters screen, click on the Tools menu in the top right corner.
Select Load from file… from the dropdown menu.
Browse to the location of your
.paramsfile on your computer, select it, and click Open.
Apply the Parameters:
QGroundControl will load and apply the parameters from the file to your vehicle. Progress indicators or messages will confirm that the parameters are being applied.
Reboot the Vehicle:
After loading the parameters, it is usually necessary to reboot the flight controller for changes to take effect.
You can reboot the vehicle by selecting Reboot Vehicle from the Tools menu.
Additional Tips#
Multiple Loads: Some parameters may require multiple loads until they are all applied correctly.
Check for Errors: Ensure QGroundControl does not report any errors during the parameter loading process.
On-board calibration is mandatory: the shipped
.paramsfile deliberately omits allCAL_*(accelerometer/gyro/magnetometer/barometer calibration) entries because those are tied to a specific board’s sensor IDs. Run the Sensors calibration in QGroundControl on the actual flight controller after loading the parameters.
Troubleshooting#
Troubleshooting
SYMPTOM
dfu-util shows no devices.
RESOLUTION
The FC has not entered DFU mode. Disconnect USB, hold the BOOT button while reconnecting, then run dfu-util -l again. On Linux, also confirm there is no kernel driver claiming the device (e.g., ModemManager) by checking dmesg after plug-in. On macOS, run system_profiler SPUSBDataType | grep -i stm and confirm the board enumerates as STM32 BOOTLOADER — if it does not, the BOOT button was released too early.
Troubleshooting
SYMPTOM
On macOS, dfu-util -l lists the board but the write step hangs or errors with Cannot open DFU device.
RESOLUTION
Another process is holding the USB interface. The usual culprit is a previous dfu-util run that did not exit cleanly, or QGroundControl scanning for serial devices. Quit QGroundControl, then run pkill -9 dfu-util before retrying. Unlike Linux, macOS does not need any permissions or group changes for DFU access.
Troubleshooting
SYMPTOM
After flashing, the board does not enumerate as a PX4 bootloader.
RESOLUTION
The most common cause is that the firmware was flashed to 0x08000000 instead of 0x08008000, overwriting the bootloader. Re-enter DFU mode and re-run step 3 to restore the bootloader, then re-run step 4 with the correct address.
Troubleshooting
SYMPTOM
px4_uploader.py reports “expected board ID 42, got X”.
RESOLUTION
The wrong bootloader was flashed in step 3. Re-flash omnibusf4sd_bl.bin (board ID 42 matches the mamba-f405-mk2 PX4 target).
Troubleshooting
SYMPTOM
I am having issues following the instructions!
RESOLUTION
We’re happy to support and to hear your feedback! Please post a question on our StackOverflow, you can find the instructions on how to join it here.
You can also contact us via Slack at the following channel: duckietown-sky-help