Operations - Duckiebot Power Management
Contents
What you will need
A correctly assembled Duckiebot: Testing - Duckiebot Hardware Components
An up to date (v. >2.0.2) Duckiebattery: Debug - Duckiebattery Software Update
What you will get
Understanding on how to power on a Duckiebot
Understanding on how to power off a Duckiebot (soft and hard shutdowns)
Understanding on how to charge a Duckiebot
Tips and tricks for efficient Duckiebot power management
Operations - Duckiebot Power Management#
Robots, as well as humans, need energy to operate. Duckiebots take their energy from the Duckiebattery. This section covers the basic operations for power management.
Tutorial video#
How to charge the Duckiebot#
To charge the Duckiebot:
Plug one end of the charging cable into the
OUTCHARGERport on the HUT.Plug the other end of the charging cable into a
5V2Apower source.
Note
To minimize mechanical stress on the HUT, do not unplug the charging cable from the HUT.
Note
The Duckiebattery can draw up to 2A but feeding a higher amperage will not be a problem. However, the wrong voltage can send the battery into protection mode.
Note
If your Duckiebot is turned on while charging, a battery charge indicator will appear on the top right of the screen. If your Duckiebot is turned off, the LEDs will turn on. In both cases, a small LED on the HUT near the charging port will turn green, indicating incoming power.
How to turn your Duckiebot on#
Warning
Make sure that your Duckiebattery is fully charged before attempting to turn your Duckiebot on. The external power supply may not be able to provide sufficient current if the battery is low, causing the on-board computer to reboot. Should that happen during the first boot, you will likely have to re-initialize the SD card.
To turn your Duckiebot on, press the button on the Duckiebattery once.
What to expect:
The front and back LEDs will turn blue, the LEDs on the on-board computer and HUT will turn on, and the fan will turn on.
The Wi-Fi dongle will start blinking.
The front and back LEDs will turn white and red, respectively.
The top button and screen will turn on, as shown in Tutorial video.
To verify that your Duckiebot has completed the booting process, run the following command and wait for Status to change from Booting to Ready:
dts fleet discover
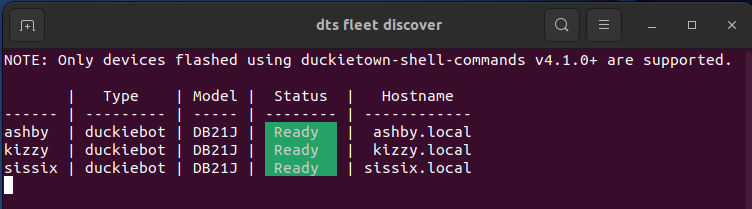
Fig. 24 Output of dts fleet discover.#
How to turn your Duckiebot off#
There are several ways to perform a soft shutdown (i.e., the proper way) of a Duckiebot: through the Duckietown shell, the Duckiebot’s Dashboard, and the top button on the Duckiebot itself. To perform a soft shutdown, the Duckiebattery’s software must be up to date (version >2.0.2).
Warning
Run the following command and verify that version is greater than or equal to 2.0.2:
dts duckiebot battery check_firmware DUCKIEBOT_NAME
Otherwise, follow Duckiebattery software update before proceeding, or perform a hard shutdown.
Soft shutdown#
Top button shutdown: to turn your Duckiebot off using the top button (preferred), press the top button (not the button on the Duckiebattery) for
5 sand then release it.You should see the button blinking and the screen showing “Shutdown”. It will take a few seconds for the procedure to complete.
Attention
If the screen switched to the next page and the top button did not blink, try again and fully press the top button for a little longer than 5 seconds.
DTS shutdown: to turn your Duckiebot off using
dts, run:dts duckiebot shutdown DUCKIEBOT_NAME
Dashboard shutdown: to turn your Duckiebot off through the
Dashboard:Run
dts duckiebot dashboard DUCKIEBOT_NAME.Click the
Powerbutton.Select the
Shutdownoption.Click the
Yesbutton.
SSH shutdown: to turn your Duckiebot off using
ssh, run:ssh duckie@DUCKIEBOT_NAME.local sudo poweroff
Hard shutdown (last resort)#
If none of the previous methods worked, after waiting a few seconds from your last attempt, unplug the cable connected to the 5VRASPI port on the HUT (the closest mini-USB port on the HUT to the camera side). Use this method only as a last resort, and not during the first boot.