Reflashing Jetson Nano Development Kit 4GB
Contents
Reflashing Jetson Nano Development Kit 4GB#
This chapter describes how to re-flash the on-board computer.
What you will need
Completed Software dependencies installation with Ubuntu running natively.
An NVIDIA Jetson Nano Developer Kit (
4 GB) with eMMC memory.A power source for the Jetson Nano.
A Micro USB cable with data connections that can connect to your computer or a Micro USB to USB type A adapter.
A method for shorting pins (e.g., jumper, F-F Dupont cable, stripped wire, paper clip, screwdriver, etc.).
(optional) An HDMI cable and screen.
(optional) A serial cable that can connect to your computer (to see detailed UART logs).
What you will get
A re-flashed NVIDIA Jetson Nano Developer Kit (4 GB) with eMMC memory.
Attention
After running this procedure, it will be necessary to re-flash the SD card.
The minimum sufficient firmware version is 1.4.2.
Warning
Do not proceed with these instructions unless your Jetson Nano is affected by the booting problem described below. This procedure applies to a specific use case and will irreversibly alter your Jetson Nano’s on-board filesystem. Instructions to revert the effects of these instructions are not provided. If uncertain, follow Troubleshooting or reach out to the Duckietown team.
Procedure#
What will this procedure do?#
This procedure will re-flash the Jetson Nano’s eMMC memory so that it can boot from the SD card.
When should this procedure be performed?#
This procedure should be performed if your Duckiebot does not seem to perform the first boot procedure and, upon connecting the Jetson Nano to a screen with an HDMI cable, you only see an NVIDIA logo (white or black background) occasionally flickering (constantly rebooting).
Upon further debugging (e.g., looking at the UART logs during boot), the 4 GB Jetson Nano seems to be recognized as a 2 GB Jetson Nano.
This procedure will not be useful in fixing problems such as your Duckiebot not connecting to a network or moving.
Why should this procedure be performed?#
“Recent” (post February 2025, to the best of our knowledge) 4 GB Jetson Nanos have a different memory module that requires a specific patch to be recognized.
Without installing this patch, the on-board memory is not recognized correctly and “nothing works”.
What are all these different flashings about?
Flashing a Jetson Nano is different to flashing an SD card or an Ubuntu ISO on a thumbdrive:
Ubuntu is the OS running on your computer (base station).
Jetson Nanos are tiny but mighty computers and require an OS to function. In the same way as your computer has a BIOS (that you may have accessed in the above step to, for example, change the boot order), without installing a “basic” OS on the Jetson Nano, it will not know where to boot from (and much more).
Flashing an SD card provides a more “sophisticated” OS for the Jetson Nano, that will be used as an alternative to the “basic” one installed through this procedure. Nonetheless, it is necessary to install a “basic” OS on the Jetson Nano to let it know to read from the SD card when booting.
Jetson Nano terminology
The terminology regarding Jetson Nanos may be confusing, so let us clarify a few terms:
The Jetson Nano module (often referred to as the Jetson Nano) is the small board underneath the heat sink. These modules are all manufactured by NVIDIA (i.e., they are “original”).
The Jetson Nano developer board is the carrier board onto which the Jetson Nano module attaches. This is the PCB with all of the peripheral plugs (e.g., camera ports, USB ports, HDMI port, GPIO pins, etc.). These boards are no longer manufactured by NVIDIA but a number of third-party carrier boards exist on the market.
The combination of a Jetson Nano module and Jetson Nano developer board is a Jetson Nano Developer Kit. In Duckietown, we sometimes call Jetson Nano Developer Kits with original developer boards “Green Jetsons” because of the color of their packaging (these are no longer on the market). We also sometimes call the Jetson Nano Developer Kits with third party developer boards “Blue Jetsons”. In theory, these kits should come in blue colored packaging. However, in practice, they are often offered by manufacturers with non-descriptive cardboard boxes.
In this chapter, “Jetson Nano” and “kit” will be used to refer to the (Blue) Jetson Nano Developer Kits included in DB21J4 Duckieboxes.
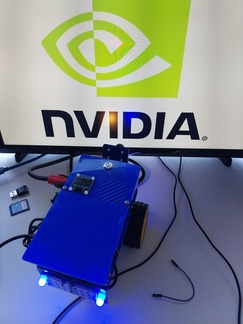
Fig. 49 A Duckiebot that does not boot correctly, connected to a screen that shows an NVIDIA logo.#
Note
This procedure is normally performed by the Duckietown team at the manufacturing stage, so that users do not need to worry about it. Occasionally, issues arise that slip through quality control, requiring the Jetson Nano to be re-flashed by the user. In particular, Jetson Nanos received between February and April 2025 may need to be re-flashed.
Preparing the flashing environment on your computer#
Note
This step needs to be performed only once, even if you are re-flashing multiple Jetson Nanos.
On your computer, run:
mkdir -p /tmp/duckietown/jn/overlay
cd /tmp/duckietown/jn
curl -LO "https://developer.nvidia.com/downloads/embedded/l4t/r32_release_v7.6/t210/jetson-210_linux_r32.7.6_aarch64.tbz2"
curl -LO "https://developer.nvidia.com/downloads/embedded/l4t/r32_release_v7.6/t210/tegra_linux_sample-root-filesystem_r32.7.6_aarch64.tbz2"
curl -Lo overlay_32.7.5_PCN211181.tbz2 "https://drive.google.com/uc?export=download&id=1Kmocz6tPmEaepPIvwKc3bT7MpJqpwkvv"
tar -xpf jetson-210_linux_r32.7.6_aarch64.tbz2
tar -xpf tegra_linux_sample-root-filesystem_r32.7.6_aarch64.tbz2 -C Linux_for_Tegra/rootfs
tar -xpf overlay_32.7.5_PCN211181.tbz2 -C overlay
cp overlay/Linux_for_Tegra/bootloader/t210ref/BCT/P3448_A00_lpddr4_204Mhz_P987.cfg Linux_for_Tegra/bootloader/t210ref/BCT
cp -r overlay/Linux_for_Tegra/kernel/dtb/. Linux_for_Tegra/kernel/dtb
./Linux_for_Tegra/apply_binaries.sh
tar -xpf overlay_32.7.5_PCN211181.tbz2 -C Linux_for_Tegra
Preparing the Jetson Nano and connecting it to your computer#
To start, make sure that the Jetson Nano is turned off. If your Duckiebot is already assembled, remove all USB cables plugged into the Jetson Nano and HUT (detach the battery).
Note
The fan in the figures below is unnecessary for this procedure and can be ignored.
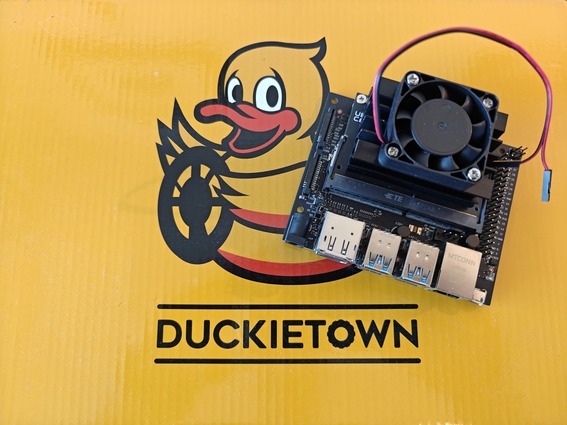
Fig. 50 A Jetson Nano Developer Kit (4 GB) with a third party carrier board.#
Identifing the FC REC pin#
To (over)write the Jetson Nano’s (carrier board…) on-board memory, which in the case of this document is assumed to be a 16 GB eMMC hard drive, we need to turn the Jetson Nano on while in forced recovery mode.
To do so, we need to first identify the FC REC pin placed underneath the Jetson Nano module, near the SD card slot, as shown in Fig. 51.
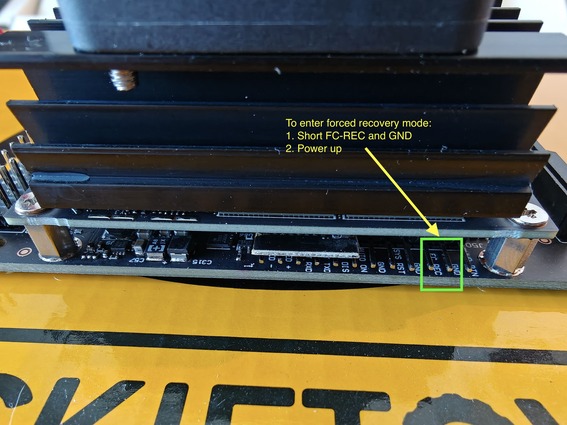
Fig. 51 The forced recovery mode pin is labeled FC REC and needs to be shorted with the pin labeled GND.#
Shorting the FC REC and GND pins#
The Jetson Nano will boot into forced recovery mode when the FC REC and GND pins are shorted before it turns on.
Short the pins using, for example, a jumper or cables (neither are provided in the Duckiebox).
Note
Any expedient to bridge those two metal pins with a conductive material (e.g., metal) will work (e.g., using the tip of a screwdriver, a paperclip, etc.). Make sure to only bridge these two pins while the Jetson Nano is turning on. After it has booted, you can safely remove the connection.
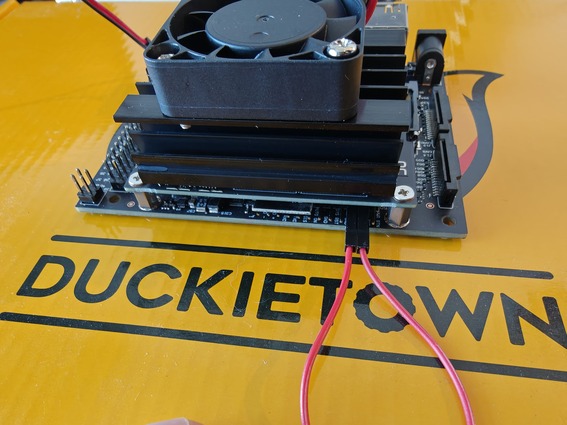
Fig. 52 The FC REC and GND pins on a Jetson Nano being shorted using a jumper cable.#
Preparing to turn the Jetson Nano on#
These Jetson Nanos can only be powered through the DC jack, or the 5V and GND GPIO pins.
While DC jack cables are not included in the Duckiebox, we can use the HUT to conveniently access the GPIO power pins.
Place the HUT onto the GPIO pins of the Jetson Nano, making sure to perfectly align the HUT’s header with the Jetson Nano’s pins to avoid erratic behaviors.
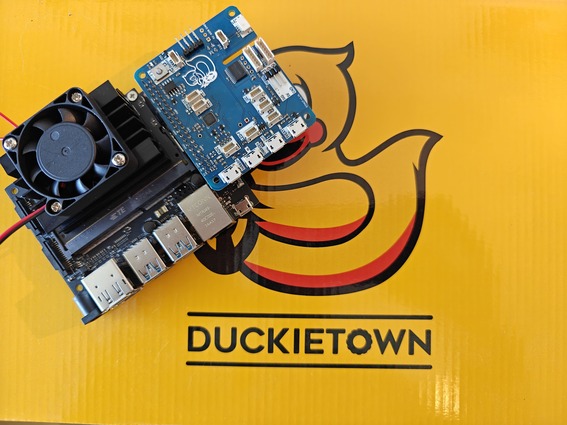
Fig. 53 A HUT connected to the GPIO pins of a Jetson Nano.#
Establishing a data connection between the Jetson Nano and your computer#
Connect the Jetson Nano to your computer using a Micro USB cable with a data channel.
Note
Not including the USB type A to USB type A connection of the “Y” shaped cable, the USB cables provided in the Duckiebox are power only. If you have a USB type A to Micro USB adapter, you can use the USB type A to USB type A connection of the “Y” shaped cable.

Fig. 54 A Micro USB cable connected to a Jetson Nano.#
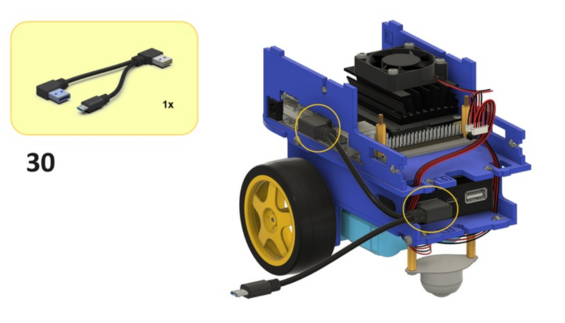
Fig. 55 The “Y” shaped cable provided in the Duckiebox.#
(optional) Further debugging probes#
Note
This passage is not necessary, and can be skipped.
To gain a better understanding of what will happen in the next steps, you can perform either or both of the following two steps:
Connect the Jetson Nano to a screen through an HDMI cable (not shown in the figure below).
Connect the Jetson Nano to your computer through a serial connector (example), making sure to “flip” the transmission (TXD) and receiving (RXD) channels between the connector and the Jetson Nano (i.e., connect: GND ↔︎GND, TXD ↔︎RXD, RXD ↔︎TXD). These pins are on the same array as the
FC RECpin and are labeledUART TXDandUART RXD, respectively.
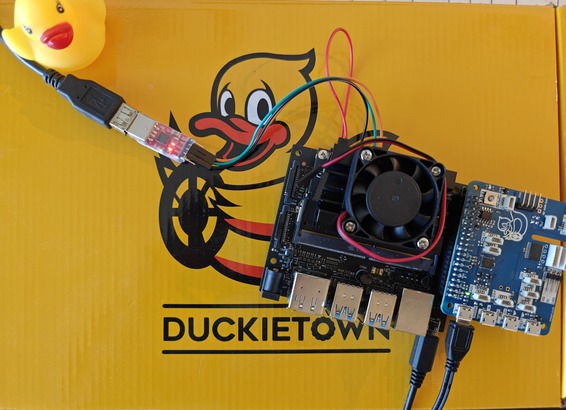
Fig. 56 A UART serial cable connected to a Jetson Nano.#
To visualize the UART logs on your computer, run:
sudo apt install screen
screen /dev/ttyUSB0 115200
Note
Depending on your computer, the number after ttyUSB could be different.
Check /dev/tty* after establishing the UART connection and powering the Jetson Nano to find the right one.
Turning the Jetson Nano on#
Connect a 5 V 2 A charger to the 5VRASPI port of the HUT.
Note
You should see a (previously faint) green LED shining brightly on the HUT and a new green LED on the Jetson Nano, near the power cable, turn on.
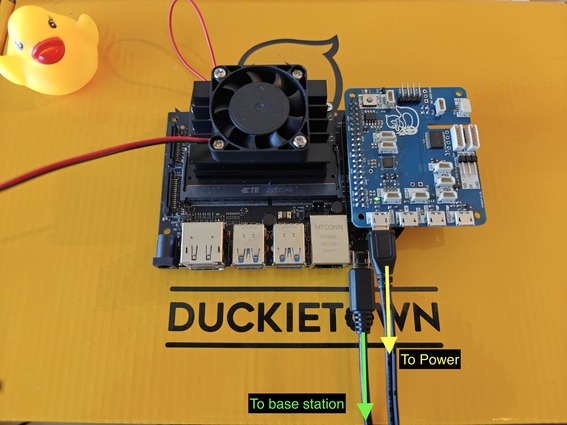
Fig. 57 A Jetson Nano being powered through a HUT’s 5VRASPI port.#
Checkpoint 1#
Attention
This checkpoint is critical!
Test
From your computer, run:
lsusb
Expected Result
...
Bus 001 Device 012: ID 0955:7f21 NVIDIA Corp. APX
...
Attention
If a line containing NVIDIA Corp. APX is not present, the Jetson Nano is not connected to your computer.
Follow Troubleshooting.
Flashing the Jetson Nano#
From your computer, run:
sudo ./flash.sh -x 0x21 jetson-nano-emmc sda1
Note
The resulting output should look like the following:
...
[ 207.0591 ] Flashing completed

[ 207.0592 ] Coldbooting the device
[ 207.0622 ] tegradevflash --reboot coldboot
[ 207.0635 ] Cboot version 00.01.0000
[ 207.0673 ]
*** The target t210ref has been flashed successfully. ***
Reset the board to boot from internal eMMC.
Note
The Jetson Nano should restart immediately after the process has completed.
If you have an HDMI cable and screen plugged in and would like to see if the process worked, remove the short from the FC REC and GND pins while the board is being flashed (it is safe to do so).
Checkpoint 2#
Test
Method 1: Remove the jumper, data cable and power cable from the Jetson Nano, connect it to a screen using an HDMI cable, plug the power cable back in and then look at the screen.
Expected Result
A green NVIDIA logo with a white background followed by boot information (as long as it moves past the NVIDIA logo, you may proceed).
Test
Method 2: Follow Duckiebot SD Card preparation - introduction, Assembly Instructions (DB21J) and Duckiebot Handling Cheatsheet (DB21).
Expected Result
Your Duckiebot boots successfully.
Attention
This procedure updates the NVIDIA Jetpack version to 4.6.6, requiring a Duckiebot with firmware version 1.4.2 or newer.
You can find the firmware version number in the Dashboard or from the name of the file downloaded when initializing the SD card (e.g., dt-nvidia-jetpack-v1.4.2-4gb).
Troubleshooting#
Troubleshooting
SYMPTOM
The Jetson Nano is not showing up after running lsbusb.
RESOLUTION
Make sure that it is in forced recovery mode and that the Micro USB cable connected to your computer has a data channel.
Troubleshooting
SYMPTOM
The Jetson Nano takes over a minute or two to show up with after running lsbusb.
RESOLUTION
The Micro USB cable connected to your computer could be finnecky, as the process should be instantaneous. Therefore try using a different cable.
Troubleshooting
SYMPTOM
The Jetson Nano shows up after running lsusb but if I unplug and re-plug the data cable, it does not show up anymore.
RESOLUTION
Remove the power cable before plugging the data cable back in.
Troubleshooting
SYMPTOM
The Jetson Nano shows up after running lsusb but the flashing procedure gets stuck.
RESOLUTION
Make sure that you are running Ubuntu natively.
Troubleshooting
SYMPTOM
I believe that I have completed the procedure successfully but the Jetson Nano still does not work (e.g., a static NVIDIA logo on screen). In particular, I see from the logs that it is recognized as a 2 GB Jetson Nano.
RESOLUTION
The overlay patch has not been applied correctly. Try again, while following the instructions more carefully.
Additional information#
Successful flash logs
tani@tani-ubuntu:~/jn/Linux_for_Tegra$ sudo ./flash.sh -x 0x21 jetson-nano-emmc sda1
###############################################################################
# L4T BSP Information:
# R32 , REVISION: 7.6
###############################################################################
# Target Board Information:
# Name: jetson-nano-emmc, Board Family: t210ref, SoC: Tegra 210,
# OpMode: production, Boot Authentication: ,
# Disk encryption: disabled ,
###############################################################################
./tegraflash.py --chip 0x21 --applet "/home/tani/jn/Linux_for_Tegra/bootloader/nvtboot_recovery.bin" --skipuid --cmd "dump eeprom boardinfo cvm.bin"
Welcome to Tegra Flash
version 1.0.0
Type ? or help for help and q or quit to exit
Use ! to execute system commands

[   0.0034 ] Generating RCM messages
[   0.0053 ] tegrarcm --listrcm rcm_list.xml --chip 0x21 0 --download rcm /home/tani/jn/Linux_for_Tegra/bootloader/nvtboot_recovery.bin 0 0
[   0.0057 ] RCM 0 is saved as rcm_0.rcm
[   0.0069 ] RCM 1 is saved as rcm_1.rcm
[   0.0069 ] List of rcm files are saved in rcm_list.xml
[   0.0069 ]
[   0.0069 ] Signing RCM messages
[   0.0086 ] tegrasign --key None --list rcm_list.xml --pubkeyhash pub_key.key
[   0.0090 ] Assuming zero filled SBK key
[   0.0162 ]
[   0.0162 ] Copying signature to RCM mesages
[   0.0178 ] tegrarcm --chip 0x21 0 --updatesig rcm_list_signed.xml
[   0.0190 ]
[   0.0190 ] Boot Rom communication
[   0.0207 ] tegrarcm --chip 0x21 0 --rcm rcm_list_signed.xml --skipuid
[   0.0210 ] RCM version 0X210001
[   0.0626 ] Boot Rom communication completed
[   1.0711 ]
[   1.0712 ] dump EEPROM info
[   1.0745 ] tegrarcm --oem platformdetails eeprom /home/tani/jn/Linux_for_Tegra/bootloader/cvm.bin
[   1.0758 ] Applet version 00.01.0000
[   1.0795 ] Saved platform info in /home/tani/jn/Linux_for_Tegra/bootloader/cvm.bin
[   1.1654 ]
[   1.1684 ] tegrarcm --reboot recovery
[   1.1698 ] Applet version 00.01.0000
[   1.1742 ]
Board ID(3448) version(402)
copying bctfile(/home/tani/jn/Linux_for_Tegra/bootloader/t210ref/BCT/P3448_A00_lpddr4_204Mhz_P987.cfg)... done.
copying bootloader(/home/tani/jn/Linux_for_Tegra/bootloader/t210ref/cboot.bin)... done.
copying initrd(/home/tani/jn/Linux_for_Tegra/bootloader/l4t_initrd.img)... done.
Making Boot image... done.
Existing sosfile(/home/tani/jn/Linux_for_Tegra/bootloader/nvtboot_recovery.bin) reused.
copying tegraboot(/home/tani/jn/Linux_for_Tegra/bootloader/t210ref/nvtboot.bin)... done.
copying cpu_bootloader(/home/tani/jn/Linux_for_Tegra/bootloader/t210ref/cboot.bin)... done.
copying bpffile(/home/tani/jn/Linux_for_Tegra/bootloader/t210ref/sc7entry-firmware.bin)... done.
copying wb0boot(/home/tani/jn/Linux_for_Tegra/bootloader/t210ref/warmboot.bin)... done.
Existing tosfile(/home/tani/jn/Linux_for_Tegra/bootloader/tos-mon-only.img) reused.
Existing eksfile(/home/tani/jn/Linux_for_Tegra/bootloader/eks.img) reused.
./flash.sh: line 2663: [: : integer expression expected
copying dtbfile(/home/tani/jn/Linux_for_Tegra/kernel/dtb/tegra210-p3448-0002-p3449-0000-b00.dtb)... done.
Copying nv_boot_control.conf to rootfs
generating system.img for booting...
Making system.img...
	populating rootfs from /tmp/tmp.g5o6AwlRHm ... 	populating /boot/extlinux/extlinux.conf ... done.
	Sync'ing system.img ... done.
	Converting RAW image to Sparse image... done.
system.img built successfully.
Existing tbcfile(/home/tani/jn/Linux_for_Tegra/bootloader/nvtboot_cpu.bin) reused.
copying tbcdtbfile(/home/tani/jn/Linux_for_Tegra/kernel/dtb/tegra210-p3448-0002-p3449-0000-b00.dtb)... done.
copying cfgfile(/home/tani/jn/Linux_for_Tegra/bootloader/t210ref/cfg/flash_l4t_t210_emmc_p3448.xml) to flash.xml... done.
copying flasher(/home/tani/jn/Linux_for_Tegra/bootloader/t210ref/cboot.bin)... done.
Existing flashapp(/home/tani/jn/Linux_for_Tegra/bootloader/tegraflash.py) reused.
./tegraflash.py --bl cboot.bin --bct  P3448_A00_lpddr4_204Mhz_P987.cfg --odmdata 0xa4000 --bldtb kernel_tegra210-p3448-0002-p3449-0000-b00.dtb --applet nvtboot_recovery.bin  --cmd "flash; reboot"  --cfg flash.xml --chip 0x21    --bins "EBT cboot.bin; DTB tegra210-p3448-0002-p3449-0000-b00.dtb"
saving flash command in /home/tani/jn/Linux_for_Tegra/bootloader/flashcmd.txt
saving Windows flash command to /home/tani/jn/Linux_for_Tegra/bootloader/flash_win.bat
assign_value: crc-flash.xml.bin 1 131056 1
printf '\x1' | dd of=crc-flash.xml.bin bs=1 seek=131056 count=1 conv=notrunc
1+0 records in
1+0 records out
1 byte copied, 5.6995e-05 s, 17.5 kB/s
assign_value: crc-flash.xml.bin 0 131057 1
printf '\x0' | dd of=crc-flash.xml.bin bs=1 seek=131057 count=1 conv=notrunc
1+0 records in
1+0 records out
1 byte copied, 3.266e-05 s, 30.6 kB/s
assign_string: crc-flash.xml.bin PTHD 131064 4
echo PTHD | dd of=crc-flash.xml.bin bs=1 seek=131064 count=4 conv=notrunc
4+0 records in
4+0 records out
4 bytes copied, 3.7921e-05 s, 105 kB/s
*** Flashing target device started. ***
Welcome to Tegra Flash
version 1.0.0
Type ? or help for help and q or quit to exit
Use ! to execute system commands

[   0.0019 ] tegrasign --getmode mode.txt --key None
[   0.0022 ] Assuming zero filled SBK key
[   0.0026 ]
[   0.0027 ] Generating RCM messages
[   0.0042 ] tegrarcm --listrcm rcm_list.xml --chip 0x21 0 --download rcm nvtboot_recovery.bin 0 0
[   0.0045 ] RCM 0 is saved as rcm_0.rcm
[   0.0051 ] RCM 1 is saved as rcm_1.rcm
[   0.0053 ] List of rcm files are saved in rcm_list.xml
[   0.0053 ]
[   0.0053 ] Signing RCM messages
[   0.0069 ] tegrasign --key None --list rcm_list.xml --pubkeyhash pub_key.key
[   0.0072 ] Assuming zero filled SBK key
[   0.0118 ]
[   0.0119 ] Copying signature to RCM mesages
[   0.0135 ] tegrarcm --chip 0x21 0 --updatesig rcm_list_signed.xml
[   0.0145 ]
[   0.0145 ] Parsing partition layout
[   0.0159 ] tegraparser --pt flash.xml.tmp
[   0.0166 ]
[   0.0167 ] Using default ramcode: 0
[   0.0168 ] Disable BPMP dtb trim, using default dtb
[   0.0168 ]
[   0.0168 ] Creating list of images to be signed
[   0.0187 ] tegrahost --chip 0x21 0 --partitionlayout flash.xml.bin --list images_list.xml
[   0.0276 ]
[   0.0276 ] Generating signatures
[   0.0292 ] tegrasign --key None --list images_list.xml --pubkeyhash pub_key.key
[   0.0295 ] Assuming zero filled SBK key
[   0.1184 ]
[   0.1184 ] Generating br-bct
[   0.1228 ] tegrabct --bct P3448_A00_lpddr4_204Mhz_P987.cfg --chip 0x21 0
[   0.1306 ]
[   0.1306 ] Updating boot device parameters
[   0.1323 ] tegrabct --bct P3448_A00_lpddr4_204Mhz_P987.bct --chip 0x21 0 --updatedevparam flash.xml.bin
[   0.1326 ] Warning: No sdram params
[   0.1328 ]
[   0.1328 ] Updating bl info
[   0.1344 ] tegrabct --bct P3448_A00_lpddr4_204Mhz_P987.bct --chip 0x21 0 --updateblinfo flash.xml.bin --updatesig images_list_signed.xml
[   0.1358 ]
[   0.1358 ] Updating secondary storage information into bct
[   0.1378 ] tegraparser --pt flash.xml.bin --chip 0x21 0 --updatecustinfo P3448_A00_lpddr4_204Mhz_P987.bct
[   0.1385 ]
[   0.1385 ] Updating Odmdata
[   0.1406 ] tegrabct --bct P3448_A00_lpddr4_204Mhz_P987.bct --chip 0x21 0 --updatefields Odmdata =0xa4000
[   0.1410 ] Warning: No sdram params
[   0.1412 ]
[   0.1412 ] Get Signed section of bct
[   0.1427 ] tegrabct --bct P3448_A00_lpddr4_204Mhz_P987.bct --chip 0x21 0 --listbct bct_list.xml
[   0.1441 ]
[   0.1441 ] Signing BCT
[   0.1485 ] tegrasign --key None --list bct_list.xml --pubkeyhash pub_key.key
[   0.1494 ] Assuming zero filled SBK key
[   0.1510 ]
[   0.1510 ] Updating BCT with signature
[   0.1532 ] tegrabct --bct P3448_A00_lpddr4_204Mhz_P987.bct --chip 0x21 0 --updatesig bct_list_signed.xml
[   0.1549 ]
[   0.1549 ] Copying signatures
[   0.1571 ] tegrahost --chip 0x21 0 --partitionlayout flash.xml.bin --updatesig images_list_signed.xml
[   0.1741 ]
[   0.1742 ] Updating BFS information on BCT
[   0.1763 ] tegrabct --bct P3448_A00_lpddr4_204Mhz_P987.bct --chip 0x21 0 --updatebfsinfo flash.xml.bin
[   0.1771 ]    BFS:
[   0.1806 ]      0: [PT ] crc-flash.xml.bin (size=131072/131072)
[   0.1813 ]      1: [TBC] nvtboot_cpu.bin.encrypt (size=80816/196608)
[   0.1818 ]      2: [RP1] kernel_tegra210-p3448-0002-p3449-0000-b00.dtb.encrypt (size=261712/1048576)
[   0.1825 ]      3: [EBT] cboot.bin.encrypt (size=485952/655360)
[   0.1829 ]      4: [WB0] warmboot.bin.encrypt (size=3952/131072)
[   0.1832 ]      5: [BPF] sc7entry-firmware.bin.encrypt (size=3376/262144)
[   0.1836 ] BFS0: 131072 @ 2560 SUM e53bd17c over 2883584 bytes
[   0.1840 ]    BFS:
[   0.1861 ]      0: [PT-1] crc-flash.xml.bin (size=131072/131072)
[   0.1865 ]      1: [TBC-1] nvtboot_cpu.bin.encrypt (size=80816/196608)
[   0.1869 ]      2: [RP1-1] kernel_tegra210-p3448-0002-p3449-0000-b00.dtb.encrypt (size=261712/1048576)
[   0.1875 ]      3: [EBT-1] cboot.bin.encrypt (size=485952/655360)
[   0.1878 ]      4: [WB0-1] warmboot.bin.encrypt (size=3952/131072)
[   0.1881 ]      5: [BPF-1] sc7entry-firmware.bin.encrypt (size=3376/262144)
[   0.1885 ]      8: [VER_b] emmc_bootblob_ver.txt (size=102/32768)
[   0.1892 ]      9: [VER] emmc_bootblob_ver.txt (size=102/32768)
[   0.1898 ] BFS1: 131072 @ 8704 SUM e53bd17c over 2981888 bytes
[   0.1904 ]    KFS:
[   0.2272 ]      0: [DTB] kernel_tegra210-p3448-0002-p3449-0000-b00.dtb.encrypt (size=261712/1048576)
[   0.2277 ]      1: [TOS] tos-mon-only.img.encrypt (size=54208/6291456)
[   0.2282 ]      2: [EKS] eks.img (size=1028/81920)
[   0.2285 ]      3: [LNX] boot.img.encrypt (size=667648/67092480)
[   0.2289 ] KFS0: 1048576 @ 29376546 SUM 5040b3ff over 8089600 bytes
[   0.2330 ]    KFS:
[   0.2668 ]      0: [DTB-1] kernel_tegra210-p3448-0002-p3449-0000-b00.dtb.encrypt (size=261712/1048576)
[   0.2675 ]      1: [TOS-1] tos-mon-only.img.encrypt (size=54208/6291456)
[   0.2679 ]      2: [EKS-1] eks.img (size=1028/81920)
[   0.2681 ]      3: [LNX-1] boot.img.encrypt (size=667648/67092480)
[   0.2686 ] KFS1: 1048576 @ 29522082 SUM 5040b3ff over 8089600 bytes
[   0.2733 ]
[   0.2733 ] Boot Rom communication
[   0.2752 ] tegrarcm --chip 0x21 0 --rcm rcm_list_signed.xml
[   0.2755 ] BR_CID: 0x32101001644086c9180000000efd8500
[   0.3743 ] RCM version 0X210001
[   0.3750 ] Boot Rom communication completed
[   1.3830 ]
[   1.3831 ] Sending BCTs
[   1.3859 ] tegrarcm --download bct P3448_A00_lpddr4_204Mhz_P987.bct
[   1.3872 ] Applet version 00.01.0000
[   1.3911 ] Sending bct
[   1.3915 ] [................................................] 100%
[   1.6159 ]
[   1.6193 ] tegrahost --chip 0x21 --align cboot.bin
[   1.6211 ]
[   1.6237 ] tegrahost --magicid EBT --appendsigheader cboot.bin cboot.bin_blheader
[   1.6298 ]
[   1.6317 ] tegrasign --key None --list cboot.bin_list.xml
[   1.6322 ] Assuming zero filled SBK key
[   1.6482 ]
[   1.6502 ] tegrahost --updatesigheader cboot.bin_blheader.encrypt cboot.bin_blheader.hash zerosbk
[   1.6517 ]
[   1.6539 ] tegrahost --chip 0x21 --align tegra210-p3448-0002-p3449-0000-b00.dtb
[   1.6547 ]
[   1.6565 ] tegrahost --magicid DTB --appendsigheader tegra210-p3448-0002-p3449-0000-b00.dtb tegra210-p3448-0002-p3449-0000-b00.dtb_blheader
[   1.6582 ]
[   1.6601 ] tegrasign --key None --list tegra210-p3448-0002-p3449-0000-b00.dtb_list.xml
[   1.6605 ] Assuming zero filled SBK key
[   1.6684 ]
[   1.6703 ] tegrahost --updatesigheader tegra210-p3448-0002-p3449-0000-b00.dtb_blheader.encrypt tegra210-p3448-0002-p3449-0000-b00.dtb_blheader.hash zerosbk
[   1.6714 ]
[   1.6717 ] Sending bootloader and pre-requisite binaries
[   1.6735 ] tegrarcm --download ebt cboot.bin.encrypt 0 0 --download rp1 tegra210-p3448-0002-p3449-0000-b00.dtb.encrypt 0
[   1.6739 ] Applet version 00.01.0000
[   1.6760 ] Sending ebt
[   1.6764 ] [................................................] 100%
[   1.7854 ] Sending rp1
[   1.7897 ] [................................................] 100%
[   1.8517 ]
[   1.8547 ] tegrarcm --boot recovery
[   1.8560 ] Applet version 00.01.0000
[   1.8604 ]
[   1.8605 ] Retrieving storage infomation
[   1.8631 ] tegrarcm --oem platformdetails storage storage_info.bin
[   1.8645 ] Applet is not running on device. Continue with Bootloader
[   2.4968 ]
[   2.5061 ] tegradevflash --oem platformdetails storage storage_info.bin
[   2.5068 ] Cboot version 00.01.0000
[   2.5111 ] Saved platform info in storage_info.bin
[   2.5125 ]
[   2.5125 ] Flashing the device
[   2.5146 ] tegradevflash --pt flash.xml.bin --storageinfo storage_info.bin --create
[   2.5155 ] Cboot version 00.01.0000
[   2.5180 ] Writing partition GPT with gpt.bin
[   2.5189 ] [................................................] 100%
[   2.5262 ] Writing partition PT with crc-flash.xml.bin
[   3.2718 ] [................................................] 100%
[   3.2817 ] Writing partition PT-1 with crc-flash.xml.bin
[   3.2933 ] [................................................] 100%
[   3.3166 ] Writing partition NVC with nvtboot.bin.encrypt
[   3.3577 ] [................................................] 100%
[   3.3762 ] Writing partition TBC with nvtboot_cpu.bin.encrypt
[   3.4072 ] [................................................] 100%
[   3.4269 ] Writing partition RP1 with kernel_tegra210-p3448-0002-p3449-0000-b00.dtb.encrypt
[   3.4756 ] [................................................] 100%
[   3.5014 ] Writing partition EBT with cboot.bin.encrypt
[   3.5527 ] [................................................] 100%
[   3.5897 ] Writing partition WB0 with warmboot.bin.encrypt
[   3.6432 ] [................................................] 100%
[   3.6600 ] Writing partition BPF with sc7entry-firmware.bin.encrypt
[   3.7081 ] [................................................] 100%
[   3.7247 ] Writing partition NVC-1 with nvtboot.bin.encrypt
[   3.7728 ] [................................................] 100%
[   3.7970 ] Writing partition TBC-1 with nvtboot_cpu.bin.encrypt
[   3.8589 ] [................................................] 100%
[   3.8789 ] Writing partition RP1-1 with kernel_tegra210-p3448-0002-p3449-0000-b00.dtb.encrypt
[   3.9402 ] [................................................] 100%
[   3.9681 ] Writing partition EBT-1 with cboot.bin.encrypt
[   4.0314 ] [................................................] 100%
[   4.0694 ] Writing partition WB0-1 with warmboot.bin.encrypt
[   4.1366 ] [................................................] 100%
[   4.1548 ] Writing partition BPF-1 with sc7entry-firmware.bin.encrypt
[   4.2165 ] [................................................] 100%
[   4.2344 ] Writing partition VER_b with emmc_bootblob_ver.txt
[   4.2951 ] [................................................] 100%
[   4.3135 ] Writing partition VER with emmc_bootblob_ver.txt
[   4.3653 ] [................................................] 100%
[   4.3841 ] Writing partition APP with system.img
[   4.4349 ] [................................................] 100%
[   7.3784 ] Writing partition DTB with kernel_tegra210-p3448-0002-p3449-0000-b00.dtb.encrypt
[   8.9185 ] [................................................] 100%
[   8.9381 ] Writing partition TOS with tos-mon-only.img.encrypt
[   8.9774 ] [................................................] 100%
[   8.9901 ] Warning: EKS partition magic header mismatch!
[   9.0258 ] Writing partition EKS with eks.img
[   9.0270 ] [................................................] 100%
[   9.0368 ] Writing partition LNX with boot.img.encrypt
[   9.0729 ] [................................................] 100%
[   9.1121 ] Writing partition DTB-1 with kernel_tegra210-p3448-0002-p3449-0000-b00.dtb.encrypt
[   9.1572 ] [................................................] 100%
[   9.1780 ] Writing partition TOS-1 with tos-mon-only.img.encrypt
[   9.2170 ] [................................................] 100%
[   9.2303 ] Writing partition EKS-1 with eks.img
[   9.2679 ] [................................................] 100%
[   9.2801 ] Writing partition LNX-1 with boot.img.encrypt
[   9.3170 ] [................................................] 100%
[   9.3577 ] Writing partition BMP with bmp.blob
[   9.4061 ] [................................................] 100%
[   9.4325 ] Writing partition RP4 with rp4.blob
[   9.4703 ] [................................................] 100%
[   9.5249 ]
[   9.5282 ] tegradevflash --write BCT P3448_A00_lpddr4_204Mhz_P987.bct
[   9.5296 ] Cboot version 00.01.0000
[   9.6306 ] Writing partition BCT with P3448_A00_lpddr4_204Mhz_P987.bct
[   9.6330 ] [................................................] 100%
[  10.0292 ]
[  10.0293 ] Flashing completed

[  10.0294 ] Coldbooting the device
[  10.0324 ] tegradevflash --reboot coldboot
[  10.0339 ] Cboot version 00.01.0000
[  10.0377 ]
*** The target t210ref has been flashed successfully. ***
Make the target filesystem available to the device and reset the board to boot from external sda1.