Calibration - Camera
Contents
Calibration - Camera#
This section describes the intrinsic and extrinsic calibration procedures. You will need to complete both the Camera and Wheels calibration processes before running any Duckietown demos.
What you will need
You can see the camera image on the laptop.
What you will get
Your camera intrinsics and extrinsics are calibrated and stored on the Duckiebot. You will be able to access these calibrations via the dashboard.
0) Required Materials#
Calibration board#

Fig. 49 Calibration checkerboard#
If you do not have one already:
Download the Calibration checkerboard pdf
Print it with A3 Format
Fix the checkerboard to a rigid planar surface that you can move around
Note
The squares must have side equal to 0.031 m = 3.1 cm. Please measure this, as having the wrong size will make your Duckiebot crash.
In case your squares are not of the right size, make sure your printer settings are on A3 format, no automatic scaling, 100% size.
Warning
If the pattern is not rigid the calibration will be useless. You can print on thick paper or adhere to something rigid to achieve this.
Optional material#
This is not necessary, but you could also use a “lane” during the extrinsic calibration procedure.
1) Intrinsic Calibration#
Every camera is a little bit different, so we need to do a camera calibration procedure to account for the small manufacturing discrepancies. This process will involve displaying a predetermined pattern to the camera, and using it to solve for the camera parameters. For more information, see our theory slides. And the procedure is basically a wrapper around the ROS camera calibration tool.
Launch the intrinsic calibration application#
You can launch the intrinsic calibration program with:
dts duckiebot calibrate_intrinsics [your_duckiebot_hostname]
You should see an application launching, similar to the following figure, on the laptop.

Fig. 50 Intrinsic camera calibration tool#
Troubleshooting
SYMPTOM
Only a black window starts up
RESOLUTION
Try resizing the window manually once using cursor, and you should see the window content correctly.
Do the calibration dance#
Position the checkerboard in front of the camera until you see colored lines overlaying the checkerboard. You will only see the colored lines if the entire checkerboard is within the field of view of the camera.
Make sure to focus the image by rotating the mechanical focus ring on the lens of the camera until you can clearly read the x and y labels.
Warning
Do not adjust the focus again after this process, as it will invalidate the calibration.
You should also see colored bars in the sidebar of the display window. These bars indicate the current range of the checkerboard in the camera’s field of view:
X bar: the observed horizontal range (left - right)
Y bar: the observed vertical range (top - bottom)
Size bar: the observed range in the checkerboard size (forward - backward from the camera direction)
Skew bar: the relative tilt between the checkerboard and the camera direction
Now move the checkerboard right/left, up/down, and tilt the checkerboard through various angles of relative to the image plane. After each movement, make sure to pause long enough for the checkerboard to become highlighted.
The indicator bars will fill as you collect enough data along each axis.
Once you have collected enough data, all four indicator bars will turn green. Then press the “CALIBRATE” button in the sidebar.
Tip
If you are having a difficult time getting the indicator bars to turn green, try slowly increasing the extremes at which you present the checkerboard to the camera, focusing on one indicator bar at a time. (Move further left/right along the x axis only, then the y axis, etc.)
Calibration may take a few moments. Note that the screen may dim. Don’t worry, the calibration is working.
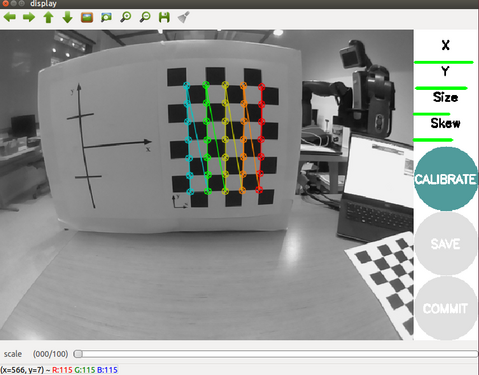
Fig. 51 Calibration step#
Save the calibration results#
If you are satisfied with the calibration, you can save the results by pressing the “COMMIT” button in the side bar. (You never need to click the “SAVE” button.)

Fig. 52 Committing the calibration#
This will automatically save the calibration results on your Duckiebot:
/data/config/calibrations/camera_intrinsic/[your_duckiebot_hostname].yaml
You can view or download the calibration file using the Dashboard running at http://[your_duckiebot_hostname].local under File Manager in the sidebar on the left, navigating to config/calibrations/camera_intrinsic/.
Confirm the calibration#
Use the Dashboard to confirm that both calibration the intrinsic file has been saved.
Keeping your calibration valid#
Warning
Do not change the focus during or after the calibration, otherwise your calibration is no longer valid.
Do not use the lens cover anymore; removing the lens cover may change the focus.
2) Extrinsic Camera Calibration#
Setup#
Arrange the Duckiebot and checkerboard according to Fig. 53. Note that the axis of the wheels should be aligned with the y-axis.
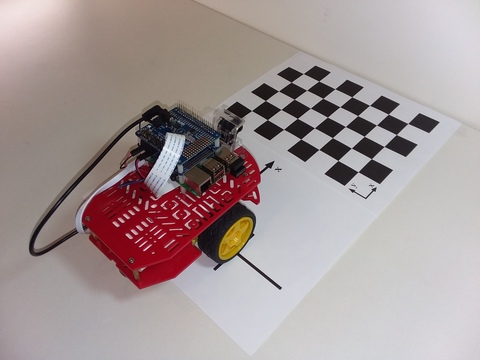
Fig. 53 Extrinsic calibration setup#
Fig. 54 shows a view of the calibration checkerboard from the Duckiebot. To ensure proper calibration there should be no clutter in the background.
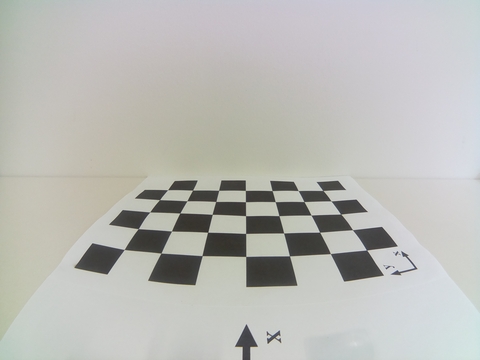
Fig. 54 Extrinsic calibration view#
Launch the extrinsic calibration pipeline#
Run:
dts duckiebot calibrate_extrinsics [your_duckiebot_hostname]
You will see the calibration window pop up:
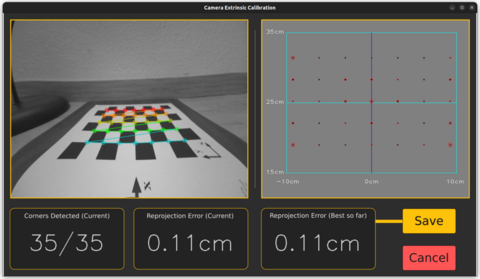
Fig. 55 Extrinsic calibration GUI#
Press Save to automatically save the calibration results on your Duckiebot. You can find it at the path:
/data/config/calibrations/camera_extrinsic/[your_duckiebot_hostname].yaml
Similarly to the intrinsic calibration, you can also view or download the calibration file through the Dashboard.
Once the calibration has been saved a validation window will open. Here you should be able to see the checkerboard from a top-down view obtained using the computed homography matrix.
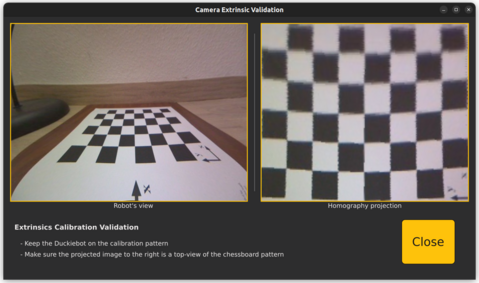
Fig. 56 Extrinsic calibration validation GUI#
Attention
If you do not see a saved extrinsic calibration file, your Duckiebot was not able detect the checkerboard and generate a valid calibration.
This could be due to
lack of evenly bright overhead lighting
A patterned background in the environment
A textured background wall or the shadowson the background wall
Try changing the calibration environment to match Fig. 54 before running the calibrate_extrinsics command again.
Confirm the calibration#
Use the Dashboard to confirm that both calibration the intrinsic and extrinsic files have been saved.
Troubleshooting#
Troubleshooting
SYMPTOM
You see a long complicated error message that ends with something about findChessBoardCorners failed.
RESOLUTION
Your camera is not viewing the full checkerboard pattern. Most likely part of the chess board pattern is occluded. Possibly you didn’t assemble your Duckiebot correctly or you did not put it on the calibration pattern properly.