Docker Basics
Contents
Docker Basics#
What is Docker?#
Docker is used to perform operating-system-level virtualization, something often referred to as “containerization”. While Docker is not the only software that does this, it is by far the most popular one.
Containerization is a process that allows partitioning the hardware and the kernel of an operating systems in such a way that different containers can co-exist on the same system independently from one-another. Programs running in such a container have access only to the resources they are allow to and are completely independent of libraries and configurations of the other containers and the host machine. Because of this feature Docker containers are extremely portable.
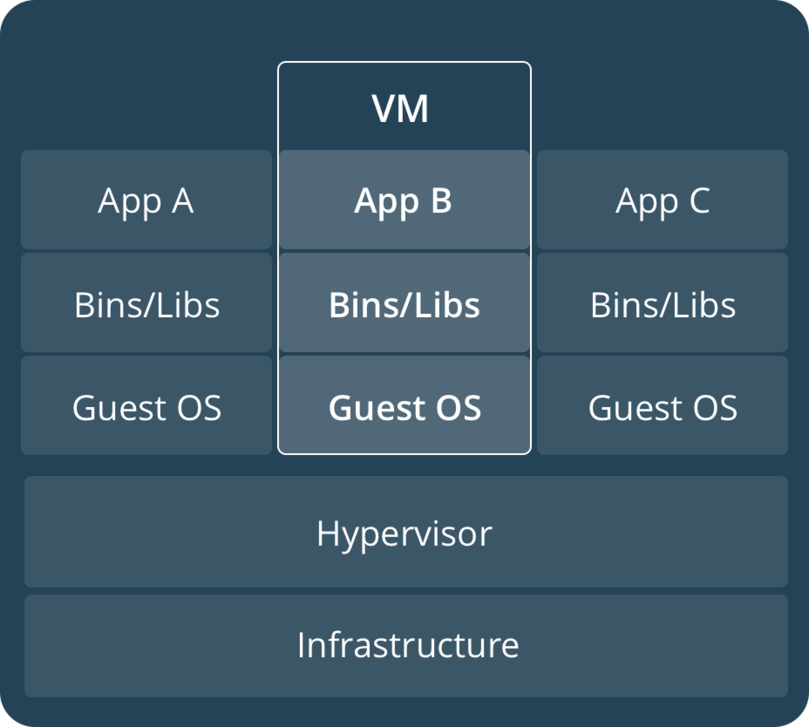
Containers are often compared to virtual machines (VMs). The main difference is that VMs require a host operating system (OS) with a hypervisor and a number of guest OS, each with their own libraries and application code. This can result in a significant overhead. Imagine running a simple Ubuntu server in a VM on Ubuntu: you will have most of the kernel libraries and binaries twice and a lot of the processes will be duplicated on the host and on the guest. Containerization, on the other hand, leverages the existing kernel and OS and adds only the additional binaries, libraries and code necessary to run a given application. See the illustration bellow.
Using containers |
Using VMs |
|---|---|
|
|
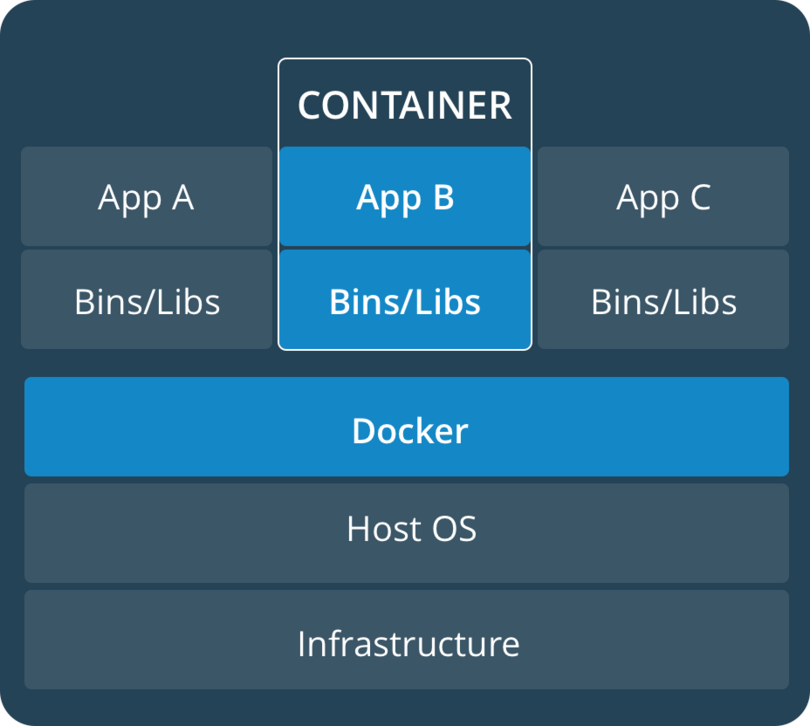
Because containers don’t need a separate OS to run they are much more lightweight than VMs. This makes them perfect to use in cases where one needs to deploy a lot of independent services on the same hardware or to deploy on not-especially powerful platforms, such as Raspberry Pi - the platform Duckiebots use.
Containers allow for reuse of resources and code, but are also very easy to work with in the context of version control. If one uses a VM, they would need to get into the VM and update all the code they are using there. With a Docker container, the same process is as easy as pulling the container image again.
How does Docker work?#
You can think that Docker containers are build from Docker images which in turn are build up of Docker layers. So what are these?
Docker images are build-time constructs while Docker containers are run-time constructs. That means that a Docker image is static, like a .zip or .iso file. A container is like a running VM instance: it starts from a static image but as you use it, files and configurations might change.
Docker images are build up from layers. The initial layer is the base layer, typically an official stripped-down version of an OS. For example, a lot of the Docker images we run on the Duckiebots have rpi-ros-kinetic-base as a base.
Each layer on top of the base layer constitutes a change to the layers below. The Docker internal mechanisms translate this sequence of changes to a file system that the container can then use. If one makes a small change to a file, then typically only a single layer will be changed and when Docker attempts to pull the new version, it will need to download and store only the changed layer, saving space, time and bandwidth.
In the Docker world images get organized by their repository name, image name and tags. As with Git and GitHub, Docker images are stored in image registers. The most popular Docker register is called DockerHub and it is what we use in Duckietown.
An image stored on DockerHub has a name of the form:
duckietown/![IMAGE_NAME]:![VERSION-NAME]-![ARCH-NAME]
All Duckietown-related images are in the duckietown repository. The images themselves can be very different for various applications.
Sometimes a certain image might need to have several different versions. These can be designated with tags. For example, the daffy tag means that this is the image to be used with the daffy version of Duckietown.
It is not necessary to specify a tag. If you don’t, Docker assumes you are interested in the image with latest tag, should such an image exist.
Working with images#
If you want to get a new image from a Docker register (e.g. DockerHub) on your local machine then you have to pull it. For example, you can get an Ubuntu 18.04 image by running the following command:
docker pull library/ubuntu:18.04
You will now be able to see the new image you pulled if you run:
docker image list
If you don’t need it, or if you’re running down on storage space, you can remove an image by simply running:
docker image rm ubuntu:18.04
You can also remove images by their IMAGE ID as printed by the list command.
Sometimes you might have a lot of images you are not using. You can easily remove them all with:
docker image prune
However, be careful not to delete something you might actually need. Keep in mind that you can’t remove images that a container is using. To do that, you will have to stop the container, remove it, and then you can remove the related images.
If you want to look into the heart and soul of your images, you can use the commands docker image history and docker image inspect to get a detailed view.
Working with containers#
Containers are the run-time equivalent of images. When you want to start a container, Docker picks up the image you specify, creates a file system from its layers, attaches all devices and directories you want, “boots” it up, sets up the environment up and starts a pre-determined process in this container. All that magic happens with you running a single command: docker run. You don’t even need to have pulled the image beforehand, if Docker can’t find it locally, it will look for it on DockerHub.
Here’s a simple example:
docker run ubuntu
This will take the ubuntu image with latest tag and will start a container from it.
The above won’t do much. In fact, the container will immediately exit as it has nothing to execute. When the main process of a container exits, the container exits as well. By default this ubuntu image runs bash and as you don’t pass any commands to it, it exits immediately. This is no fun, though.
Let’s try to keep this container alive for some time by using the -it switch. This tells Docker
to create an interactive session.
docker run -it ubuntu
Now you should see something like:
root@73335ebd3355:/#
Keep in mind that the part after @ will be different—that is your container ID.
In this manual, we will use the following icon to show that the command should be run in the container:
command to be run in the container
You are now in your new ubuntu container! Try to play around, you can try to use some basic bash commands like ls, cd, cat to make sure that you are not in your host machine.
Note: If you are sure about the difference between the host and the container, you might want to see what happens when you do rm -rf / IN THE CONTAINER.
You will destroy the OS inside the container—but you can just exit and start another one. If instead you have confused host and container, at this
point you probably need to re-install from scratch.
You can check which containers you are running using the docker ps command — analogous to the ps command. Open a new terminal window (don’t close the other one yet) and type:
docker ps
An alternative syntax is
docker container list
These commands list all running containers.
Now you can go back to your ubuntu container and type exit. This will bring you back to you host shell and will stop the container. If you again run the docker ps command you will see nothing running. So does this mean that this container and all changes you might have made in it are gone? Not at all, docker ps and docker container list only list the currently running containers.
You can see all containers, including the stopped ones with:
docker container list -a
Here -a stands for all. You will see you have two ubuntu containers here. There are two containers because every time you use docker run, a new container is created. Note that their names seem strangely random. We could have added custom, more descriptive names—more on this later.
We don’t really need these containers, so let’s get rid of them:
docker container rm ![container name 1] ![container name 2]
You need to put your container names after rm. Using the containr IDs instead is also possible. Note that if the container you are trying to remove is still running you will have to first stop it.
You might need to do some other operations with containers. For example, sometimes you want to start or stop an existing container. You can simply do that with:
docker container start ![container name]
docker container stop ![container name]
docker container restart ![container name]
Imagine you are running a container in the background. The main process is running but you have no shell attached. How can you interact with the container? You can open a terminal in the container with:
docker attach ![container name]
Running images#
There are many command line arguments that can be passed to the docker run command.
Table of Docker Command Flags shows a summary of the options we use most often in Duckietown. Below, we give some examples
Short Command |
Full Command |
Explanation |
|---|---|---|
-i |
–interactive |
Keep STDIN open even if not attached, typically used together with |
-t |
–tty |
Allocate a pseudo-TTY, gives you terminal access to the container, typically used together with |
-d |
–detach |
Run container in background and print container ID. |
–name |
Sets a name for the container. If you don’t specify one, a random name will be generated. |
|
-v |
–volume |
Bind mount a volume, exposes a folder on your host as a folder in your container. Be very careful when using this. |
-p |
–publish |
Publish a container’s port(s) to the host, necessary when you need a port to communicate with a program in your container. |
-d |
–device |
Similar to |
–priviledged |
Give extended privileges to this container. That includes access to all devices. Be extremely careful when using this. |
|
–rm |
Automatically remove the container when it exits. |
|
-H |
–hostname |
Specifies remote host name, for example when you want to execute the command on your Duckiebot, not on your computer. |
–help |
Prints information about these and other options. |
Note
Most of this is hidden from the Duckietown user when running commands because it is contained within the Duckietown Shell commands.
Examples#
Set the container name to joystick:
--name joystick
Mount the host’s path /home/myuser/data to /data inside the container:
-v /home/myuser/data:/data
Publish port 8080 in the container as 8082 on the host:
-p 8082:8080
Allow the container to use the device /dev/mmcblk0:
-d /dev/mmcblk0
Run a container on the Duckiebot:
-H duckiebot.local
Other useful commands#
Pruning images#
Sometimes your docker system will be clogged with images, containers and what not. You can use docker system prune to clean it up.
docker system prune
Keep in mind that this command will delete all containers that are not currently running and all images not used by running containers. So be extremely careful when using it.
Portainer#
Often, for simple operations and basic commands, one can use Portainer.
Portainer is itself a Docker container that allows you to control the Docker daemon through your web browser. You can install it by running:
docker volume create portainer_data
docker run -d -p 9000:9000 --name portainer --restart always -v /var/run/docker.sock:/var/run/docker.sock -v portainer_data:/data portainer/portainer
Note that Portainer comes pre-installed on your Duckiebot, so you don’t need to run the above command to access the images and containers on your robot. You still might want to set it up for your laptop.
Further resources#
There is much more that you can learn to do with Docker.
Here are some resources you can look up:
Duckietown Introduction to Docker for Robotics and Machine Learning;
Docker Deep Dive, by Nigel Poulton.
Docker Troubleshooting#
Troubleshooting
SYMPTOM
I got a permission denied error while trying to connect to the Docker daemon socket
RESOLUTION
If this is on your laptop, that means when you set up your environment you did not grant your user account right to do certain things. You can fix this by running:
sudo adduser ``whoami`` docker
Log out and in again - it should now be fixed.
Troubleshooting
SYMPTOM
The container I am trying to run does not start - docker: Error response from daemon: Conflict. The container name "/![container_name]" is already in use by container "![container_hash]". You have to remove (or rename) that container to be able to reuse that name.
RESOLUTION
Stop the container (docker stop ![container_name]) if running and then remove (docker rm ![container_name]) the container with the
Troubleshooting
SYMPTOM
Docker exits with the message tls: oversized record received
RESOLUTION
If Docker exits with the above error when running remote commands, the most likely reason is different versions of Docker on your computer and Duckiebot. You can check that by running docker version on both devices. If that is indeed the case, you need to upgrade the Docker binaries on your computer. To do that, follow the official instructions here.
Troubleshooting
SYMPTOM
I can’t run a container because I get exec user process caused "exec format error"
RESOLUTION
Despite not being very descriptive, an error like this typically means that there is a mismatch between the container’s processor architecture and the one on your computer. Different processor architectures have different instruction sets and hence binaries compiled for one are generally not executable on another. Raspberry Pis use ARM processors, while most of the laptops use x86 architecture which makes them incompatible. Still, there’s hope. Most of the Duckietown Raspberry Pi containers have a piece of magic inside called Qemu which allows emulation of an ARM processor on a x86 machine. You can activate this emulator if you change the default entrypoint of the container by adding --entrypoint=qemu3-arm-static to options when running it.