Calibration - Wheels
Contents
Calibration - Wheels#
What you will need
You can make your robot move
What you will get
You can calibrate the wheels of the Duckiebot such that it goes in a straight line when commanded so. You can set the maximum speed of the Duckiebot.
Note
In the following documentation on this page, [hostname] refers to the hostname of your duckiebot. For example:
ping [hostname].local
with a Duckiebot named myrobot would be:
ping myrobot.local
Also, replace other fields in a command with [] around with the corresponding values.
Step 1: Make your robot move#
Follow instructions in Operation - Make it Move to make your robot move with keyboard control, and keep the terminal open.
Step 2: See how the robot really moves#
There is a lot going on between pressing ⇧ (up arrow) on the keyboard and your Duckiebot moving. To get a better view of what is going on, we need another terminal, but ran closer to where the action is happening:
dts start_gui_tools [hostname]
Duckietown uses ROS to move data around. To determine if the command above worked, type:
rostopic list
You should see a list of ROS topics currently active on your Duckiebot. If you know ROS, here you can use ROS commands at will. If you are not familiar with ROS, note that each of these topics might carry messages, i.e., actual data. You can, e.g., “listen” to the data inside each topic. For example:
rostopic echo /[hostname]/camera_node/image/compressed
will show you incoming images as the Duckiebot sees them! You won’t be able to read bytes or make sense of pixel values, though. Now, press Ctrl+C to stop reading the camera stream.
Note
Keep this terminal open. We will use it to perform the wheel calibration. All the ros... commands below are executed in such a terminal.
Step 3: Perform the calibration#
Calibrating the trim parameter#
The trim parameter is set to 0.00 by default, under the assumption that both motors and wheels are perfectly identical. You can change the value of the trim parameter by running the command (in the start_gui_tools terminal from the previous step):
rosparam set /[hostname]/kinematics_node/trim [trim_value]
Use some tape to create a straight line on the floor (Fig. 57).
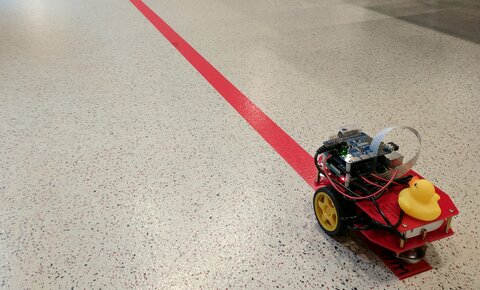
Fig. 57 Straight line useful for wheel calibration#
Place your Duckiebot on one end of the tape. Make sure that the Duckiebot is perfectly centered with respect to the line.
Command your Duckiebot to go straight for about 2 meters. Observe the Duckiebot from the point where it started moving, and annotate on which side of the tape the Duckiebot drifted (Fig. 58).
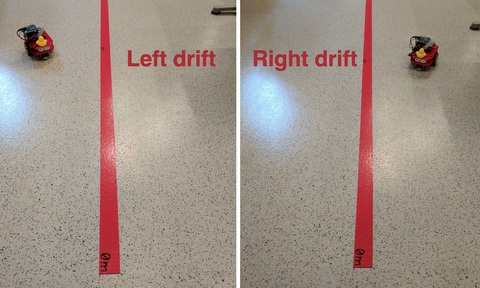
Fig. 58 Left/Right drift#
Measure the distance between the center of the tape and the center of the axle of the Duckiebot after it traveled for about 2 meters (Fig. 59).
Make sure that the ruler is orthogonal to the tape.
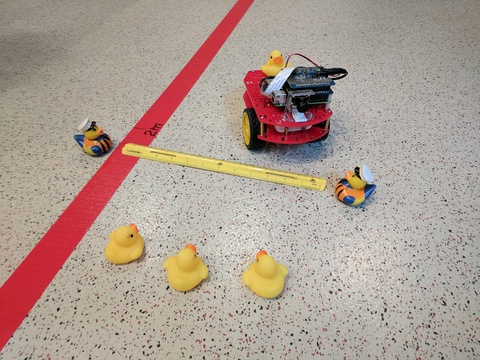
Fig. 59 Measure the amount of drift after 2 meters run#
If the Duckiebot drifted by less than 10 centimeters you can stop calibrating the trim parameter.
A drift of 10 centimeters in a 2 meters run is good enough for Duckietown.
If the Duckiebot drifted by more than 10 centimeters, continue with the next step.
If the Duckiebot drifted to the left side of the tape, decrease the value of r, by running, for example:
rosparam set /[hostname]/kinematics_node/trim -0.1
If the Duckiebot drifted to the right side of the tape, increase the value of r, by running, for example:
rosparam set /[hostname]/kinematics_node/trim 0.1
Repeat this process until the robot drives straight.
Calibrating the gain parameter#
The gain parameter is set to 1.00 by default. You can change its value by
running the command:
rosparam set /[hostname]/kinematics_node/gain [gain_value]
Store the calibration#
When you are all done, save the parameters by running:
rosservice call /[hostname]/kinematics_node/save_calibration
The first time you save the parameters, this command will create the calibration file
Final check to make sure it’s stored#
The calibration result is saved on your Duckiebot:
/data/config/calibrations/kinematics/[hostname].yaml
You can view or download the calibration file using the Dashboard running at http://[hostname].local under File Manager in the sidebar on the left, navigating to config/calibrations/kinematics/.
Additional information#
There are additional parameters you can to play around with to get a better driving experience. You can learn about odometry and odometry calibration here: video, theory, activities and exercises.