First boot
Contents
First boot#
There is only one first time you can connect to your Duckiedrone. Savor the experience.
What you will need
An assembled
DD21A
DD21initialized SD card, see Software initialization
What you will get
A live
DD21
Before getting started#
The first time a newly flashed SD card is inserted in the Duckiedrone a special “first boot” procedure is executed.
Note
The first boot procedure will take roughly 10-15 minutes, during which your Raspberry Pi might look unresponsive. It is crunching as fast as it can, do not worry.
During this process the Duckiedrone will require a stable power source.
Attention
Make sure you have a wall outlet power adapter, e.g., a phone charger (5V, 2-3A) or a fully charged Duckiebattery before starting the process.
Do not power the Raspberry Pi just yet.
Getting started#
Warning
Do not interrupt the first boot procedure, e.g., by removing power to the Raspberry Pi. It will likely corrupt the SD card. A corrupted SD card will have to be flashed again.
Make sure the Raspberry Pi is not powered.
Make sure you have a wall adapter or fully charged battery available.
Networks are typically one of the biggest headaches in robotics. We offer different network configurations to minimize these headaches. If you are not sure which choice to make, the right answer typically is: if you are in a university go for AP mode. If you are at home go for CL mode. In both cases, you need to place the jumper accordingly on your
5&6pins before getting started.If you want to have the drone emit its own Wi-Fi network that your base station can connect to. This is the go-to choice if you do not have a network (WLAN) or admin access to the existing network where you are operating.
Pros:
You can connect to your drone without the need for a pre-existing existing network infrastructure
Cons:
You might not have access to the internet (which is not required, but useful during development), unless your base station has a secondary network adapter (e.g., an Ethernet port) and you bridge the connection.
How to:
short pins
5&6on the breadboard by using the provided jumper.

Fig. 113 Pins
5&6shorted.#
If you want to have the drone connect to an existing local area network. This is the go-to choice if you have an existing network and admin powers to it in the environment where you are operating.
Pros:
both your base station and your drone can talk with each other (and other devices on the network), and to the internet.
Cons:
requires admin access to a pre-existing network in your space.
How to:
do not short pins
5&6on the breadboard by not using the provided jumper.
Tip
Keep the jumper on one pin to avoid misplacing and losing it!
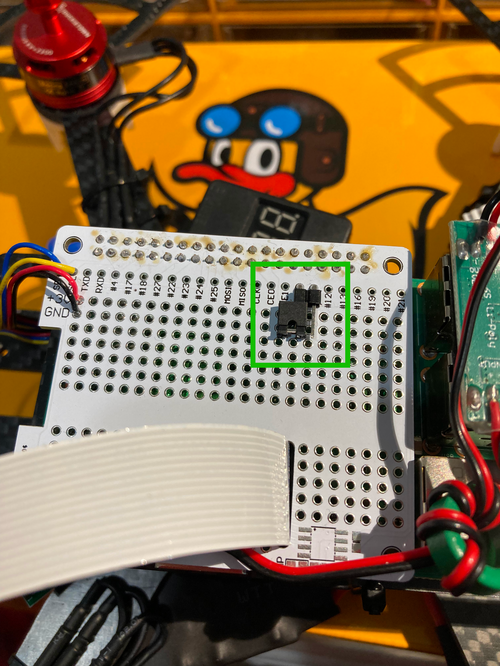
Fig. 114 Pins
5&6not shorted.#
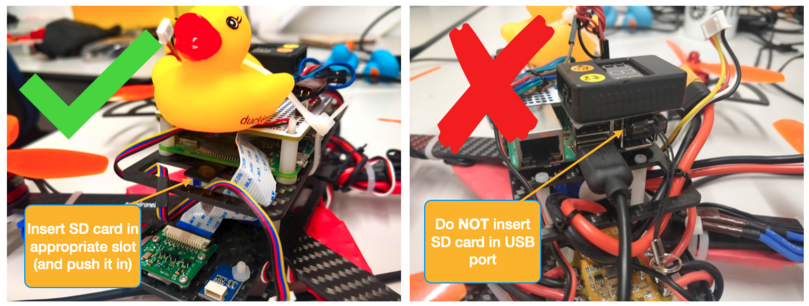
If you haven’t already, insert the initialized micro SD card inside the micro SD card slot of the Raspberry Pi, as shown here.
Attention
Do not connect the SD card inside the adapter to a USB-A port of the Raspberry Pi.
Power the Raspberry Pi
You will see a red and green light turning on the Raspberry Pi. The green light shows computation usage. You should expect it to become solid green for several minutes.
See also
Watch a short video of a busy Raspberry Pi booting up for the first time: Raspberry Pi first boot
Wait until the first boot sequence is complete:
Scan available networks through the base station: once the booting procedure is complete you will find a network called
duckietown-<hostname>-ap, where<hostname>is the name of the robot, as determined during the initialization procedure. The default name isamelia.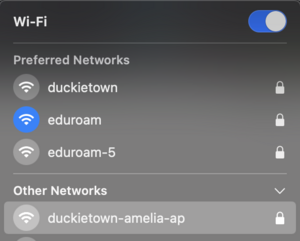
Once the booting procedure is complete the Duckiedrone will automatically connect to the default client network, or any available network previously set up in the
wpa_supplicant.conffile.See also
A detailed guide on how to change
wpa_supplicant.confcan be found in Software initialization.Tip
If you already know the format of the
wpa_supplicant.conffile, you can add different networks by manually editing it in the SD card’sconfigpartition.To edit this file, you will need to:
Power off the drone
Remove the SD card from the SD card slot of the raspberry pi
Use the USB-A adapter to connect it back to the base station
Open the
configdisk partition.
Congratulations, you are now ready to connect to your Duckiedrone for the first time!
Troubleshooting
SYMPTOM
I disconnected my 5 & 6 pins but cannot see my robot on the network.
RESOLUTION
Sometimes things go awry during the first boot. It is possible that the Wi-Fi detection container times out. Search for a duckietown-hostname-ap network instead. Reboot the Duckiedrone (with disconnected pins) to have it join the configured existing network.