Flying Your Drone
Contents
Flying Your Drone#
What you will need
Fully assembled drone
Charged battery
Base station
Safety goggles
Highly textured planar surface
What you will get
Flying your Duckiedrone
Duckiecaptain will be delighted
Environment Checks#
Warning
Flying your Duckiedrone is safe only when done in an appropriate environment. Make sure:
You are in an open space that is free of obstructions
You’ve alerted those around you that you are going to fly and have told them to clear the area
You are wearing safety goggles
The surface you are flying over is not reflective, and is not uniform in details. Ideally, you’ve created a highly textured planar surface, which is a poster board with a bunch of scribbles and shapes. A patterned carped will work fine as well.
Fig. 118 Example of a highly textured planar surface#
Hardware Checks#
If not already, disconnect the battery before performing the following safety checks.
Wire Management#
Spin the props with your finger and make sure there are no wires in the way. If wires do get close, use a zip tie to hold the wires to the frame, away from the props.
USB Connection#
Make sure that the Flight Controller USB cable is plugged into the Raspberry Pi. Any of the USB ports will work.
Software and Sensors Checks#
Power#
Plug the battery into your drone.
Screen Environment#
Connect to your drone using ssh by running ssh duckie@<hostname>.
Navigate to the pidrone_pkg directory and run screen -c pi.screenrc to start the Screen session. Screen is a program that allows you to run multiple terminals in one ssh session. The screen
will persist even if the ssh session is disconnected and you log in
again. However, it will disappear if you reboot the drone.
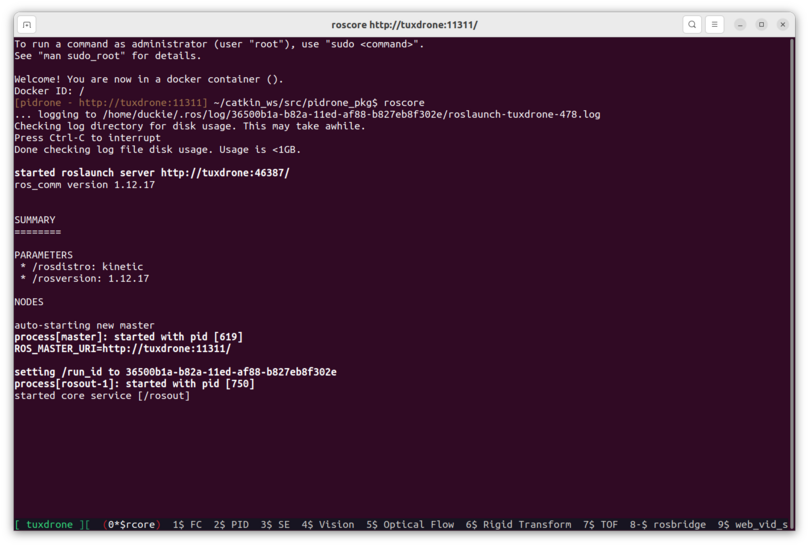
Fig. 119 Screen terminal interface#
Make sure to only have one screen session running at a time.
Tip
When in doubt, run screen -x to see what screen sessions are running and reconnect to a session that you have disconnected from.
The screen session will start the ROS nodes needed to run your drone and make it fly. However it will not start the flight controller node: we ask you to start this node manually because you should only run it if you are prepared for your propellers to spin.
The screen ‘escape’ key is back-tick. The “tick” 1 key, and is on the same key as the tilde ~.
Note
You will not see anything appear when you are typing ` 1
To navigate the screen tabs, use the following commands:
`1, `2, etc to navigate to a particular window.
`” : Open tab menu
`n : Go to next tab
`p : Go to previous tab
`’ : Ability to enter full numbers (such as
10and11)
Start the Flight Code#
Go to a free screen (`11 )
Calibrate the accelerometer by typing
python scripts/calibrateAcc.pyand pressing enter.Start up the Flight Controller node by going to the
1*$FCscreen and pressing enter.Note
Anytime you need to start the Flight Controller node you should run the command
python flight_controller_node.pyin the Flight Controller screen.
Web Interface#
The Web Interface allows you to control the drone from your base station. To open it up follow these steps:
On your base station, clone the git repository and switch to the correct branch:
git clone https://github.com/h2r/pidrone_pkg
cd pidrone_pkg
In your file manager browse to the directory containing the repository you just cloned and open the file
index.htmlin/pidrone_pkg/web/.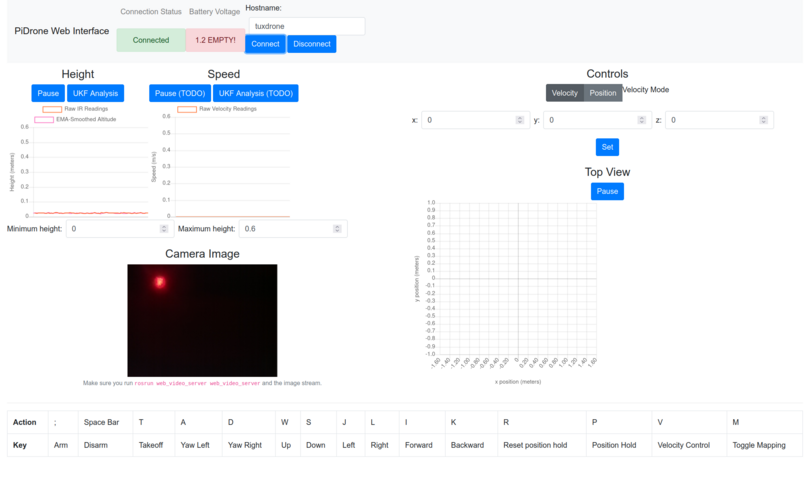
Fig. 120 Duckiedrone web interface#
At the top of the web interface type the
hostnameyou assigned to your Duckiedrone in theHostname:field and press theConnectbutton to connect to your drone.Note
If the web interface does not say
"connected", then wait about 5 seconds and refresh the page.
Check the ToF Sensor#
While looking at the Height graph in the web interface, move the drone up and down and make sure you see changes in the height graph on the web interface
Check the Camera#
While looking at the X Velocity Chart in the web interface, move the drone to the left and right and verify that the graph changes. While looking at the Y Velocity Chart in the web interface, move the drone forward and back and make sure the graph changes.
Check the ROS Nodes#
In the terminal of the code editor, go through each of the screens using `n, where n is a number between 1-8, and make sure there are no errors printed out. It is normal that there may be an error at the top of each screen that says something about not connecting to ROS master, but that is OK because it takes a bit for ROS to startup. Each screen should say “started” or “publishing”.
The screen terminals contain the following nodes:
`1is the flight controller node; you’ve already seen this one.`2is the PID controller; this sends the roll, pitch, yaw, and throttle commands to the flight controller`3is the state estimator; this combines sensor data to estimate the state (position, velocity, orientation) of the drone`4is the camera node; this gets velocity and position data from the camera`5is the Optical Flow node, getting the info from the Raspicam.`6the Rigid Transform node computes the pose of the DuckieDrone`7is the ToF node; this gets height readings from the ToF sensor`8is the rosbridge node, exposing ROS topics and parameters to the web interface
Controlling the flight#
Familiarize yourself with the keyboard commands#
Find and read the keyboard commands to control the drone at the bottom of the web interface.
Note
The keyboard focus must be on the web page for these commands to work: you may need to click on the screen before typing the first keyboard command.
The main keys you’ll need are the spacebar (to disarm the drone), the semicolon ; (to arm the drone), and t (to takeoff).
Danger
If anything goes wrong be prepared to immediately hit the spacebar to disarm the drone.
Other useful keys are i j k and l which allow you to fly the drone around. The drone will attempt to hover in one place, but if it moves too much to one side, you can steer it back to the center using these keys.
Orient the drone#
Rotate the drone so that the camera end is facing away you and the PDB is facing away from you. In this way the keyboard controls (i,j,k,l) will match the drone’s orientation.
They have the following map:
i- forward (Camera side)j- leftk- backward (PDB side)l- right
Takeoff sequence#
First arm your drone by pressing
;. The propellers should start spinning slowly.Danger
If they spin fast, or you hear strange noises, immediately disarm the drone.
Disarm your drone (
spacebar) and ensure that the propellers slow down almost immediately and then stop spinning. If there is a delay, then there is likely network latency and this could cause flight issues. If you are connected to the drones network and there is delay, try restarting the Pi. If you are connected to your home network and there is delay, restart the Pi and use the drone’s network to fly instead.Try arming (
;) and disarming (spacebar) again to ensure that the drone is responsive.If all goes well, arm the drone again, then press
tto takeoff. Be prepared to disarm the drone if anything goes wrong.Move in the plane using
i,j,k,lon the keyboard. When not moving the drone will try to maintain zero planar velocity but may drift.
Congrats on flying!
Troubleshooting
SYMPTOM
After arming the drone the propellers do not spin at all.
RESOLUTION
Check the Flight Controller node screen. This is where any error message will be printed out.