Preparing the software stack
Contents
Preparing the software stack#
Before you can fly your Duckiedrone, you need an up-to-date software stack running on the Duckiedrone and a browser on your base station that can reach the Duckietown Dashboard.
What you will need
A fully assembled Duckiedrone DD24-B with a configured Flight Controller
A base station on the same network as the Duckiedrone (see First connection)
The Duckietown Shell (
dts) installed on the base station
What you will get
A Duckiedrone ready to fly from the Duckietown Dashboard
Attention
This chapter replaces the legacy pidrone_pkg / screen workflow. On the ente distribution, the flight code runs inside Duckietown containers and is controlled from the Duckietown Dashboard. You do not need to SSH into the Duckiedrone to start scripts manually.
1. Update the Duckietown Shell#
On the base station, make sure you are on the ente profile and that dts itself is current.
dts profile list          # 'ente' should be the active profile
pipx upgrade duckietown-shell
dts update
dts desktop update
2. Update the Duckiedrone software#
Pull the latest Duckiedrone containers onto the Duckiedrone. This can take several minutes the first time.
dts duckiebot update ROBOT_NAME
Note
Replace ROBOT_NAME with the hostname you assigned to your Duckiedrone. On the default image, the hostname is amelia.
Wait for the command to terminate before continuing. When it finishes, the Duckiedrone’s automatic stacks include:
dashboard— the web UI you will use to flydriver-tof-bottomandros2-tof-bottom— the altitude sensor and its ROS 2 bridgeros2-mavros— the MAVROS bridge between ROS 2 and the PX4 flight controllerzenoh-routerandros2-rosbridge-websocket— ROS 2 messaging and Dashboard connectivity
See Duckiedrone Containers for the complete list of automatic containers.
3. Open the Duckietown Dashboard#
On the base station, open a browser and navigate to
http://ROBOT_NAME.local/
The landing page is the Duckietown Dashboard. The first time you open it on a freshly-flashed robot, it will show a four-step setup wizard. Complete the steps until you land on the robot info page.
Tip
If the page does not load, confirm the Duckiedrone is reachable with ping ROBOT_NAME.local. See First connection for network troubleshooting.
4. Verify the flight stack is healthy#
On the robot info page, click Mission Control in the top navigation bar. The default mission is a grid of widgets showing the live state of the Duckiedrone:
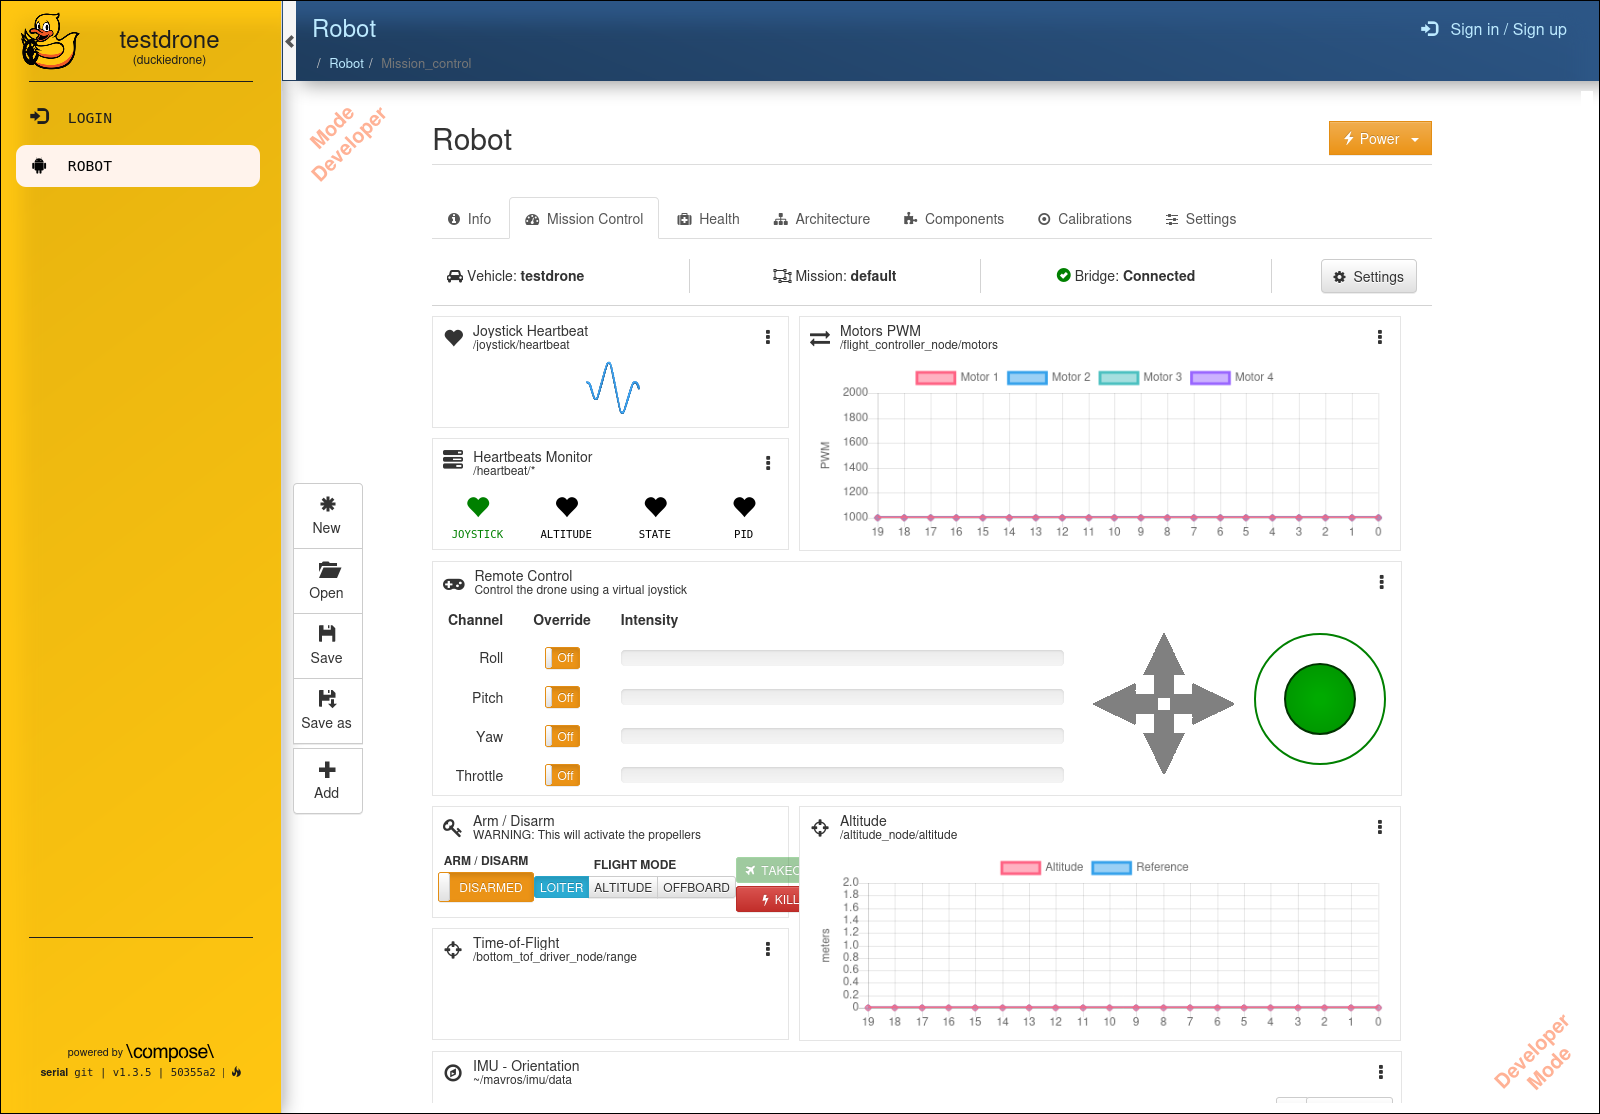
Fig. 70 The default Duckiedrone mission, before arming.#
Before the first flight, confirm:
Heartbeats Monitor (top left) — the
JOYSTICKandALTITUDEindicators are both green. A red indicator means the matching node is not publishing.Motors PWM — four bars are visible, all close to the minimum (~1000). If no bars appear, check that
ros2-mavrosis healthy and that the Dashboard is receiving flight-controller data.Altitude — the blue trace updates as you gently move the Duckiedrone up and down.
Time-of-Flight — the distance reading (in meters) reacts to your hand passing under the Duckiedrone.
IMU – Orientation — the attitude indicator tilts when you tilt the Duckiedrone.
Camera — the image stream shows what the Duckiedrone sees.
Tip
If the Arm / Disarm widget shows nothing under FLIGHT MODE, it means /mavros/state has not published yet. Reload the page after a few seconds; if the issue persists, see Common issues.
When all widgets are populated, the software stack is healthy and you can proceed to Flying your Duckiedrone.