Initializing the ESCs
Contents
What you will need
A base station computer with a Chrome-based browser
Flight Controller
USB-A-to-USB-C cable
A charged LiPo battery
What you will get
Four ESCs running the Bluejay firmware
Initializing the ESCs#
The four Electronic Speed Controllers (ESCs) translate the Flight Controller’s commands into the currents that drive the motors. In this section you will flash the Bluejay firmware onto the four ESCs using the esc-configurator.com web tool.
Danger
Remove the propellers and keep them off for the entire procedure.
1. (skip if not necessary) Flash Betaflight onto the Flight Controller (FC)#
Attention
This step should not be necessary because the Duckiedrone DD24-B ships with Betaflight BTFL 4.3.2 for the MAMBAF405_2022B target already installed on the FC. Follow this step only if this is not the case.
The ESC configuration tool does not talk to the ESCs directly, but reaches them through the FC. For this to work, Betaflight (target firmware BTFL 4.3.2) needs to be flashed on the FC. If the Duckiedrone’s FC does not already have Betaflight installed, go ahead and flash it.
Start by installing Betaflight Configurator v10.9.0 on your base station and opening it.
Next, open the Firmware Flasher tab from the left sidebar and set the options to match your board, as shown below. The Duckiedrone uses the Mamba F405 MK2 V2, so select the MAMBAF405_2022B target and the BTFL 4.3.2 firmware version.
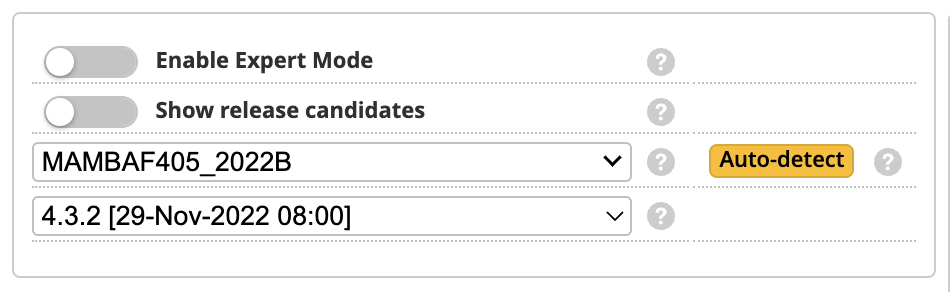
Fig. 50 Firmware Flasher settings for the Mamba F405 MK2 V2 (BTFL 4.3.2).#
Connecting the Flight Controller and loading it into bootloader mode#
Before you can write new firmware, the Flight Controller has to be in bootloader mode (also called DFU mode). When you plug the board in normally it boots straight into its regular firmware and will not accept a flash, so you need to hold it in bootloader mode while it powers up.
You put the board into bootloader mode with the small BOOT button on the Flight Controller. Locate it first:
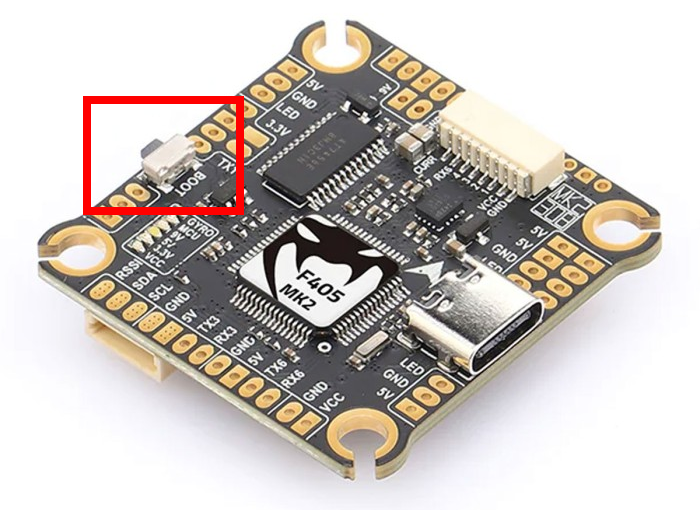
Fig. 51 BOOT button location on the Mamba F405 MK2 V2 Flight Controller.#
Remove power from the Duckiedrone if it is powered on. Disconnect the USB cable connecting the Flight Controller to the Raspberry Pi on the Raspberry Pi side. You will use this USB-A cable to connect the Flight Controller to your base station.
With the board still disconnected, press and hold the BOOT button while you connect the USB-A cable to your base station, and then release the button. The board is now waiting in bootloader mode.
Check
With the Flight Controller connected in bootloader mode, the port/target dropdown in the top toolbar of Betaflight Configurator reads DFU - STM32 BOOTLOADER, and the Connect button is grayed out, since the board is not reachable over the normal serial link while in DFU mode.
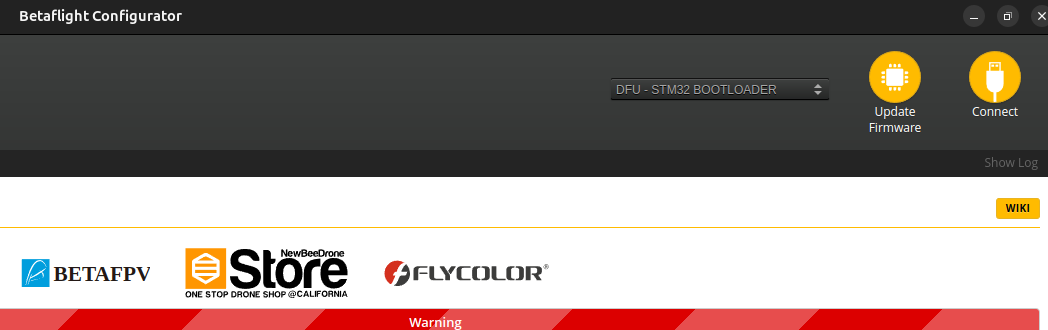
Fig. 52 The Flight Controller is correctly in bootloader mode, as shown by DFU - STM32 BOOTLOADER in Betaflight Configurator.#
If the dropdown does not show DFU - STM32 BOOTLOADER, see Troubleshooting.
Attention
Do not press the "Connect" button in Betaflight Configurator during flashing. Betaflight talks to the board over the flashing interface, not the normal serial connection.
Loading and flashing the firmware#
Now that the board is in bootloader mode, download the firmware and write it:
Click
Load Firmware [Online]in the bottom-right corner. Betaflight Configurator fetches theBTFL 4.3.2firmware for the target you selected and confirms it is ready to flash.Click
Flash Firmware, also in the bottom-right corner, and watch the progress bar as it works through the write.Check
The progress bar moves through
"Flashing…", then"Verifying…", and finally"Programming SUCCESSFUL".
Once the flash finishes, the board reboots on its own into the new firmware, so there is no need to unplug it. You can confirm it worked by clicking "Connect": the top-left of the interface should report BTFL 4.3.2.
Loading the Duckiedrone board configuration#
A freshly flashed board comes up with the stock Betaflight defaults, which do not match the Duckiedrone’s wiring. In particular, the motor outputs and the serial port assignments have to be remapped before the ESC tool can reach the four ESCs. Duckietown provides these settings as a Betaflight CLI configuration file that is applied in one paste.
With the Flight Controller connected in Betaflight Configurator (click
"Connect"if it is not connected already), open theCLItab from the left sidebar.Open
MAMBAF405MK2V2.confand copy its entire contents.Paste the contents into the CLI command box and press
Enter. The commands run as a batch, and the file ends withsave, so the board writes the settings and reboots on its own.Attention
Do not disconnect the USB cable while the batch is running.
Check
The CLI output ends without reporting any command errors, and Betaflight Configurator drops the connection as the board reboots.
When the configuration is in place, click "Disconnect" so the serial port is free for the ESC tool in the next step.
2. Connect to the ESCs#
Note
Use a Chrome-based browser (Google Chrome, Microsoft Edge, and so on).
Make sure the motors do not have propellers attached.
Check that the ESC board is wired to the Flight Controller. The ESC tool reaches the ESCs only through this connection, so the ribbon connector between the ESC board and the Flight Controller has to be fully seated at both ends, with all four motor leads attached to the ESC board.
Disconnect Betaflight (if connected), or any other programs that might be using the serial port connected to the Flight Controller.
In your browser, go to the ESC Configurator web tool.
Click
Select Serial Portin the top-right corner. In the prompt that appears, select the serial port that belongs to the Flight Controller. Its name varies by operating system and board. If multiple USB serial devices are connected, unplug the Flight Controller and observe which port disappears, then reconnect it and select the port that reappears.Once the port is identified, select it and click
Connect.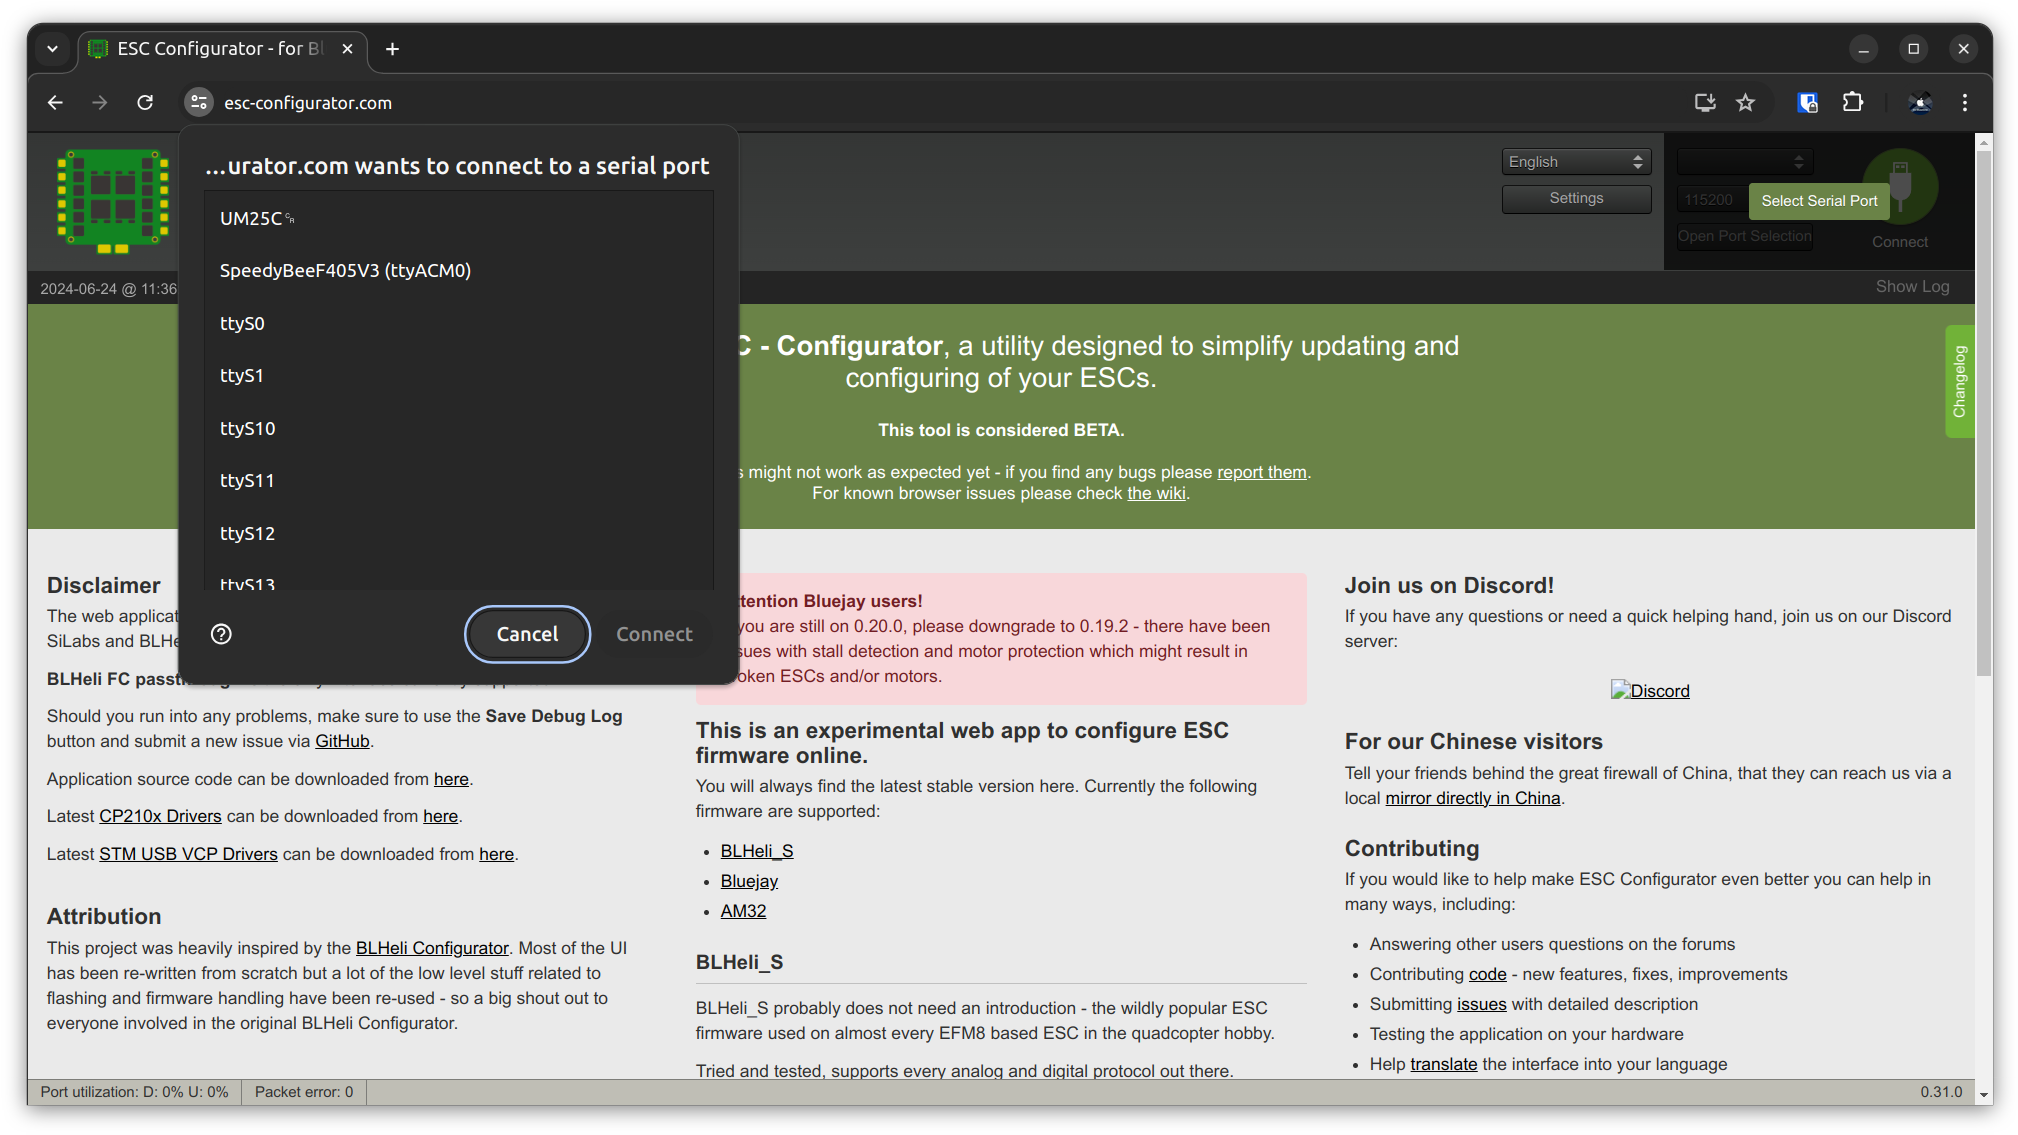
Fig. 53 Serial port selection prompt.#
Verify that the message
Unique device ID receivedappears. This confirms that the ESC Configurator is connected to the Flight Controller.
Fig. 54 The ESC Configurator has received the Flight Controller’s unique device ID.#
Attention
The ESCs cannot draw power from the Flight Controller over USB. You have to connect the LiPo battery for them to power up and accept programming. If this is the first time you are plugging in the battery, be particularly careful to notice if anything is becoming particularly hot, and be ready to unplug the battery if so.
Connect the LiPo battery to the Duckiedrone. The ESCs are now powered and ready to be read:
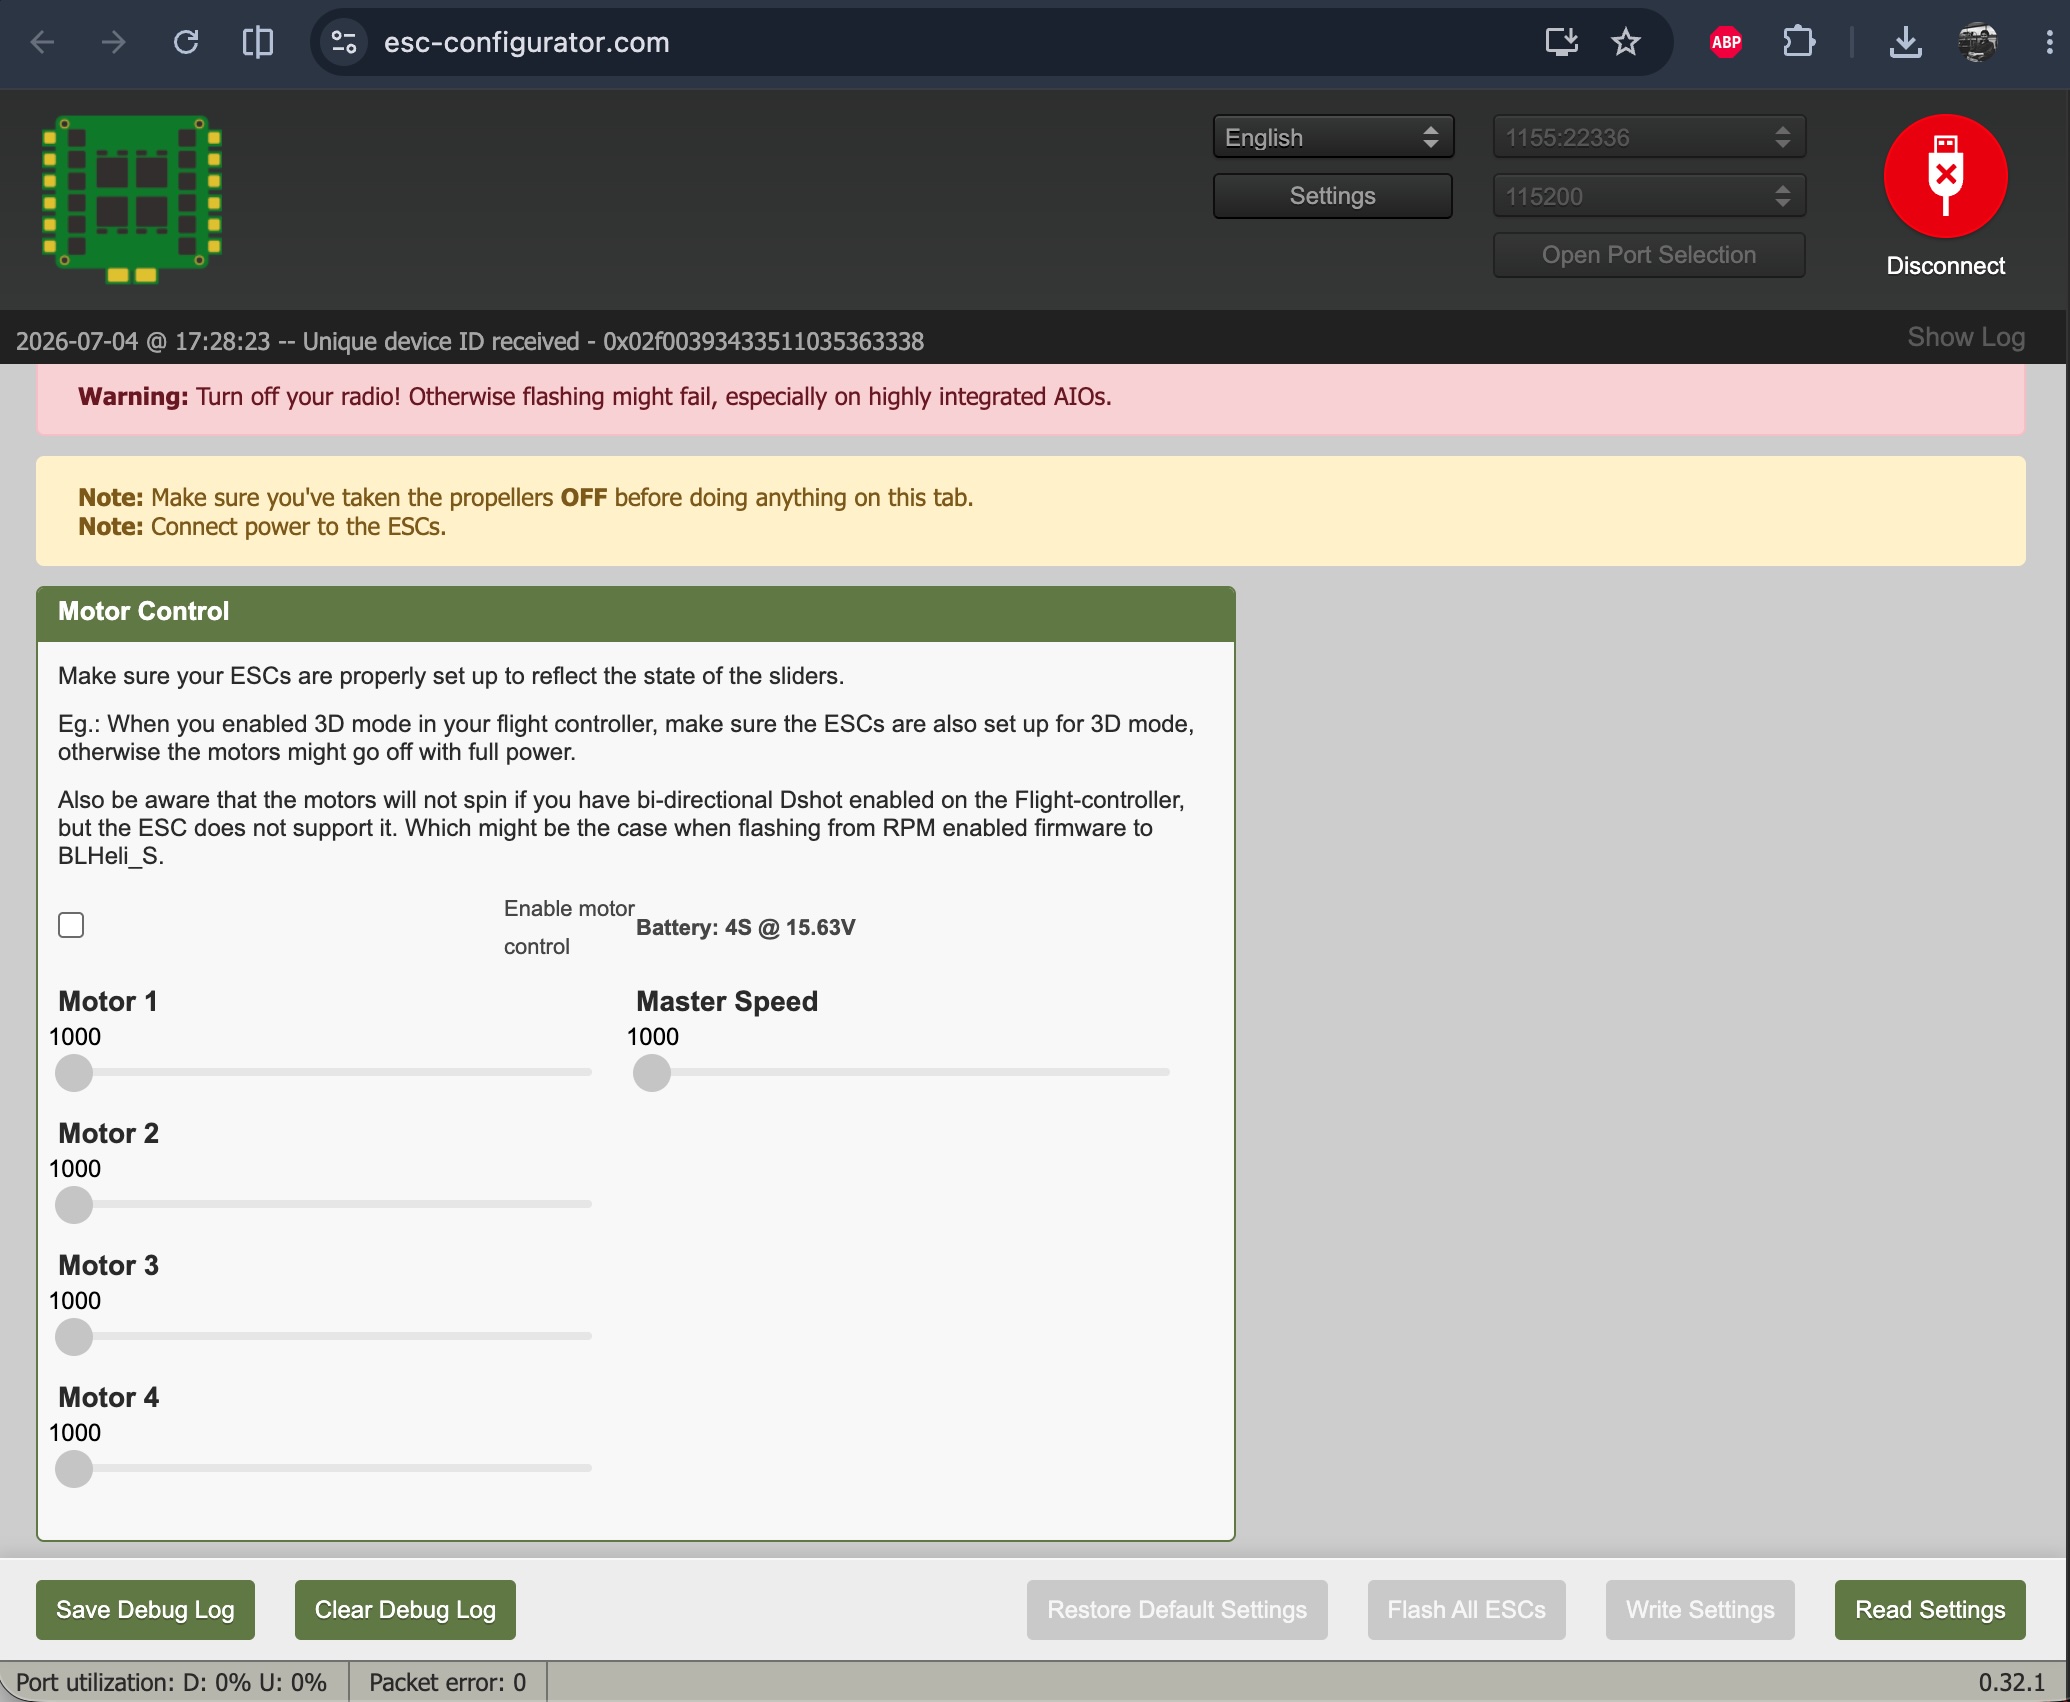
Fig. 55 The LiPo battery powers the ESCs for the following configuration steps.#
3. Flash Bluejay#
Click
Read Setup. The tool passes through the Flight Controller and reads all four ESCs. Each one comes up as aBLHeli_SESC on layoutJ-H-15.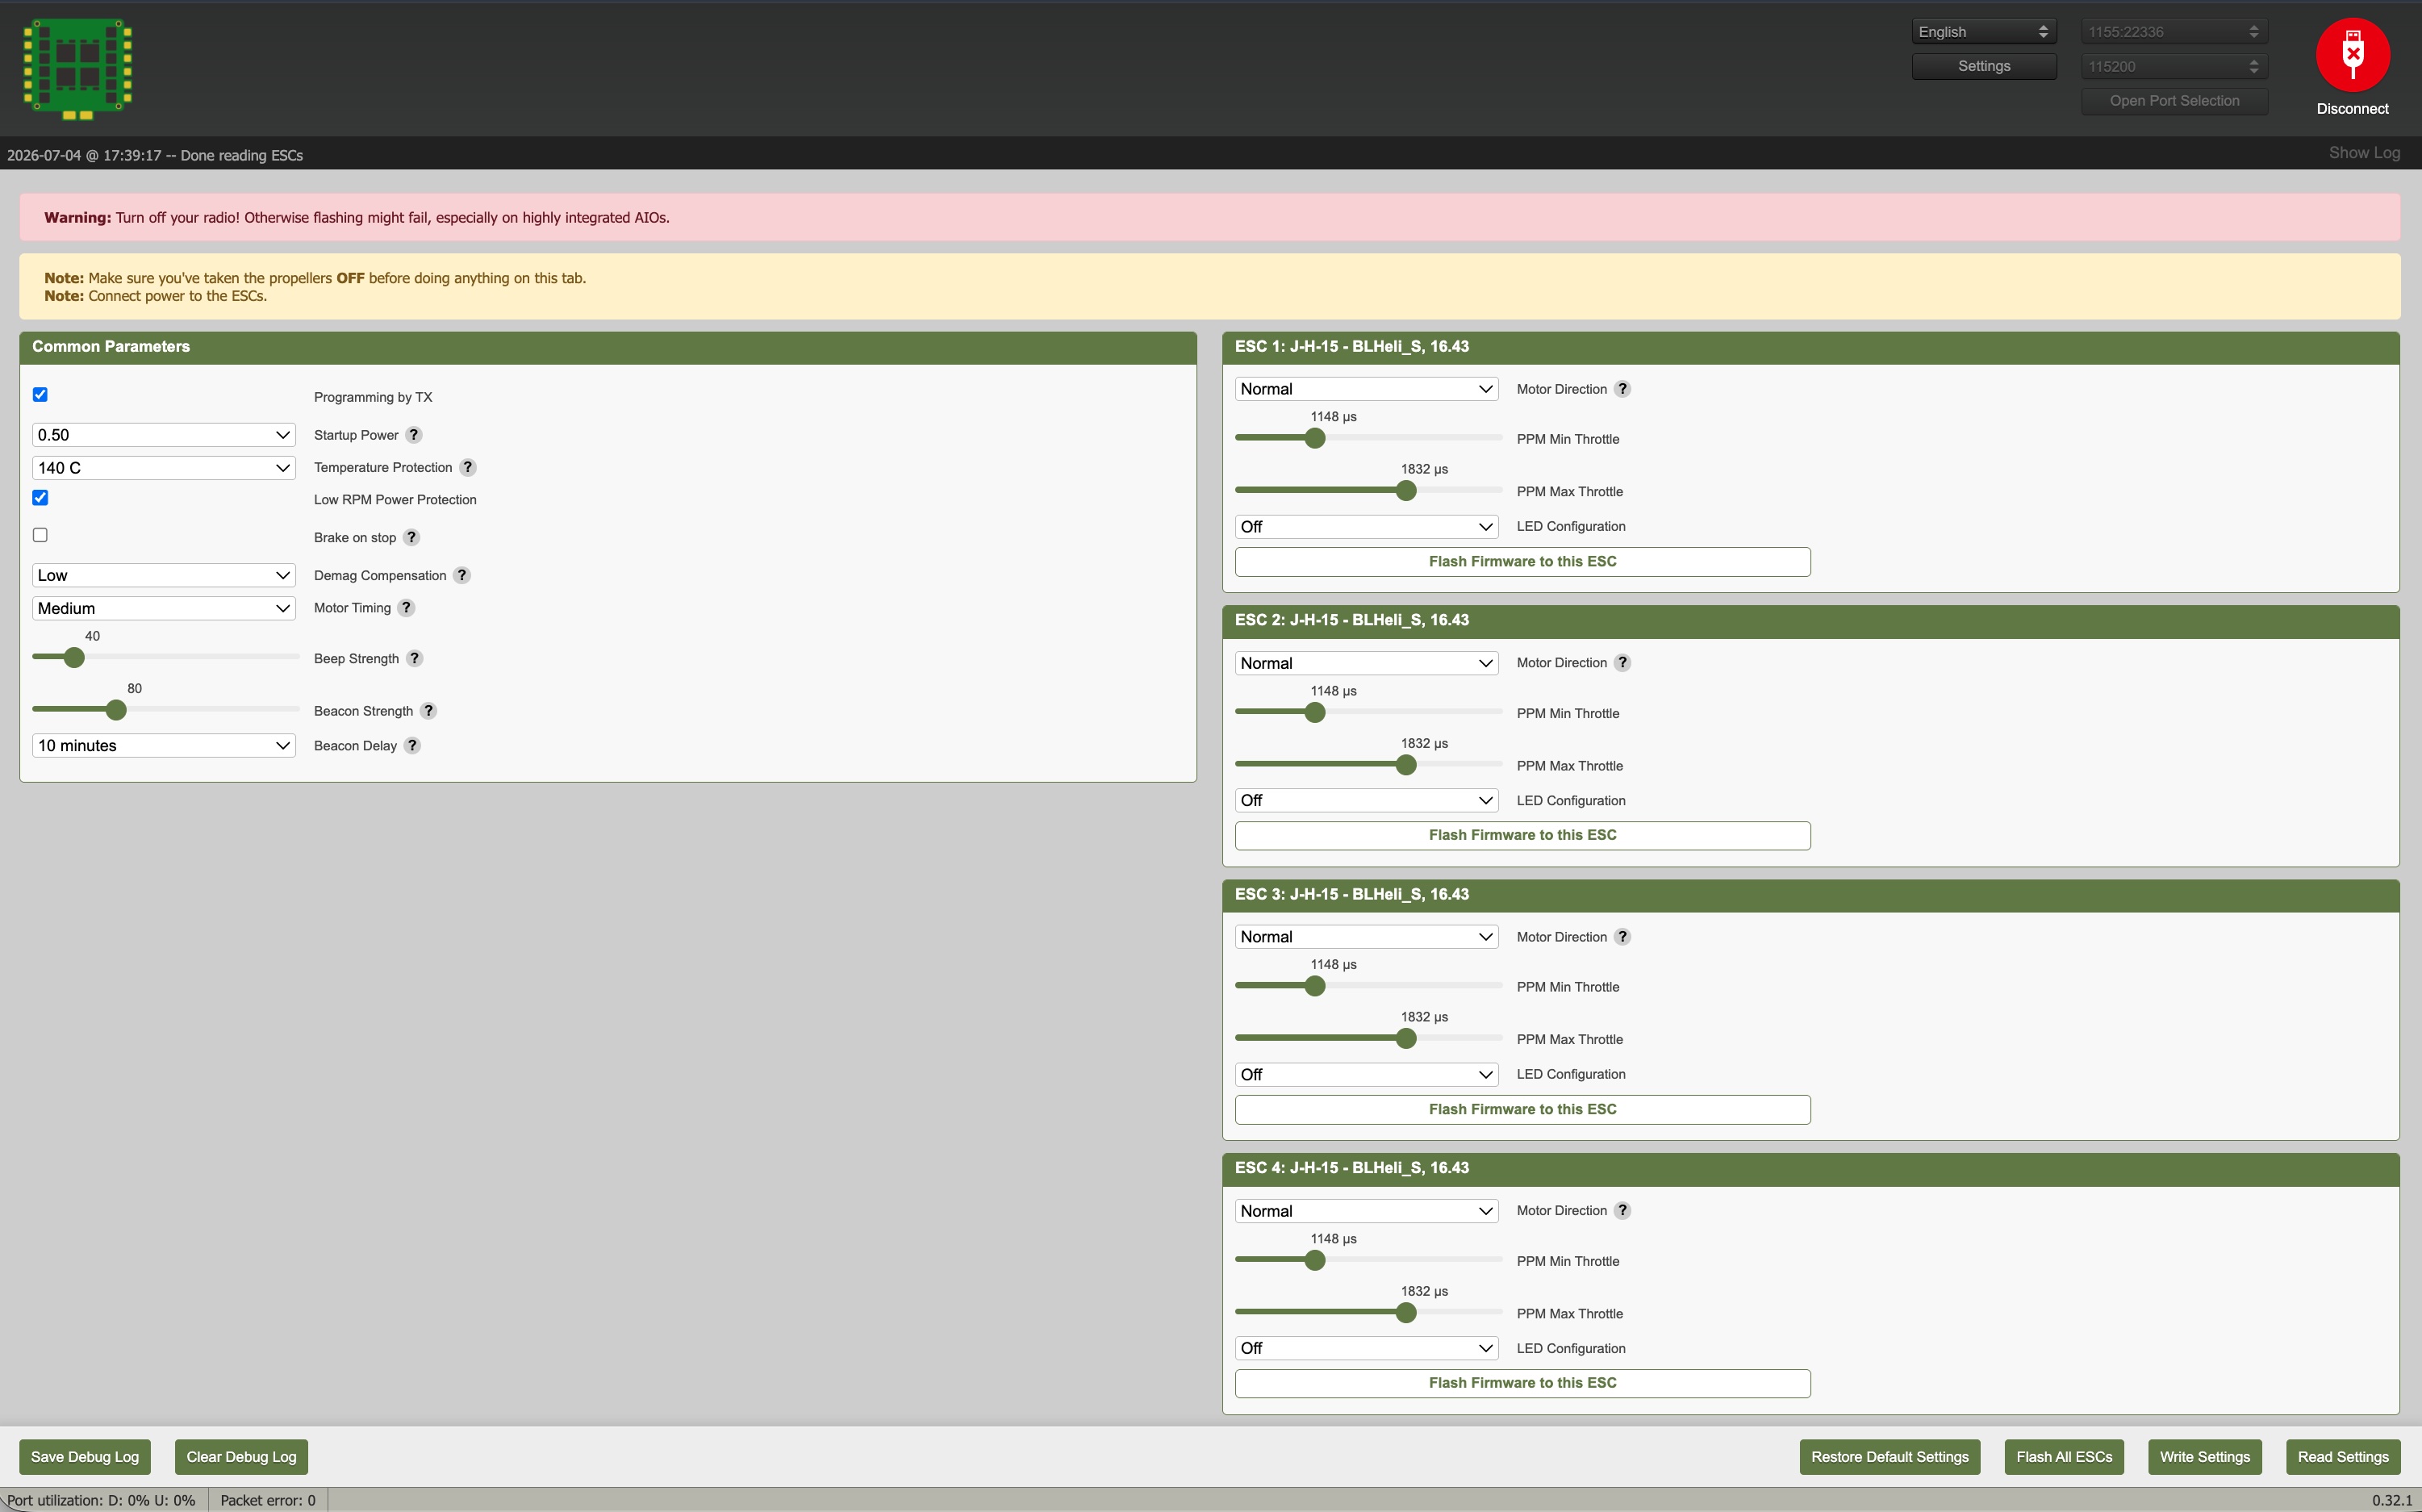
Fig. 56 The Duckiedrone DD24-B ESCs ship with BLHeli_S on J-H-15 layout.#
In the firmware selection, set:
Firmware:
BluejayVersion:
0.21.0PWM frequency:
48 kHz
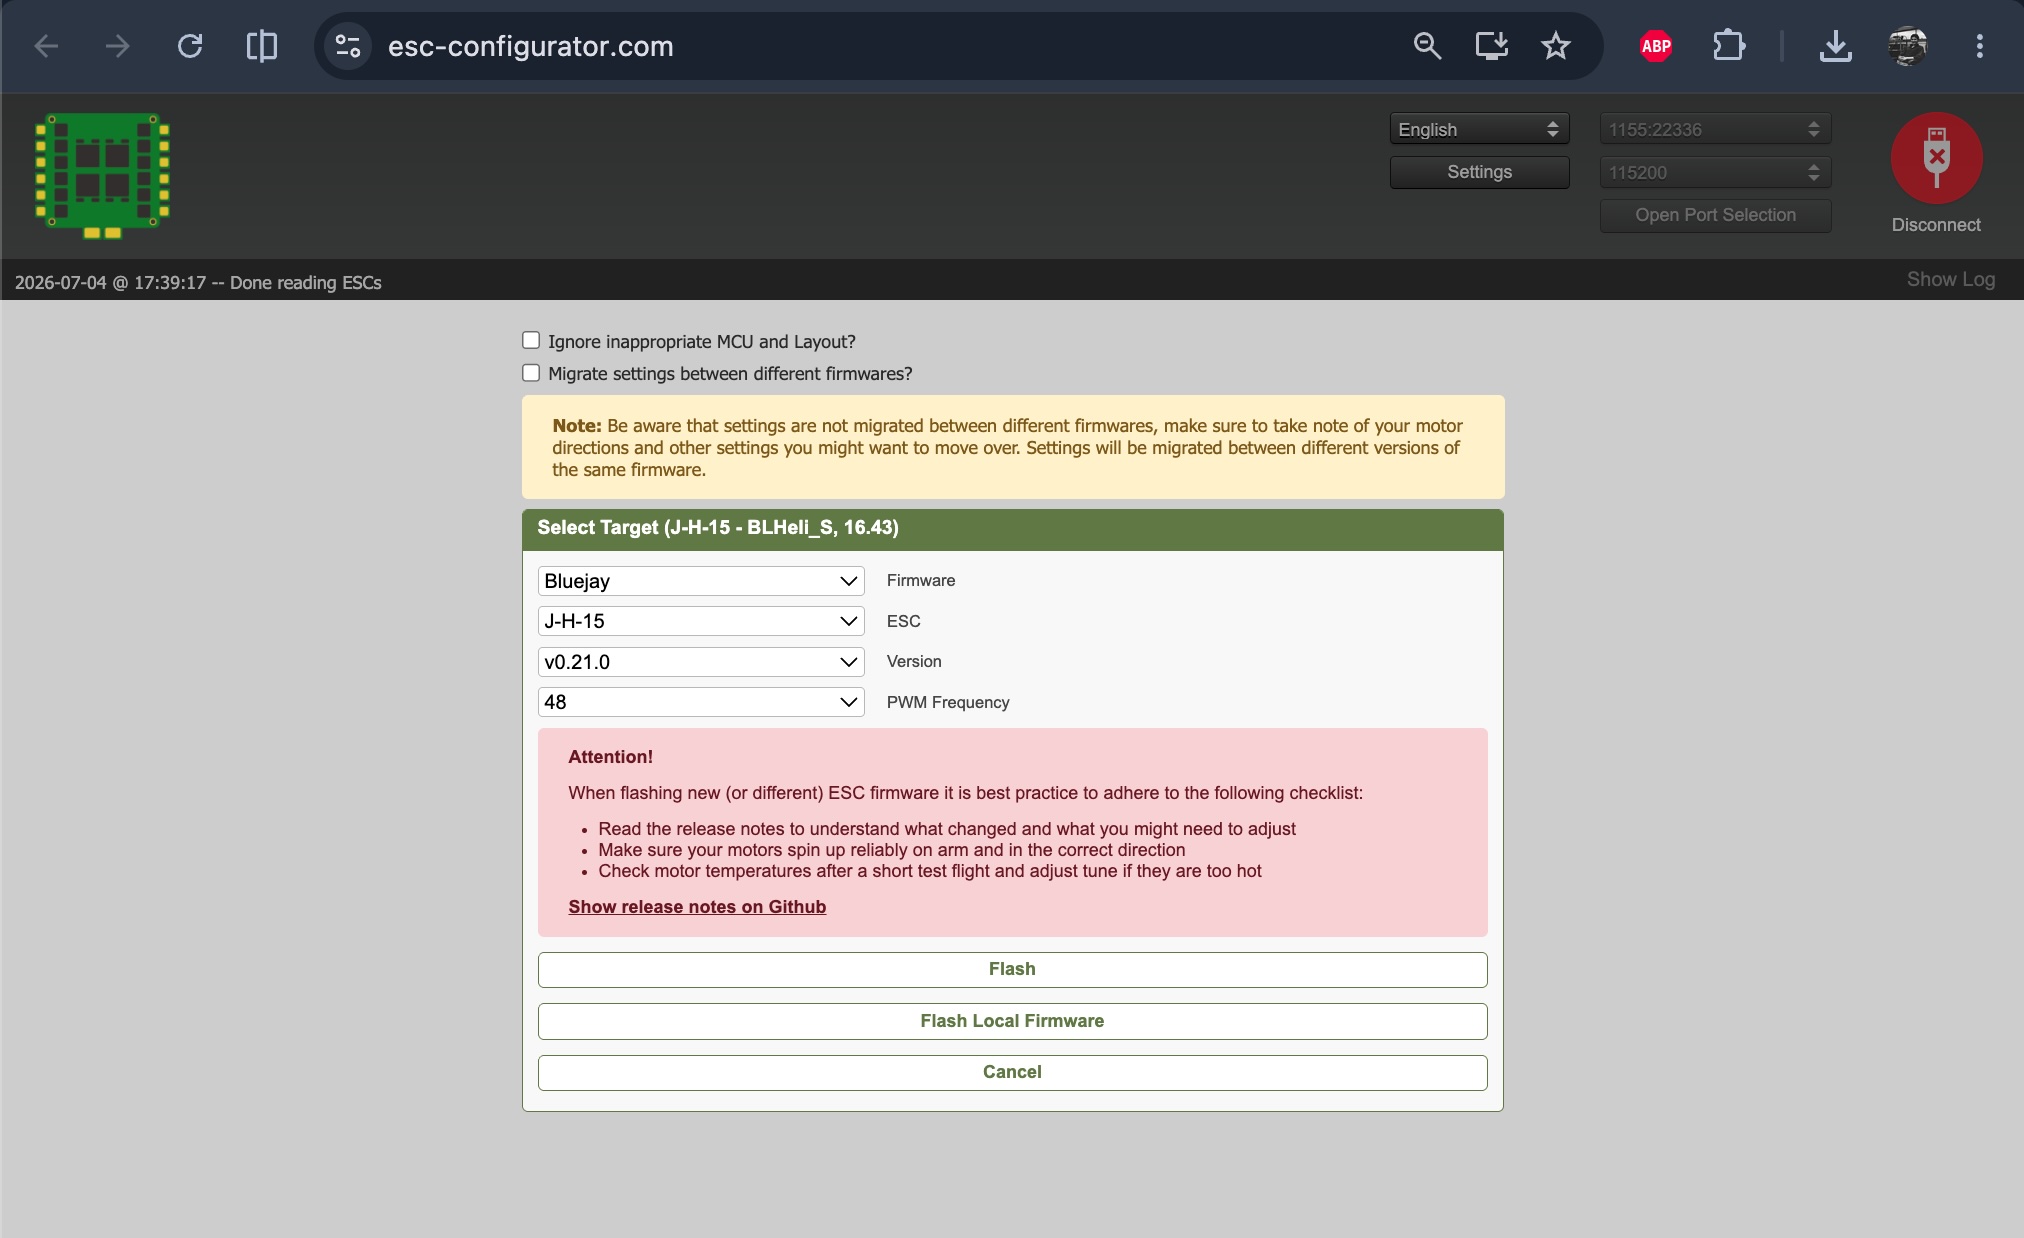
Fig. 57 Upgrading the ESC firmware with specific Bluejay parameters.#
Click
Flash Alland wait for all four ESCs to finish.Attention
Do not disconnect the battery or the USB cable while an ESC is being flashed.
When the flashing completes, click
Read Setuponce more and check that all four ESCs now reportBluejay 0.21.0.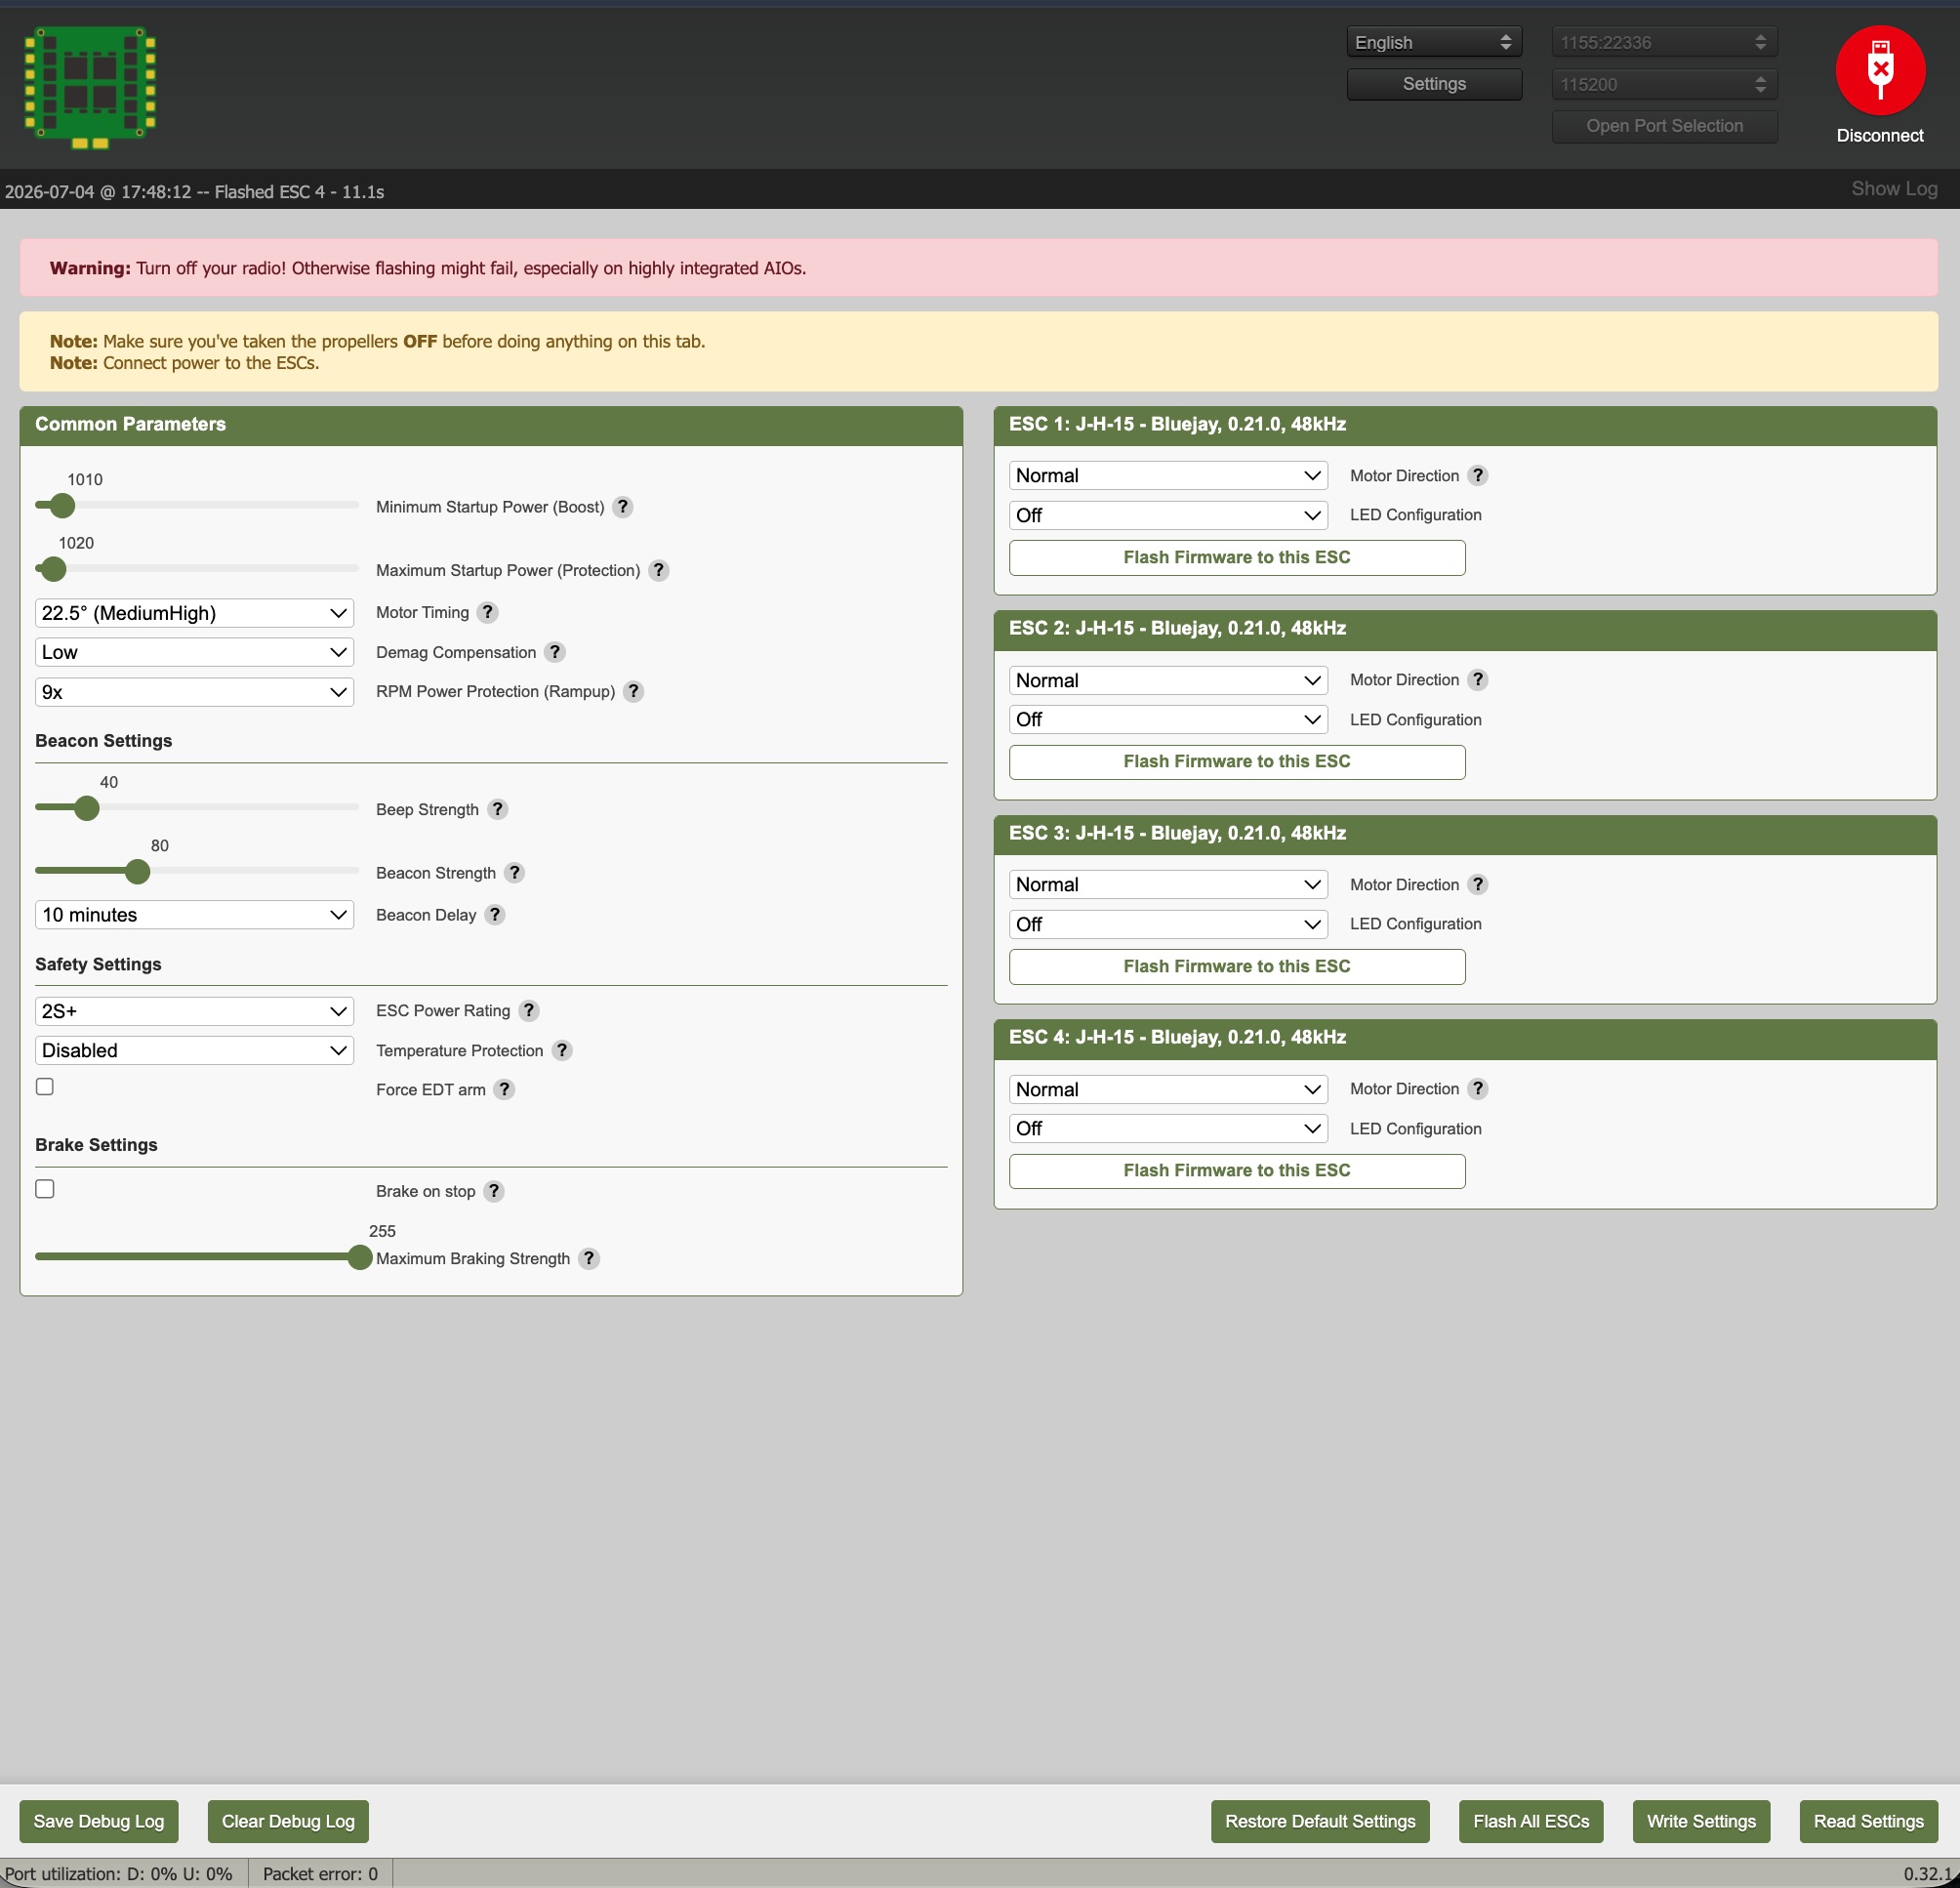
Fig. 58 Validate that the correct firmware has been successfully flashed.#
(optional) 4. Disable the beacon#
By default the ESCs give off a beep after a while without commands, which quickly gets annoying. While you are still in the ESC Configurator, turn it off:
In the
Beacon Delaydrop-down menu, selectInfinite.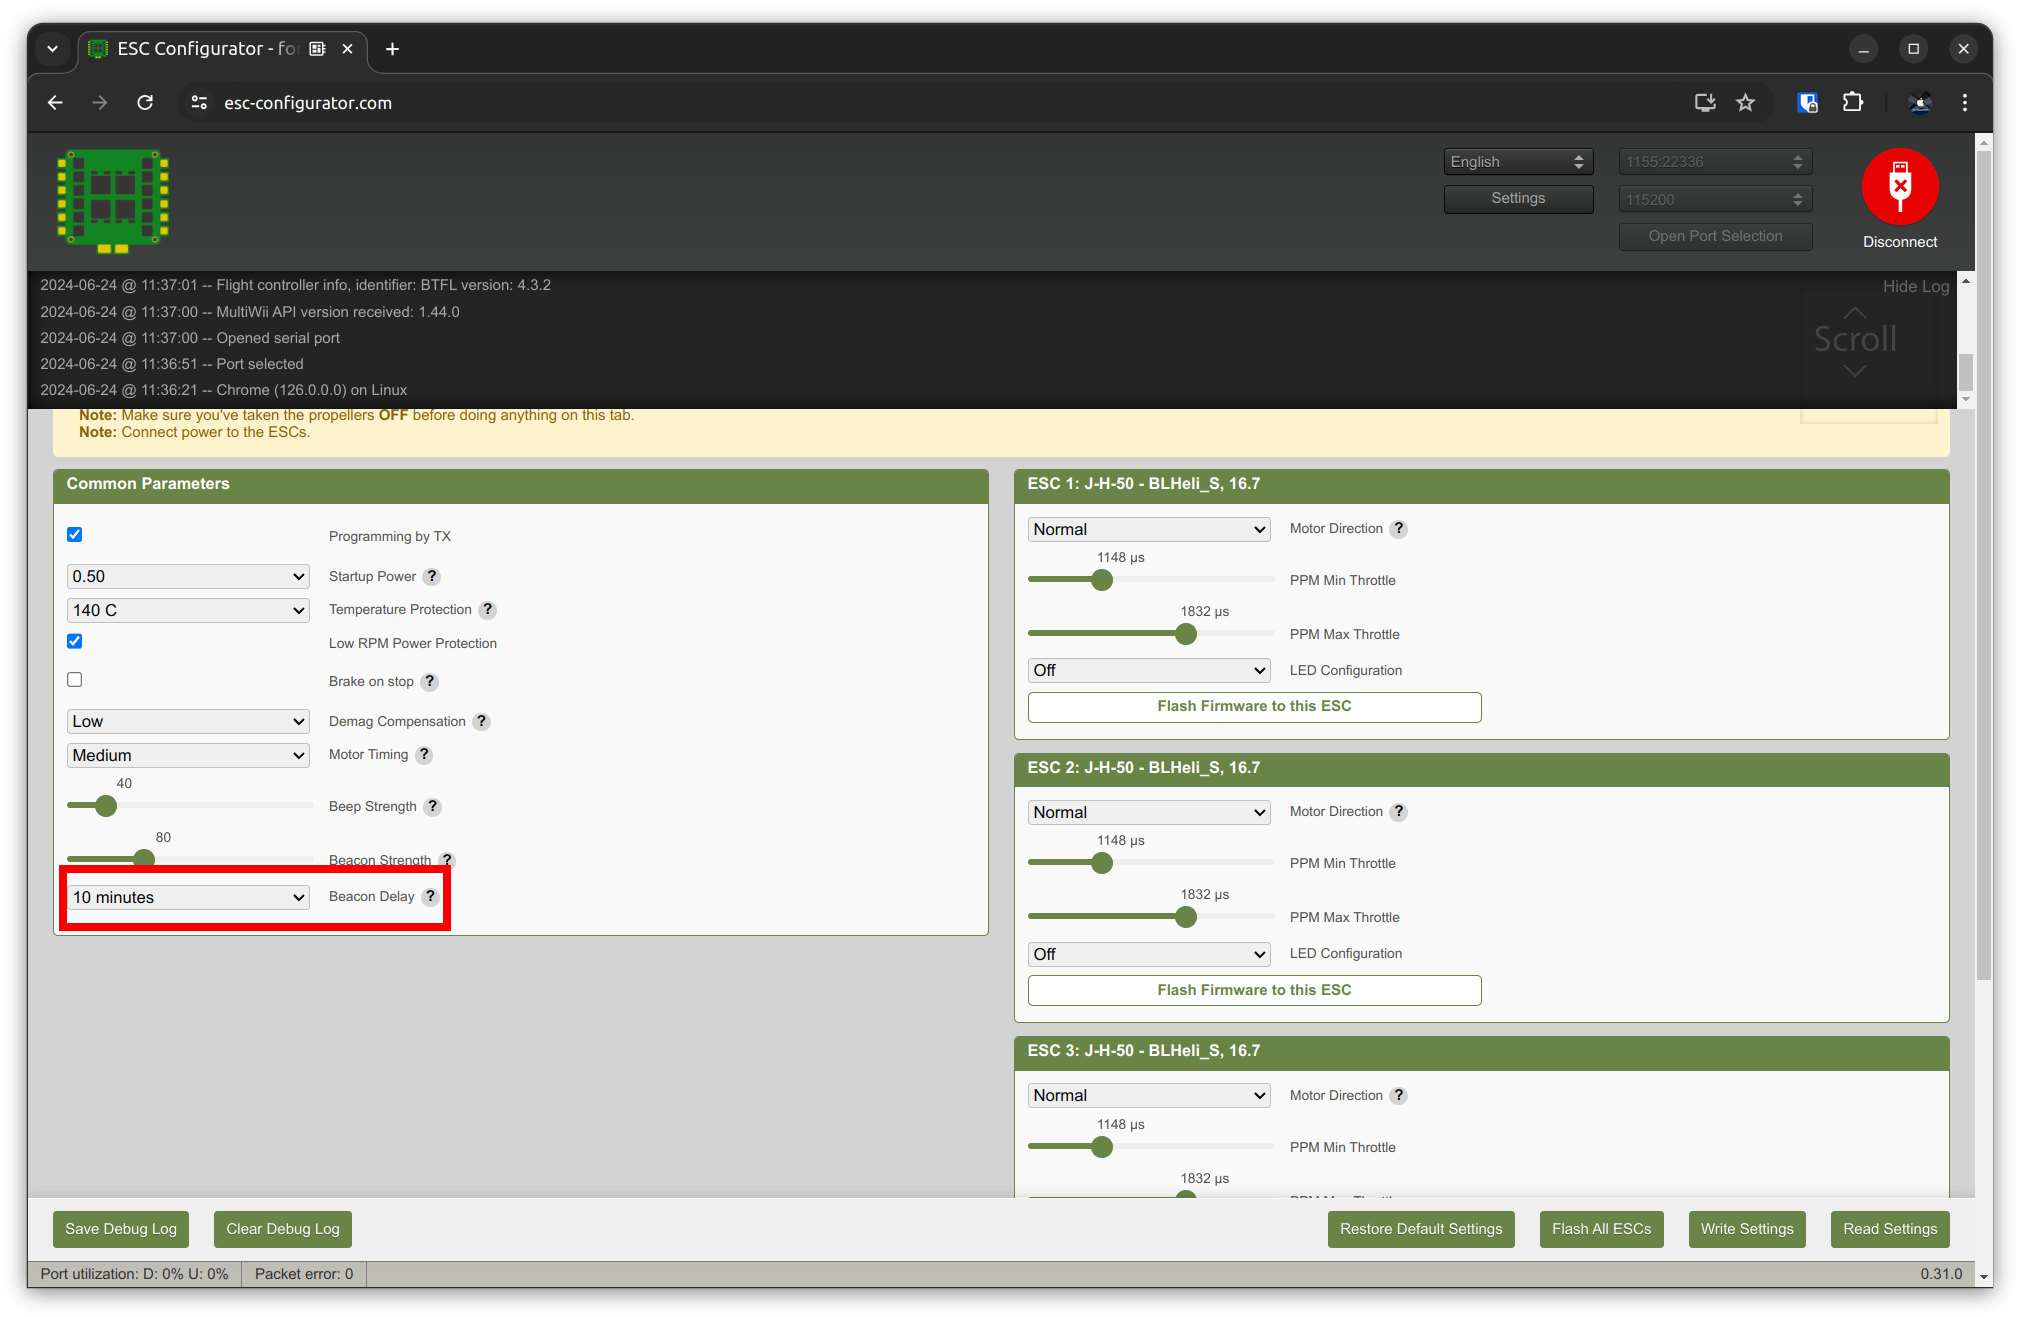
Fig. 59 Set
Beacon DelaytoInfiniteto disable the beacon sound.#Click
Write Settingsin the bottom-right corner to save.
Disconnect the LiPo battery from the Duckiedrone.
Your ESCs are now running Bluejay. Next, continue to Initializing the Flight Controller to flash the PX4 firmware.
Troubleshooting#
Troubleshooting
SYMPTOM
The ESC Configurator does not detect any ESCs after Read Setup.
RESOLUTION
The ESCs are not powered. Check that the LiPo battery is connected to the Duckiedrone, since the Flight Controller’s USB power is not enough to run the ESCs, and then click Read Setup again.
Troubleshooting
SYMPTOM
On Linux, the ESC Configurator cannot open the serial port (Failed to open serial port).
RESOLUTION
This is a serial-port permission issue. On Ubuntu, add your user to the dialout group by running sudo usermod -a -G dialout "$USER", then sign out and sign back in (or reboot) for the change to take effect. If that does not help, inspect the group that owns the device with ls -l /dev/ttyACM0 (substituting the port you are using) and add your user to that group instead of changing the device permissions for every user.
Troubleshooting
SYMPTOM
The port/target dropdown in Betaflight Configurator does not show DFU - STM32 BOOTLOADER.
RESOLUTION
The board booted into its regular firmware instead of the bootloader. Unplug the USB-C cable, press and hold the BOOT button again, reconnect the cable while still holding the button, and only release it once the cable is fully seated. If it still does not show up, try a different USB cable or port, since some cables are power-only and cannot carry data.
Troubleshooting